
Hi there! If you are a follower of the farm, you probably know about my obsession with gingham and that I have many different gingham blanket patterns here on the website, but I wanted to use this post to explain the basics of crocheting a gingham blanket.
Though I’ve used several different stitches in my gingham blankets, the technique of carrying the yarn throughout the project to create the alternating colors is always the same. You can find the links to the patterns for all the gingham blankets I have made so far at the bottom of this post.
Find the Right Colors
The hardest part about this gingham stitch is shopping for the yarn. You’ll need to find two colors in the same color family that are separated by a few shades. And sometimes when you hold the skeins together, you still won’t believe the colors will work.
For my very first gingham blanket, I experimented with Caron Simply Soft in Light Pink and Strawberry, and I wasn’t sure they would work well, but I think it turned out to be a good representation of gingham.
For your blanket to look good, you need a light, medium, and dark color. Usually, I like to use white and then two shades of the same color. For instance, white, light pink, and dark pink.

When I cannot find two shades of the same color in the type of yarn I’d like, then I use the technique of combining skeins together. That is what I did for the blue gingham blanket and the red gingham blanket.
I bought a red and a white, but then combined two reds, two whites, and then combined a red and white, making it look striped.

Sometimes I’m lucky and find yarn that is already striped for me. In the grey gingham blanket, I was able to buy a white, a grey and a grey and white stripe.
If you want to make a buffalo check blanket in black and red, then I would substitute black for the white, and find two shades of red.
Practice the gingham technique
Before you get started on your actual blanket, I would strongly encourage you to make a practice swatch to really learn the technique of carrying the yarn. A small practice chain would be plenty for you to work out tension, hook size, and technique, and to learn how to switch yarn colors.
If the pattern repeat says it is 10 plus 1, make a chain that is a multiple of 10, then add 1. So, chain 30, then add one, and get to practicing.
I carry the yarn because I am changing color so often that it doesn’t make sense to me to cut and weave in all those ends later. Also, I want this blanket to look like a continuous design. I did not want to join squares or strips.
I also believe that I am either using the same amount of yarn or maybe only a bit more carrying yarn. I also think the blanket is more secure and ends will not come undone.

I never thought crocheting over yarn was even possible. It never crossed my mind and I’d never seen or heard of the technique. I’ve come to learn that it is called tapestry crochet. I am working over the yarn not in use, and it is running along the top of the stitches and through the work.
Both sides of this blanket look exactly the same. The yarn is being hidden.
To do this, place the yarn behind the stitch you are working, and as you insert the hook into the stitch, place the yarn being carried over the hook as well.
This video will help you to see how to carry the yarn:
Here is the basic pattern that I used for the pink gingham blanket that you could use for a practice swatch:
Chain a multiple of 10 plus 1.
Make the base chain in white and with a smaller size hook (H).
Change hook size to (J), join light pink color with the chain one and turn. Start your next ten. SC with link pink, crocheting over the white yarn, when you get to the tenth SC, do not finish all the way with light pink, stop, pull up the white, pull through, and now do the next ten SC with white, crocheting over the light pink.
Continue changing colors every ten stitches. Do ten rows. At the end of your tenth row, you’ll cut off the white, add in the strawberry, and alternate between strawberry and light pink. (You will be weaving in the white end, do not crochet over the white, you’ll join that back in after ten rows).
Make sure you don’t accidentally make a checkerboard
There is certainly nothing wrong with checkerboard blankets, but if you’re trying to achieve the gingham look and it turns out like a checkerboard, you’ll probably be disappointed.
The simple way to avoid this is to ensure the medium color is used in every row. For the first block of color, the medium color alternates with the dark, and in the next block it alternates with the light. If you alternate the white and the dark, your blanket will look checkerboard. (See the difference between the two pictures below).


Use yarn bowls
Since I am always working with two balls of yarn at a time, it’s nice to keep them separate and organized. This is not a must, just a suggestion, but they are very helpful and may save you some extra headaches from untwisting yarn. I do cut off either the dark or light yarn after I am done using it for a block of color, but never the medium color. So I will switch out the dark or light yarn in the bowls.

Keep your yarn from twisting
At first, I had problems with twisting yarn and at the end of each row, I would untwist the balls of yarn. I have since learned that I can keep the yarn from twisting if I keep one strand to the back and one strand to the front.
For the yarn you are keeping in the front, just before you pull through with the new color, place the yarn to the front. Please watch the video below and I will show you what I mean and how to do that.
It’s very hard to explain in writing. But you need to learn this so you can fully enjoy making your gingham blanket.
Watch this video to see how to keep your yarn from twisting:
I hope that helps you to understand how to crochet a gingham blanket! It’s one of my very favorite designs and I probably won’t stop making them! I hope they become a crochet classic for you as well and I hope you’ll share your finished project on Facebook or Instagram and use @daisyfarmcrafts so I can see! Best of luck with your project!
Below are links to the patterns for all the gingham blankets I’ve made so far. I have a video for almost every post that shows you how to work the gingham technique using the specific stitch from that blanket.
Pink Gingham Blanket using Single Crochet

This pink gingham is the very first one I made. I used Caron Simply Soft yarn in the colors Strawberry and Light Pink. This is when I discovered that if you could find two similar shades of yarn and pair it with white, or cream, working the pattern so that the light pink is alternating with either the strawberry or white, it really does give off the appearance of gingham. Be careful to alternate the colors just so, or your blanket will be a checkerboard pattern, not gingham.
Crochet Cluster Stitch Gingham Blanket
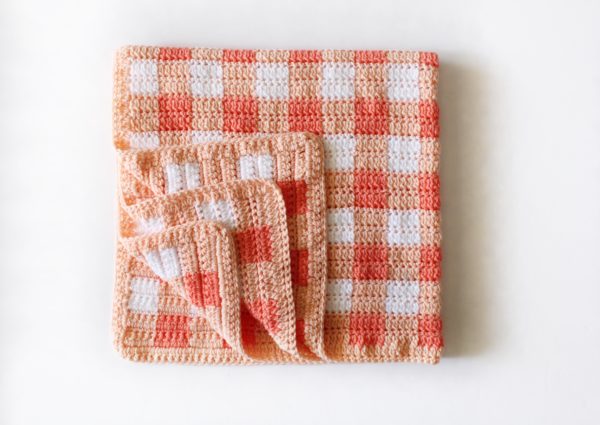
Another gingham blanket I’ve made, and I love how the peach colors turned out. I decided to use the DC2Tog Cluster stitch to achieve the look I wanted. I believe this stitch looks the most like a picnic-type, summery gingham check. The squares turned out to be just the right height and width.
Blue Gingham Blanket using Extended Half-Double Crochet

With this blanket, I experimented with combining two strands of yarn to get one of the balls to have a striped look. I used Bernat Tiny blanket yarn so the blanket would not be so heavy when finished. It worked out perfectly! I call the striped yarn, the medium color and used it in every row.
It’s the color that needed to be rotated with the dark blue and the white to get the gingham look. I wanted to experiment with a new stitch, and found that the extended half double crochet held the yarn being carried in place just fine.
Light Pink Gingham Blanket using Double Crochet 2 Together

This blanket has to be one of my favorite of all. The colors were just a shade or two different from each other and I love the cream color. I used Paton’s beehive baby sport for this, in only two colors, but I combined two skeins, a pink and a cream, to make the third color. This blanket is perfectly snuggly without being too heavy.
Red Gingham Blanket using Single Crochet and Half-Double Crochet

This Red Gingham was my first attempt at using darker colored yarn to see if I liked the look of little bits of red showing through the white. (And yes, of course, when you carry the yarn through the work, it will show a little.) I decided, when the whole thing was finished, that yes indeed, I liked it!
It really gave it a gingham feel. I used Caron Simply Soft in Autumn Red for this and combined a skein each of the red and the white to make the third color of stripe. This blanket is definitely warm and a bit heavy when finished. And that was just the baby size I made. So be aware if you want to make this a giant throw. You might want to use lighter-weight yarn to combine.
Grey Gingham Blanket using the Crumpled Griddle Stitch

Oh wait, THIS one is my favorite! (Ha ha, who am I kidding? They are all my favorites! But this one tops the list for sure. It is made with Paton’s beehive baby sport and the yarn already came striped! So I did not have to combine skeins for this one. It was already done for me. This blanket is lightweight, perfect for a baby and the crumpled stitch gave it just the right texture. LOVE!
Black and White Gingham Blanket using the Griddle Stitch

Here is one where I used Caron Simply Soft yarn in three separate colors, no combining and it turned out amazing! I’m so happy when I can just find yarn in the right shades.
Crochet Buffalo Check Gingham Blanket

For this blanket I saw some Bernat Softee Chunky in two shades of grey, with a black and a white just sitting so nicely on the shelf at JoAnn’s and I seized the opportunity! I experimented with stitches and decided that with the bulky weight of the yarn, a half double crochet (HDC) would be the best stitch to use. I’m working in the back loop to give it a ridged effect. It hides the yarn being carried through fairly well, but the bits I can see poke through give the blanket a speckled look.
Purple Gingham Blanket using Single Crochet

This is a great blanket to start with if it’s your first time working a gingham type blanket. It’s all single crochet, made with two shades of purple and one white from I Love This Yarn brand at Hobby Lobby. It has a very simple shell border and really turns out fabulous.
Six Color Gingham Crochet Blanket

This would have to be my most advanced gingham-plaid type blanket. I experimented with six colors and combined them in different ways to get the most shades. I also used a linked stitch, so the yarn is not being carried through on this blanket. Each square is worked in its entirety before changing colors and working the next one.
I would rate this as an intermediate-level blanket. You really need to understand how to work the linked stitch for one, which is a cross between Tunisian crochet and regular crochet, and be really patient with all the ends you’ll need to weave in at the end of the project. But the results are spectacular. They really are, and I used Paton’s beehive baby sport yarn for this and it is perfectly soft and blocked up very well.
Crochet Teal Gingham Blanket

Whenever I find two shades of color in a yarn that will work for gingham, I buy them. That’s what happened for this blanket one day last fall as I happened to be walking the yarn aisle of Hobby Lobby. I’d never come across two shades of teal before in baby yarn.
This stitch pattern is essentially alternating SC and DC that are stacked on top of each other. So a SC stitch is always worked into the top of a SC, and the same for a DC always worked into the DC of the row below. Each row will begin and end with a SC. You will always chain one and turn.
Thank you for stopping by!
XO, Tiffany