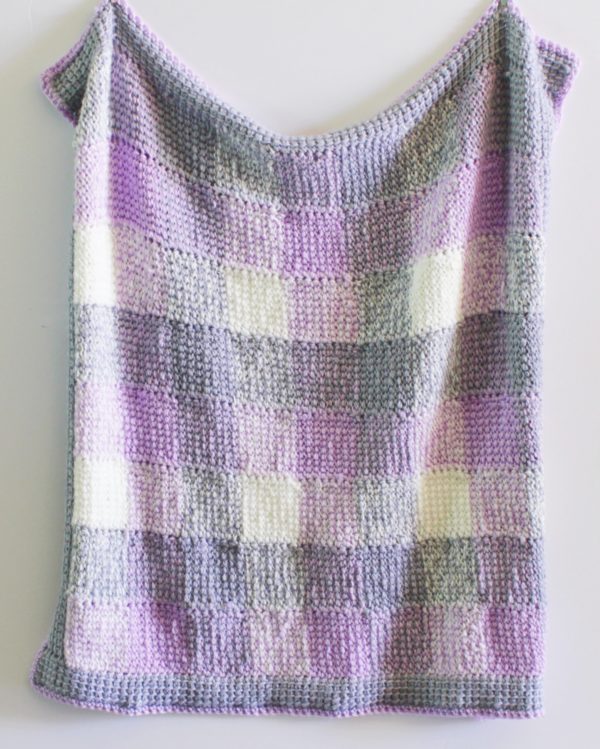
The main complaint I hear about my other gingham blankets is that the yarn being carried shows through. So, I’ve thought a lot about how I could alleviate that problem and as I was researching new stitches to put around the border of my polka dot blanket, I came across one called “linked treble.” It was worked very similar to Tunisian Crochet, wherein you are pulling up loops in a row, and then working back up the row, but this was different in that you were working vertically to the chain, where Tunisian has you working horizontal up from the base chain.
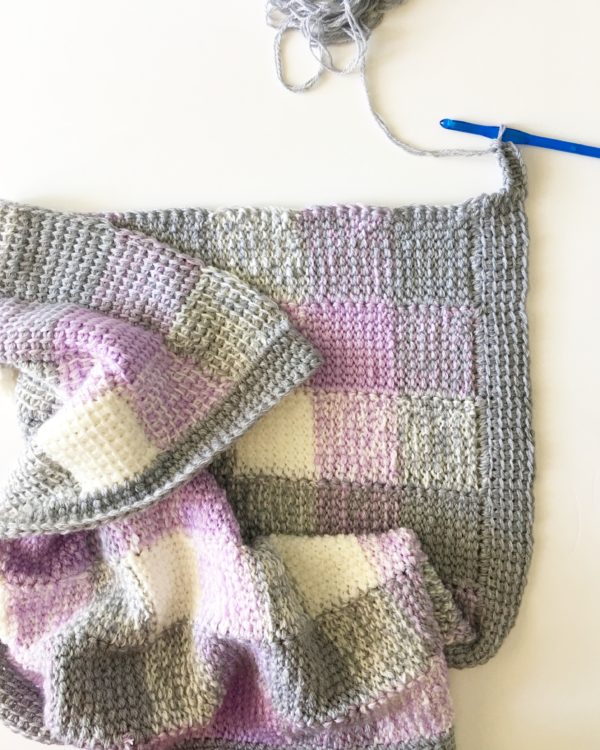
This gave me an idea that I could work a stitch 10 stitches high and eight stitches wide, alleviating the need to carry yarn. It worked! But, I did not like the look of the opposite side, and chaining and turning was not going to be possible. The two sides look very different from each other. So, I had to cut the yarn at the end of the row, go back to the start of the next row, pull up a loop and go across again.
This did create more ends to weave in than my other gingham blankets, but, if you really don’t like the yarn showing through when you carry, this might be a great option for you to try.
First, you need to know the linked stitch. (I changed the name up because I was adding so much height and it is worked into a chain. I believe in Tunisian this would be called simple stitch.)
Essentially the stitch is made by inserting your hook in the second chain from the hook and pull up a loop, then insert your hook into the next chain and pull up a loop. For this blanket, you want to pull up a loop in 10 chain spaces. After pulling up the tenth loop, YO (yarn over) and pull through two loops. YO and pull through two more. YO and continue pulling through two loops all the way back up the stitch. Now you will insert your hook under the horizontal bar that formed. You will pull up loops in nine of them, and the tenth stitch is done into the next chain space.
Here is a video clip you can watch: (I don’t work all ten stitches, but it should give you a clear enough idea on how to make the stitch.
Now for the pattern grid. You want to make 6 different colors to work with. I am combining two strands of Paton’s Beehive Baby Sport. I highly recommend this brand of yarn. I love that it is acrylic and nylon and the projects I’ve used with this yarn have turned out amazing.
You don’t need to make six giant balls of this. I recommend using fist size amounts for each row. I would wind the balls up ahead of using them in each row. Don’t pull from two skeins at once. You’ll end up with a mess.

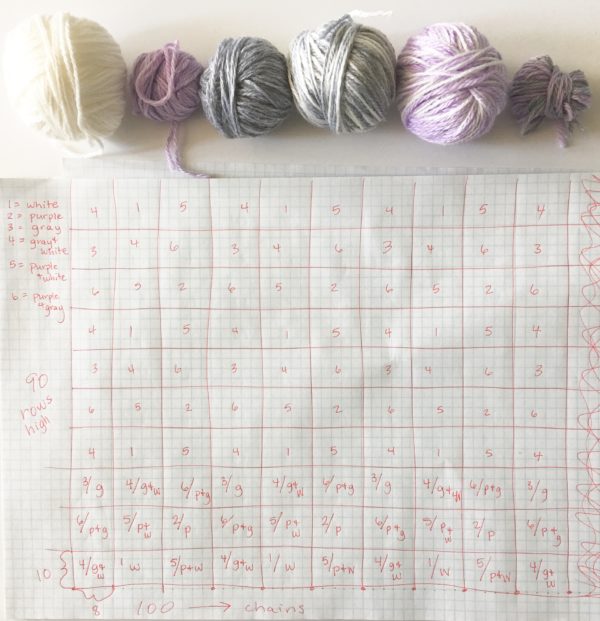
Above is the pattern grid, but if you can’t see it, essentially you are alternating 3 colors per row. (Remember, you are not turning. After each row, cut the yarn and start back at the beginning.)1=white 2=purple 3=gray 4=gray and white 5=purple and white 6=purple and gray
1=white 2=purple 3=gray 4=gray and white 5=purple and white 6=purple and gray
A. Starting in the bottom left-hand corner, alternate color 4, 1, 5, 4, 1, 5, 4, 1, 5, 4.
B. Working up from the bottom, the next row is 6, 5, 2, 6, 5, 2, 6, 5, 2, 6.
C. And the third row from bottom is 3, 4, 6, 3, 4, 6, 3, 4, 6, 3.
Now repeat A, B, C, rows for 10 blocks high. (last row is A.)
This will ensure that you are beginning and ending each row with the same block of color.
Your starting chain is 92, (not 100 like pictured.) If you’d like to go bigger, the pattern repeat is 8 plus 2. Each block is 8 chains wide, by 10 stitches high.
Materials
Patons Beehive Baby Sport (70% acrylic, 30% nylon, 100 g/3.5 oz, 328 m/359 yds)
3 skeins each White, Gray and Lilac Mist
Size L/8.00mm hook, scissors, tapestry needle
Size
Finished size 36 in x 36 in
Border

To get the flat wide border, you’ll simply pull up a loop in any color and chain 5. Work down that chain, starting your linked stitch just as you have in the blanket and work down one compete side. Be very careful to work one linked stitch per stitch on the sides. When you get to the next corner, chain 5 and turn working your first linked stitch around the post.
Here is another video clip explaining:
When you are finished, block your work and let dry. (I simply use a spray bottle and finger press the edges.) This is a very soft blanket.
I hope you’ll come and find me on Instagram or Facebook! I’d love if you’d tag me, or show me your project. Also, if you are an Etsy seller and would like to make this for your shop, reach out to me and I’ll advertise for you in my Instagram stories! I’d love the world to be filled with beautiful gingham blankets and I only have two hands!
Tiffany

