Baby Gigi loves her sweater! Gigi has been a Daisy Farm model for me since she was born. She’s my neighbor and good friend Emma’s darling baby girl. I’m so grateful she lets me practice my future grandma sweaters and blankets on her!
The first time you may have seen Gigi was when she was a tiny babe, just waking up from a nap:
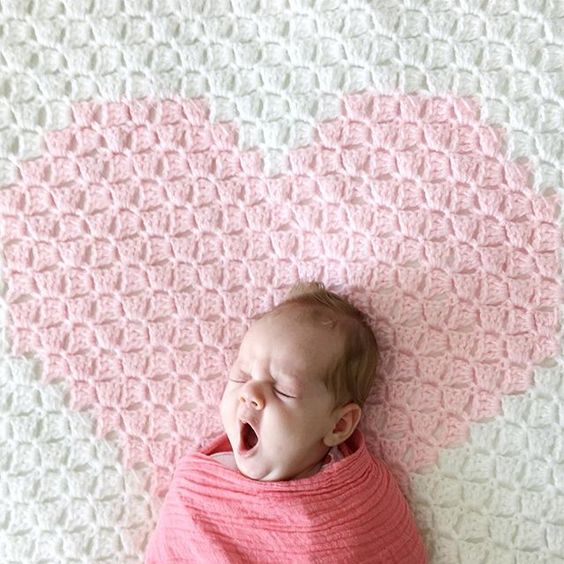
She was born in February and I really wanted to make sure she had a Daisy Farm Corner to Corner heart blanket to welcome her into this big wide world.
Last Christmas however, I had this idea for a Santa Claus type sweater, but it turned out more like a Rosemary Clooney White Christmas coat, and I knew Gigi would look adorable in it! She wasn’t so happy modeling with the fur, but we still managed a few really good pictures.

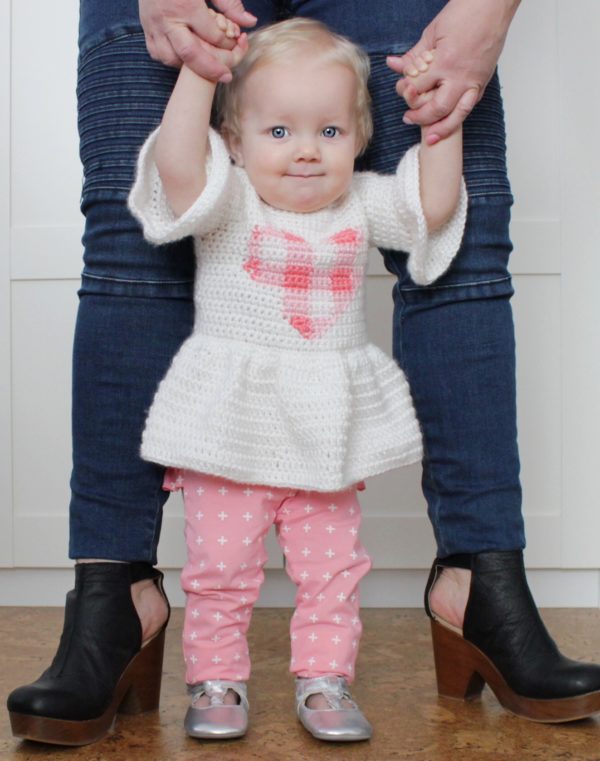
Next, you may have seen her model her one-year-old birthday sweater, based on two of my favorite designs, hearts, and gingham:
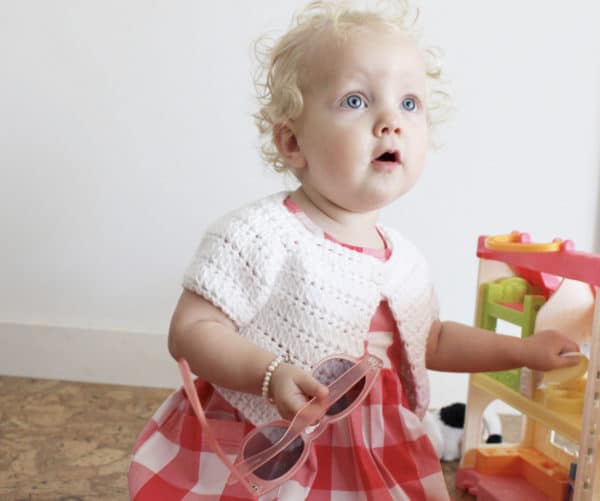
And just last Easter, I made her a baby shrug for her Easter dress:
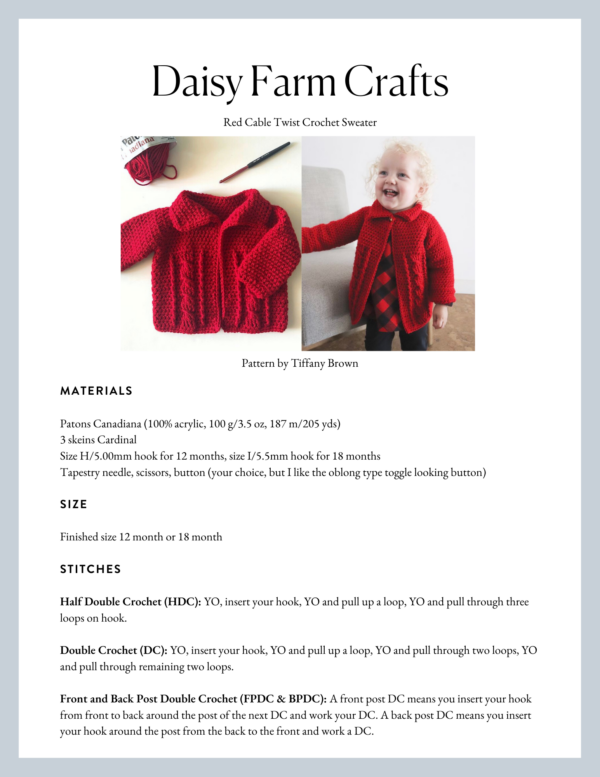
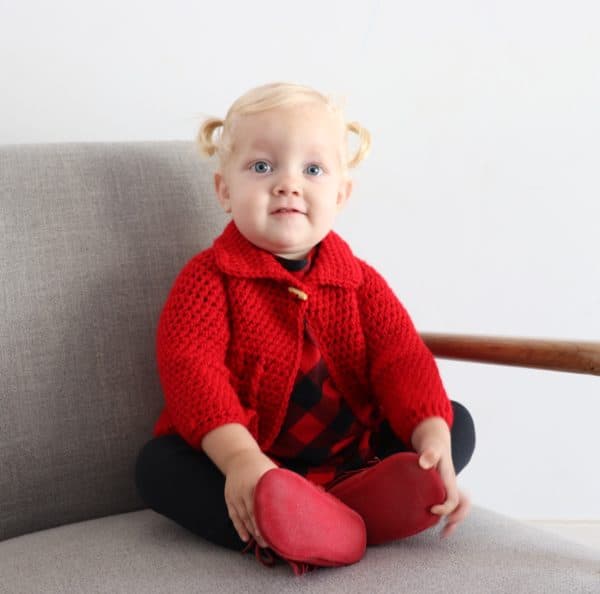
And here we are almost Christmas, and I thought an updated red sweater for her would be cute. It took me two tries to get the sizing just right. She is now an 18-month size, but I will include instructions to make a 12-month size. Here is a picture of her in the smaller size sweater I made for her at first, did the photo shoot and realized it needed to be redone:

Materials
Patons Canadiana (100% acrylic, 100 g/3.5 oz, 187 m/205 yds)
3 skeins Cardinal
Size H/5.00mm hook for 12 months, size I/5.5mm hook for 18 months
Tapestry needle, scissors, button (your choice, but I like the oblong type toggle looking button)
Size
Finished size 12 month or 18 month
Stitches
Half Double Crochet (HDC): YO, insert your hook, YO and pull up a loop, YO and pull through three loops on hook.
Double Crochet (DC): YO, insert your hook, YO and pull up a loop, YO and pull through two loops, YO and pull through remaining two loops.
Front and Back Post Double Crochet (FPDC & BPDC): A front post DC means you insert your hook from front to back around the post of the next DC and work your DC. A back post DC means you insert your hook around the post from the back to the front and work a DC.
Front Post Treble Crochet (FPTC): Insert your hook from front to back around the post and work a treble crochet: YO twice, insert your hook, YO and pull up a loop, YO and pull through two loops, YO and pull through two loops again, YO and pull through remaining two loops.
Pattern
Chain 46.
ROW 1: HDC in third chain from hook. 1 HDC in each chain. (44 HDC)
(Starting in row 2 and throughout the rest of the pattern, the HDC’s are worked in between each other.)
ROW 2: CH 2 and turn. (Does not count as a stitch now and throughout.) 1 HDC in each of the next 8 spaces. 3 HDC in the next space. 1 HDC in each of the next 5 spaces. 3 HDC in the next space. 1 HDC in each of the next 14 spaces. 3 HDC in the next space. 1 HDC in each of the next 5 spaces. 3 HDC in the next space. 1 HDC in each of the last 8 spaces. (last stitch will be worked between the HDC and the CH 2.)
ROW 3: CH 2 and turn. 1 HDC in each of the next 8 spaces. 2 HDC in the next space. 2 HDC in the next space. (You are working in between the 3 HDC’s of the row below. 2 HDC in each space.) 1 HDC in each of the next 6 spaces. 2 HDC in the next and 2 HDC in the next. 1 HDC in each of the next 15 spaces. 2 HDC in the next and 2 HDC in the next. 1 HDC in each of the next 6 spaces. 2 HDC in the next space and 2 HDC in the next. 1 HDC in each of the next 9 spaces.
ROW 4: CH 2 and turn. 1 HDC in each of the next 10 spaces. 3 HDC in the next space. (This is the space between the sets of 2 HDC’s). 1 HDC in each of the next 9 spaces. 3 HDC’s in the next space. 1 HDC in each of the next 18 spaces. 3 HDC in the next space. 1 HDC in each of the next 9 spaces. 3 HDC in the next space. 1 HDC in the remaining 10 spaces.
ROW 5: CH 2 and turn. 1 HDC in each of the next 10 spaces. 2 HDC in the next space and 2 HDC in the next. 1 HDC in each of the next 10 HDC. 2 HDC in the next space and 2 HDC into the next. 1 HDC in each of the next 19 spaces. 2 HDC in the next and 2 HDC into the next. 1 HDC in each of the next 10 spaces. 2 HDC in the next and 2 HDC into the next. 1 HDC in each of the remaining 11 spaces.
ROW 6: CH 2 and turn. 1 HDC in each of the next 12 spaces. 3 HDC in the next space. 1 HDC in each of the next 13 spaces. 3 HDC in the next space. 1 HDC in each of the next 22 spaces. 3 HDC in the next space. 1 HDC in each of the next 13 spaces. 3 HDC in the next. 1 HDC in each of the 12 spaces.
ROW 7: CH 2 and turn. 1 HDC in each of the next 12 spaces. 2 HDC in the next and 2 HDC in the next (remember that these are worked into the 3 HDC that make the corner.) 1 HDC in each of the next 14 spaces. 2 HDC in the next and 2 HDC in the next. 1 HDC in each of the next 23. 2 HDC in the next and 2 HDC into the next. 1 HDC in each of the next 14 spaces. 2 HDC in the next space and 2 HDC in the next. 1 HDC into each of the next 13 spaces.
ROW 8: CH 2 and turn. 1 HDC in each of the next 14 spaces. 3 HDC in the next space. 1 HDC in each of the next 17 spaces. 3 HDC in the next space. 1 HDC in each of the next 26 spaces. 3 HDC in the next. 1 HDC in each of the next 17 spaces. 3 HDC in the next space. 1 HDC in each of the next 14 spaces.
ROW 9: CH 2 and turn. 1 HDC into each of the next 14 spaces. 2 HDC in the next space and 2 HDC into the next. 1 HDC into each of the next 18 spaces. 2 HDC in the next space and 2 HDC into the next. 1 HDC into each of the next 27 spaces. 2 HDC into the next space and 2 HDC into the next. 1 HDC into each of the next 18 spaces. 2 HDC into the next space and 2 HDC into the next. 1 HDC into each of the next 15 spaces.
ROW 10: Ch 2 and turn. 1 HDC in each of the next 16 spaces. 3 HDC in the next space. 1 HDC into each of the next 21 spaces. 3 HDC in the next space. 1 HDC in each of the next 30 spaces. 3 HDC in the next space. 1 HDC into each of the next 21 spaces. 3 HDC in the next space. 1 HDC in each of the last 16 spaces.
(Video help is at the very end of this post.)
ROW 11: (We will be joining to make the armholes in this row for the 12 month size, work one more row for 18 month size then join for armholes.) CH 2 and turn. 1 HDC in each of the next 16 spaces. 2 HDC in the next space. SKIP over the next 24 spaces, find the second space of the chain 3 in the next corner, work 2 HDC in that space. (It helps to bring the fabric together and match the corners up so the space is easy to work into.) 1 HDC in each of the next 31 spaces. 2 HDC into the next. SKIP over the next 24 spaces, (bring the corners together and look for the second space of the 3 HDC’s that make up the corner.) 2 HDC in that space. 1 HDC in each of the last 17 spaces.
(Going forward, the counts and row numbers will be off for the 18 month size, but you are still working in the same manner–after you add the extra row that adds shoulder width, then join for armholes, continue on to row 12 of the twelve month size, just ignore the number of stitches, you obviously will have more.) (When you join for the armholes for 18-month size, add 2 chains in between the 2 HDC you work in the corner spaces.) (Also, you can refer to the video at the end of this post for a demonstration of joining to make armholes.)
ROW 12: CH 2 and turn. 1 HDC in each of the 71 spaces across the row. (The armholes will have one HDC. It’s kind of a gap, but just put 1 HDC there.) (For 18 month size, work 2 HDC around the two chains.)
ROW 13: CH 2 and turn. 1 HDC in each of the next 3 spaces. Work 1 DC around the post of the next stitch, inserting your hook from the front to the back, popping the post forward. (FPDC-this is the symbol for front post double crochet that I will use going forward to describe this action.) Work 1 HDC in each of the next 2 spaces. (tip: make sure you are inserting your hook to the left of the HDC and under the 3 loops. The popped out FPDC will make it look like you are going into that space next to it, don’t. Look to the next HDC and work to the left of that stitch.) Work 1 FPDC around the posts of the next 4 spaces. Work 1 HDC in each of the next 2 spaces. (please use the tip above. You can easily add stitches here without meaning too.) Work 1 FPDC around the next HDC post. (And it’s right next to the HDC you just made. 1 HDC in each of the next 45 spaces. 1 FPDC around the very next post. 1 HDC in each of the next 2 spaces. 1 FPDC around each of the next 4 posts. 1 HDC in each of the next 2 spaces. 1 FPDC around the very next post. 1 HDC in the remaining 3 spaces.
ROW 14: CH 2 and turn. 1 HDC in each of the next 3 spaces. 1 BPDC around the post (make sure you are inserting your hook from the back to make the post pop out on the same side as the row below.) 1 HDC in the next 2 spaces. 1 BPDC around each of the next 4 posts. HDC in each of the next two spaces. 1 BPDC around the next post. HDC in each of the next 45 spaces. 1 BPDC around the next post, HDC in the next 2 spaces. BPDC around the next 4 posts, HDC in the next 2 spaces. BPDC around the next post. HDC in the last 3 spaces.
ROW 15: (CABLE TWIST ROW- see this post if you need a tutorial.) CH 2 and turn. HDC in each of the next 3 spaces. *FPDC around the next post. HDC in the next 2 spaces. SKIP over the next three posts and work 1 Front Post Treble Crochet (FPTC) around the last post. Work 1 FPTC around the next post (3rd), 1 FPTC around the next (2nd), and 1FPTC in the next (1st). Twist the work over, HDC in the next 2 spaces. FPDC around the next post*. HDC in the next 45 spaces. Repeat from * to *. HDC in last 3 spaces.
ROW 16, 17, 18: Repeat row 14, with the exception on row 17 you would be working FPDC–keeping in mind the popping of the posts forward to keep the cables on the same side of the sweater.
ROW 19: Repeat row 15 CABLE TWIST ROW. (Tip: the cables should be facing you.)
ROW 20, 21, 22: Repeat row 14.
ROW 23: Repeat row 15 CABLE TWIST ROW
ROW 24, 25, 26: Repeat row 14.
(For 18 month size, make 6 sets of cable twists to add length to the sweater. Or customize if you have the measurements of the baby you are making this for.)
Sleeves
ROW 1: In the armholes, with the V’s of the stitches facing in the direction as if you just chained and turned, pull up a loop to the left of the one HDC that is in the bottom of the armpit.(Or in between the two HDC that are worked around the 2 chains for the 18month size.) CH 1 and work a HDC3tog with the first leg of it in the space you pulled up a loop and the next leg in between the first and second post that begins the arm and the third leg in the next space.
Tip: HDC3TOG is Yarn Over, insert your hook into the first designated space, YO and pull back through, YO, insert your hook into the next designated space, YO and pull back through, YO, insert your hook into the next designated space, YO and pull back through, YO, and pull through all loops on your hook.
Work 1 HDC in each of the next 19 spaces.(you will have a different number for 18 month size) HDC3TOG the last 2 spaces and the space in the armpit. SL ST to the starting HDC3TOG.
(Try not to get confused by the post of stitches that belong to the body. The goal is to fill gaps with HDTOG’s and to decrease the number of spaces to 21. This might be a make it work situation, use your best judgment and decrease in any manner that you may have learned. The good thing is that it’s the armpit.)
ROW 2: CH 1 and turn. 1 HDC in each of the next 21 spaces. SLST to the starting HDC.
ROWS 3- 17: Repeat ROW 2. Make extra rows for 18-month size, about an inch and a half longer than the baby you are making it for the shoulder to wrist measurement.
Decrease the second to last row of the sleeve by working a HDC2TOG over two stitches, every third stitch. For example work HDC, HDC, HDC2tog across two stitches, repeat around.
Last round of sleeve work SC in each stitch, tie off and weave in the end.
Collar
Pull up a loop and HDC in the first space of the neck. HDC in between each HDC of the row below, skipping over a space when you reach the inside corners. CH 2 and turn.

Work 8-10 rows of HDC, back and forth, always CH 2 and turn.
Finishing
Work one round of HDC in each stitch (not in between) around the entire sweater. Work one HDC per row when working down the front edges of the sweater. Tie off, weave in ends.
Attach a button.
Take a cute picture and share it with us all!!
Thank you all for stopping by our website and for sharing in our love of crochet. Hannah and I are always so grateful for your love and prayers. We know and stay always so hopeful and positive that one of these blankets or sweaters will be for an actual Daisy Farm Grandchild..but we sure love making things for our neighbors, especially when they are as cute as Gigi!
Here is a link to the video help on YouTube if the following videos do not load for you.
Click here or on image below for printable pattern