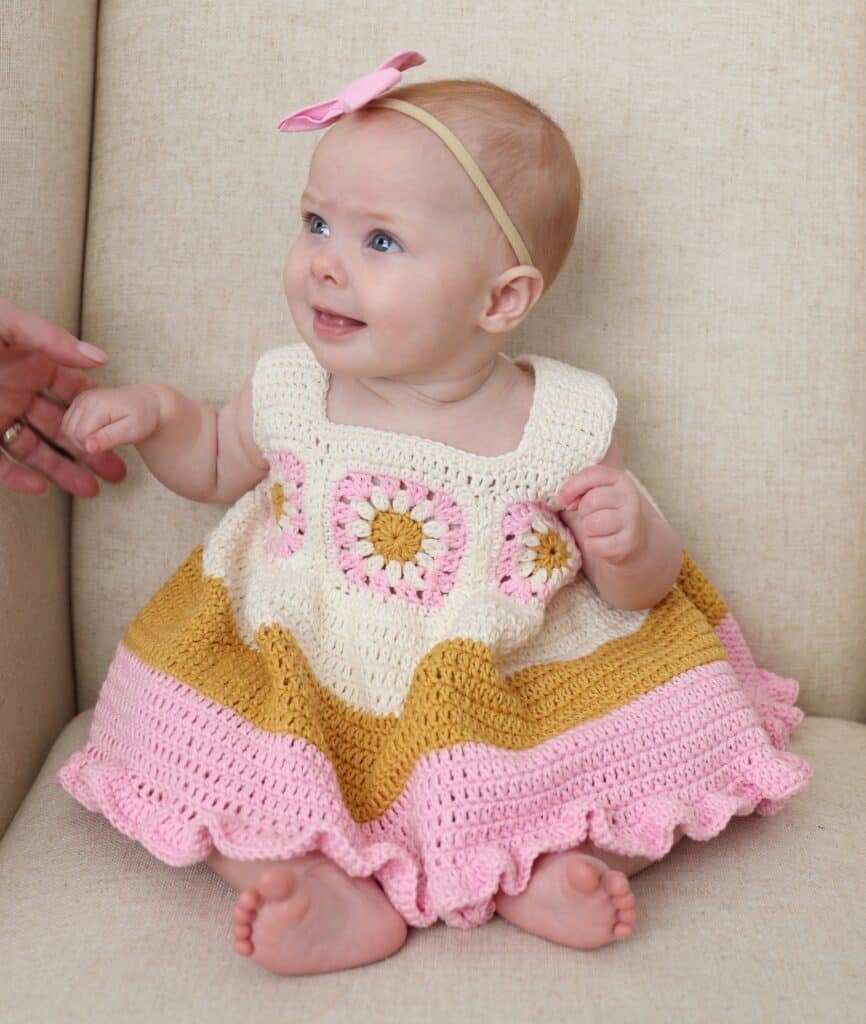
Hi there! It’s me, Tiffany, having so much fun crocheting for my grandbaby Kate. This might be the summer of baby dresses lol! This Baby Boho Sundress was so much fun to make for her and so easy.
I know there are so many of you who are going to want to make this in different sizes and so I’m going to give you suggestions on how to do that the best I can.
My first tip to adjust the size is to find a little sundress from The Goodwill or ask the person you are making one for if they have one you can borrow in the size you need.
This design is very adaptable, you just need something to measure it against.
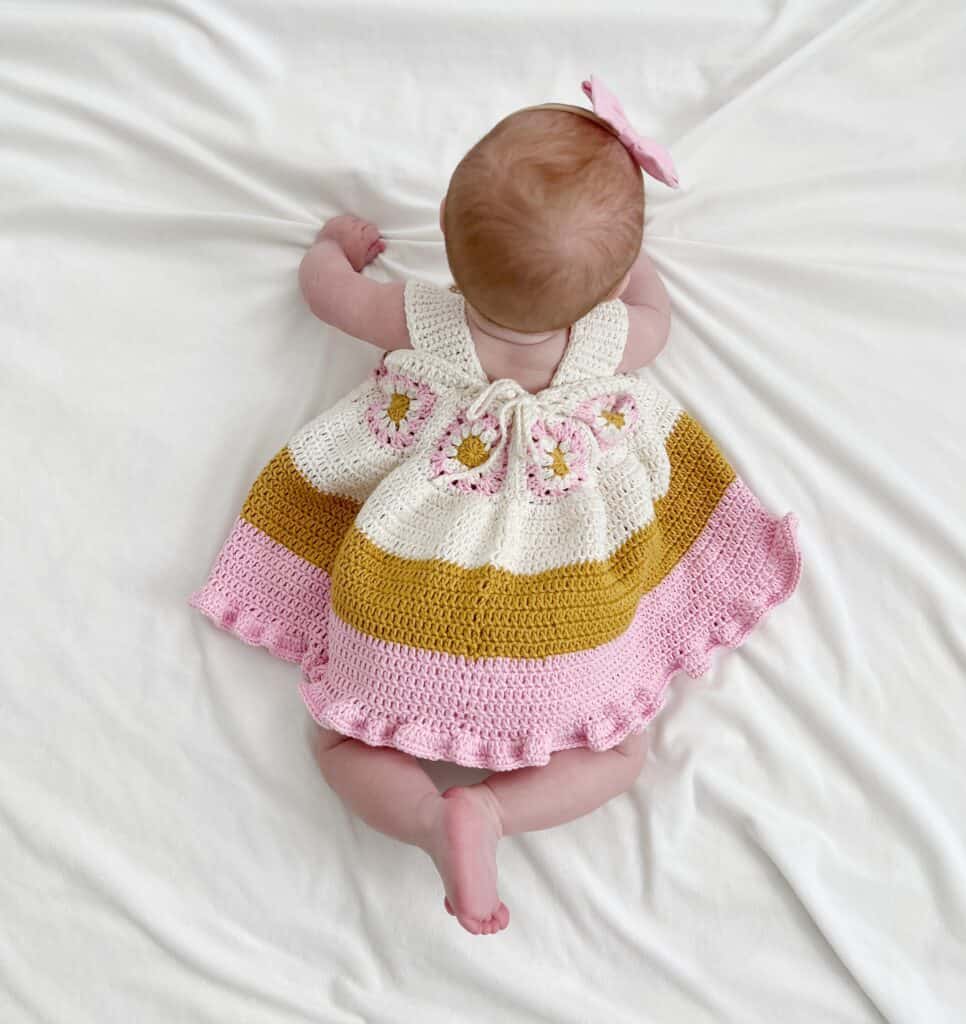
Kate is wearing a 6-9 month size. But I’ve made it so she can grow with it, and next summer, it will turn into a little top for her. The back of the dress is cinched up with a tie, and that will make the dress accommodate her as she grows.
If you need more width around the chest, all you need to do is make an extra square. The tie in the back makes it very boho looking but also will help to make it completely adjustable for size.
Crochet is really in right now for babies and my daughter-in-law can’t wait to have her wear this. I actually made her another! (I needed to make another for the video tutorial, it’s linked at the end of the post.)
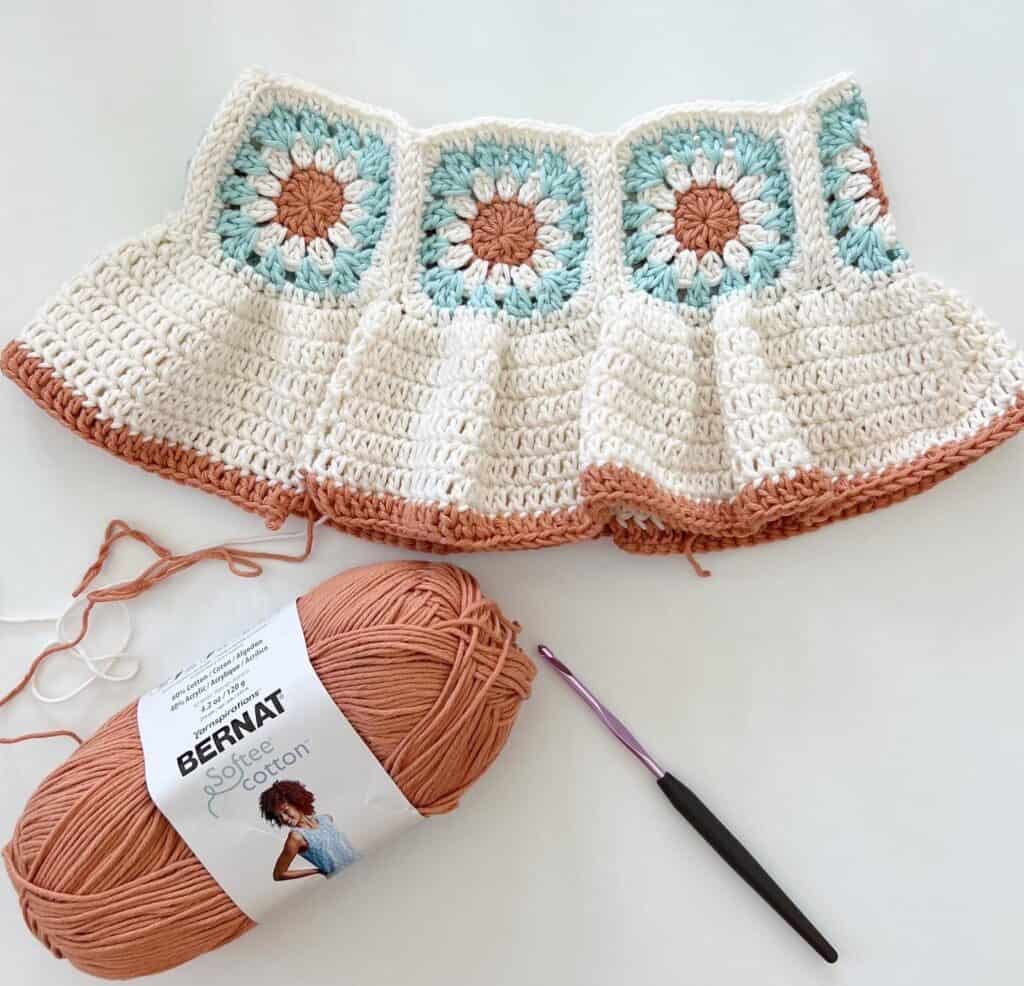
I changed up the color scheme to cooler-toned colors, and we love it so much too!
I’m highly recommending Bernat Softee Cotton and Bernat Softee Baby Cotton, which is a 3-weight yarn. It is a cotton/poly blend that washes up really well.
The colors are vibrant and since they offer this yarn in a baby line and adult line, I’m having fun being able to use non-traditional baby colors in baby projects.
First, you are going to make granny squares, then sew them together to form a circle. Then you will add rows of double crochet to form the skirt. Then work a round of double crochet on the top and make the straps. Sew on two buttons on the back and then make a long chain you’ll weave through the DC’s in the back and cinch it closed.
If you are making this a larger size, you just will need to estimate the width of stripes if you want to keep it to just the three colors, or just repeat the colors until you have the length you need.
You will want to make the straps longer too, but other than that the width of sewing 7 squares together can accommodate up to 3T. But if you are going bigger, sew 8 squares together or even more.
Okay, let’s get started!
Post Update:
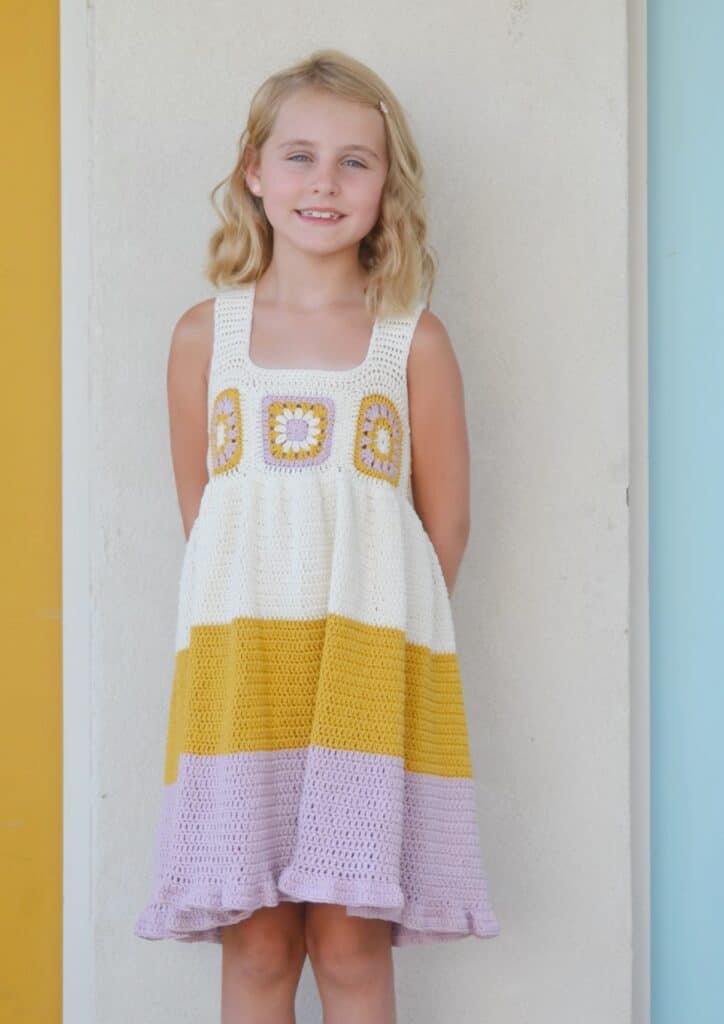
I made this as a size 8 for darling Adella and have a few adjustments to the pattern so you can make this larger if you’d like. Please read through the original pattern and tips and at the end of the post I’ll add what I did to make this larger.

Materials
Bernat Softee Cotton (tap name of each yarn to see on Yarnspirations.com)
Choose 3 colors, one skein of each color.
The colors I used are Golden, Petal and Cotton or Sandstone, Aqua Mist and Cotton
G 4.00mm hook, scissors, tapestry needle
2- 1 inch round buttons
Size
6 to 12 months
Gauge: 4 inches = 10 rows and 18 sts of DC taken from the skirt
granny squares are 3 x 3 inches
bodice to bottom of skirt: 11.5 inches, straps: 6 inches, width of bodice 11 inches.
Stitches
Pattern
Make 7 Squares
Always have right side facing you while working around.
Round 1: With Golden, make a magic ring and chain 3, work 11 DC around ring, join with a SL ST to top of the chain. Tie off. (11 DC and chain 3 = 12 DC)
Round 2: With Cotton, pull up a loop in the top of any DC, CH 3. DC into the same sp. work 2 DC into the top of each DC. Join with a SL ST to the top of ch 3. Tie off (23 DC and chain 3 = 24 DC)
Round 3: (All stitches are worked in between pairs of DC) With Petal, pull up a loop in between any pair of DC and work, [CH 3, DC, CH 1, 2 DC, CH 1] (first corner made.) *Skip 2 dc, work in between the next pairs with [2 DC, CH 1], repeat from * again. Skip 2 dc, work in between the next pairs with [2 DC, CH 1, 2 DC, CH 1] to form next corner. Repeat from * two more times. Work final, [2 DC, CH 1,] twice. Join with a SL ST to top of CH 3. Tie off. (31 DC and chain 3 = 32 DC)
Round 4: With Cotton, pull up a loop in any corner ch 1 space, CH 1 and 3 HDC into that same space. Work 1 HDC into the top of each dc and around each ch 1 space. Work 3 HDC around each corner ch 1 space. Join with a SL ST to starting HDC, Tie off. (56 HDC)
Weave in the ends (or I tied the ends into square knots on the wrong side of the squares.)
With a tapestry needle and 12 inches of yarn, sew one side of each square together to form a circle. Weave in the ends.
Skirt
Round 1: With Cotton, and with right side facing you, pull up a loop in between 2 squares. This will become the center back. Chain 3. DC into the same space. Work 2 DC into each hdc around the edge of the circle. Join with a SL ST to top of ch 3.
Round 2-6: Do not turn, CH 3, work 1 DC into each DC around. Join rounds with a SL ST to the top of ch 3. At the end of round 6 pull through with Golden.
Round 7-12: Do not turn, CH 3, work 1 DC into each DC around. Join rounds with a SL ST to the top of Ch 3. At the end of round 12 pull through with Petal.
Round 13-18: Do not turn, CH 3, work 1 DC into each DC around. Join rounds with a SL ST to the top of Ch 3.
Round 19: CH 3, Work 1 DC into same sp as join, work 2 DC into each DC. Join with a SL ST to the top of Ch 3.
Round 20: Ch 1, work 1 SC into each DC. Join and tie off. Weave in the ends.
Bodice
With right side facing, pull up a loop in center back on the top side of the squares. Ch 3 and work 1 DC into each HDC. Join with a SL ST to starting Ch 3. Tie off.
With right side front facing you, identify the front middle square and measure 4 inches across. Mark each stitch on either side.
First Strap
Row 1: Begin on the left marked stitch by pulling up a loop, work SC into that same sp. Work 1 SC into each of the next 6 sts. Ch 1 and turn. (7 SC)
Row 2 – 20: Work 1 SC into each SC, Ch 1 and turn.
Row 21: Work 1 SC into each of the first 2 sts, CH 3, SC into each of the last 2 sts. CH 1 and turn.
Row 22: Work 1 SC into each SC and 3 SC around the CH 3 space. CH 1 and turn.
Row 23: Repeat row 21
Row 24: Repeat row 22
Row 25: Repeat row 21
Row 26: Repeat row 22, tie off.
Second Strap
Count 7 sts to the right of the marked stitch and pull up a loop, SC into same space and into each of the next 6 sts to the marked st.
Repeat instructions for row 2 through 26 of the first strap.
Work one round of SC around each strap and the bodice of the dress. Join with a SL ST to beginning SC.
Tie
Chain 20 inches. Tie off and weave in the ends. After you thread through the DC on the back of dress, tie knots on each end of the tie.
Sew Buttons on the inside back of the dress.
I have a youtube tutorial available as well, see below:
Click here or image below for free printable pdf of the pattern.
![]()
Thank you all so much for stopping by! If you are new here, we are sharing our love of crochet with our friends and family and writing down the patterns. Everything is free on our website, each pattern has a free printable at the end of each post. Most also have Youtube tutorials to help you out.
We love to see what you make from our patterns! Use #daisyfarmcrafts on your Instagram posts and we share into our stories each Sunday.
Happy Crocheting!
XO, Tiffany
See below for tips on making it larger.
![]()
For a larger size, I still highly recommend having a sundress in the size you want to make so you can compare and estimate how many rows you will need of each color for the skirt.
For size 8, from the shoulder to the top of the knees measured 27 inches. For the skirt I worked 12 rows of DC for each color. Then worked the ruffle the same as the pattern.
For the chest and granny squares, I made 7 granny squares, but added one more round of HDC (Round 4 instructions.)
For the straps, the width is the same, I made 32 rows of SC before I started the button holes (row 21 instructions.)
Essentially, you need a bit more width for the bodice, length for the straps and skirt.
I hope this can help you make this the size you need. It’s a very flexible pattern.
Adella had enough length in the straps to cross them in the back.
Thank you to our beautiful Adella for loving her new Boho Dress and modeling it so perfectly. You can see more gorgeous photos of her on Instagram. (Her mommy is my former next-door neighbor, dear friend, and babysat my girls when they were little.)