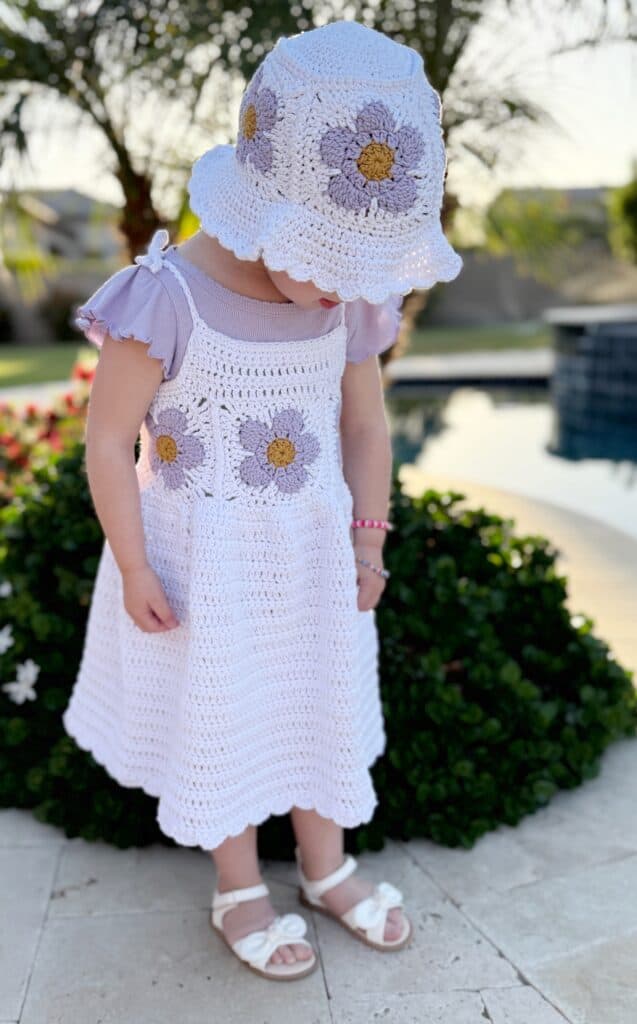
Finally, I have a matching dress pattern for the Field of Daisies Sun Hat! I know a lot of you have been waiting for this pattern. I had to make some tweaks, as the first version I created was a halter-type dress, and it looked more like an apron than a dress. I undid the whole thing and made spaghetti straps instead.
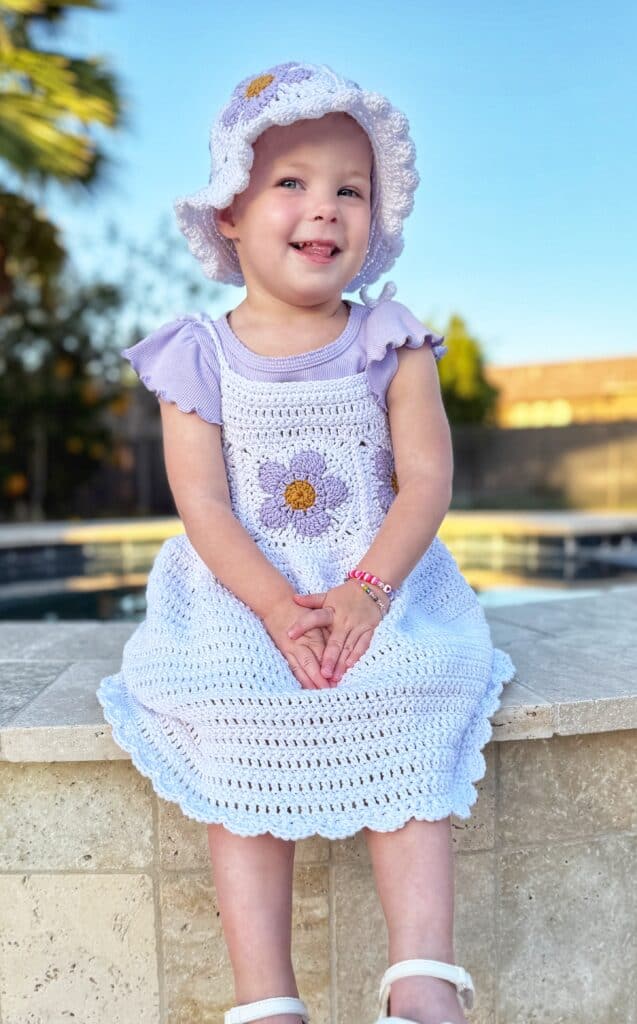
I think this looks so much cuter now! Darling Kate loves to wear hats, dresses, and all sorts of jewelry (notice her little bracelets). She is so fun to dress up in crochet!
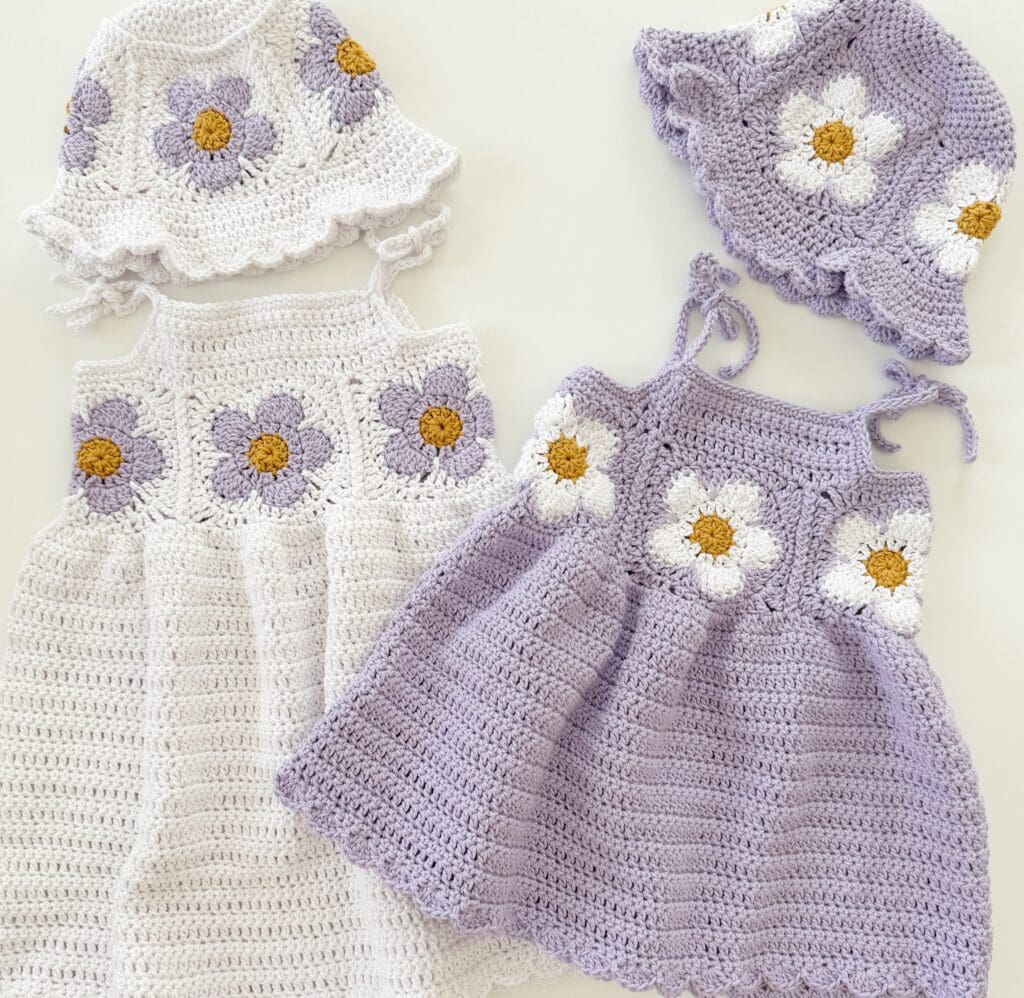
I made two versions of this dress so that baby Nora will have one too this summer when we are all together. The chest measurement for this dress is up to 21 inch chest plus some stretch. I made Nora’s shorter since she is about 18 month size right now. Kate is almost a 3T.
My best tip is always to have a dress on hand from the thrift in the size you want to make. Then you can easily match up the lengths. I tried a dress on Kate, so I knew what the length would look like on her, and then measured this sundress against it. It made it so much easier to have it fit when I’m not with her all the time.
I know that you’re going to want to make it for larger sizes so you’ll want to make more squares. Each square is 4 inches, but that is with Caron All Day Cotton. You can use smaller weight yarn, you can change hook sizes, etc, to achieve different sizes of squares to fit the bodice width that you need.
Once you see how easy the top half of the dress is made, it won’t be hard to adjust for larger sizes at all. Making the skirt would remain the same, just make it longer. But like I suggest, get a sundress in the size you’d like to make and go from there.
Here is the video tutorial for the dress that hopefully clears up anything in the written pattern. Sometimes a visual can really help! Watch below:
Materials
Caron All Day Cotton (tap name of yarn to shop Yarnspiration.com)
- 100% mercerized cotton
- Ball Size: 100 g/3.5 oz, 158 meters/173 yards
- Care: Machine wash and dry
- Gauge: #4 Worsted (Medium)
4 skeins main color (3 for smaller sizes), 1 each of contrasting colors
Colors used: White Shirt, Golden, Grape Popsicle
Tap Here to Shop on Amazon if the yarn is sold out on Yarnspirations* (on Amazon, the Grape Popsicle color is mislabeled as Mauve
*as an Amazon Associate, we may earn from qualifying purchases.
Size G 4mm hook for squares, Size H 5mm size hook for dress
Tapestry needle, scissors, tape measure
Stitches
Single Crochet (SC): Insert your hook, YO and pull up a loop, YO and pull through two loops on hook
Double Crochet (DC): YO, insert your hook, YO and pull up a loop, YO and pull through two loops, YO and pull through remaining two loops
Size
Fits up to a 21-inch chest, length is adjustable. Approximately 18 months to 3 T.
Pattern
Make 5 Field of Daisies Squares (a free pattern from Yarnspirations.com) (I used a G-4mm hook to make them 4 inches square)
Join the 5 squares to form a circle using a zig zag slip stitch join or your preferred method. Tie off and weave in all the ends.
Choose one square to be the center and front of the dress. Place your tape measure so the 3 inch mark is in the center of the square, measure 6 inches across and mark the stitches on either side of the tape measure.
Tip: Count the join as a stitch, I placed my stitch markers on the DC next to the TC on each square next to the center square for a total of 23 sts in between each marker.
Turn the dress over and place the 3-inch mark on the center join of the back. Measure 6 inches across and mark the stitches. Count the number of stitches remaining for the armholes and ensure they are the same. This will ensure that you have centered the markers on the back to match the front.
Front
Row 1: With the right side of the squares facing you, pull up a loop in the right side stitch marker. Ch 1. Work DC into the same space as join. DC into each stitch across the front to the next stitch marker making sure to work DC around ch 1 spaces and join spaces on the squares. CH 1 and turn.
Row 2: Skip the first stitch of the row, SC into the next st and each across the row. CH 1 and turn.
Row 3: Skip the first stitch of the row, DC into the next st and each across the row. CH 1 and turn.
Row 4: Skip the first stitch of the row, SC into the next st and each st across the row. Tie off (front only)
Back
Turn the dress so the back is facing you and the right sides of the squares. Repeat Rows 1 – 4 of the front, don’t tie off.
Trim and Shoulder Ties
Round 1: CH 1 and turn. Skip first st, SC into each stitch across the back. Turn to work down the sides, (1 SC per rows that end in SC, 2 SC per rows that end in DC), SC into ch 1 spaces, joins, and each stitch of the squares, and around the sides and front. Make your last SC into the starting corner.
Round 2: CH 40. (0r 10 inches), SL ST into each chain, SL ST to the corner, *SC into each stitch to the next corner. CH 40. SL ST into each chain, SL ST to the corner. Repeat from * 2 more times. Tie off. Weave in the ends.
Skirt
Row 1: Begin in the center back of the dress join, with right sides of squares facing you. Pull up a loop into the center join. CH 2, DC into same space as join. Work 2 DC into each stitch, ch 1 space and each join space. Join with a SL ST to the starting DC, CH 1 and turn.
Row 2: Work SC into same st as join. SC into each st around. Last stitch of the round is before the join. SL ST to the first st, CH 2 and turn.
Row 3: Work DC into same st as join, DC into each st around. Last stitch of round is just before the join. SL ST to the first st, CH 1 and turn.
Repeat rows 2 and 3 *to the length needed. Last row before the scallop border should be a SC round.
*I made the skirt on the white dress 12 inches (3T), the purple 10 inches (18 months) (measuring the skirt portion only)
Scallop Border
CH 1 and turn. Skip first st, *5 DC into next st, Skip next st, SL ST into next st. Repeat from * around. Join with a SL ST to first st, tie off.

Thank you for following us as we share what we’re making for friends and family! All patterns here are free and printable.
Check out our category of clothing for more ideas!
XO, Tiffany
Click here or image below for free printable pdf.
![]()