
I’m in love with the spider stitch I used it for this hat! Look at how pretty a simple series of single crochet, chain, single crochet worked all in one stitch, created those beautiful lines running vertically down the hat. And huge shout out for the yarn! (Thank you to my friends at Yarnspirations.com for sending me some to play with and make whatever I wished with it. This hat is sponsored by them!)
This is Sugar Bush Nanaimo which is a blend of alpaca and silk. It is super fine, a size 1 weight, so for this project, I worked with two strands together to make the hat a little more substantial.

I made it especially for Elizabeth because she has a hard time finding hats that fit her smaller woman’s size head. She is petite and normal hats drown her.
But you can customize the hat to fit your head or for whoever you are making it for. Here’s my tip, if it’s for you, just measure the chain to fit around your head, or if you want to be more precise, measure with a tape measure around your head and make the chain about one inch smaller than the measurement.
The only other stitch you’ll need to know is how to work around the posts of a double crochet stitch. When I alternate working around the posts from front to back, it’s called ribbing. Here’s a quick video to help you see how it’s done:
Materials
Sugar Bush Nanaimo (silk/baby alpaca, 1.75 oz/50 g, 164 yds/150 m)
2 skeins Coconut, 2 skeins Petroglyph Gray
Size H/5.00mm hook, tapestry needle, scissors
Pom pom (optional)
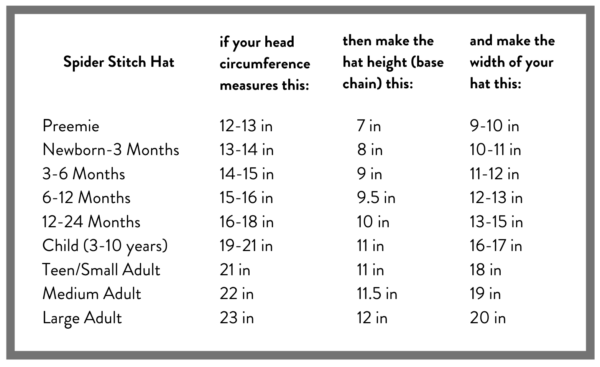
Size
Adult women’s extra small (or see hat size chart below)
Stitches
Single Crochet (SC): Insert your hook, yarn over (YO) and pull up a loop, YO and pull through two loops on hook.
Double Crochet (DC): YO, insert your hook, YO and pull up a loop, YO and pull through two loops, YO and pull through remaining two loops.
Front and Back Post Double Crochet (FPDC & BPDC): A front post DC means you insert your hook from front to back around the post of the next DC and work your DC. A back post DC means you insert your hook around the post from the back to the front and work a DC.
Pattern
Hat is worked as a flat rectangle, then sew sides together, matching the stripes, and gathering the top of the hat in. Before beginning, pull strand from the middle of two coconut color balls and wind together into one. Do the same with 2 petroglyph gray balls.
With Coconut, chain 75. (If making your own with different yarn, just make sure your chain is an odd number.)
Row 1: In the third chain from the hook, work one single crochet (SC) one chain (CH) one SC, (this is the spider stitch) then *skip one CH and work the spider stitch (SC-CH-SC). Continue repeating from * across the whole row. You should have one extra chain at the end. Work a SC into that stitch. CH 2 and turn.
Row 2: SK (skip) over the first two stitches and find the CH one space. You’ll want to work your spider into that stitch (SC-CH-SC). Continue across this row working the spider into the CH 1 space of the row below. Work one SC into the final chain space. (On this row it’s worked under the first two chains of the foundation row, going forward it will be the turning chains. Feel free to work under the two turning chains if you find that working just under the top of one of the turning chains is slowing you down or hard to find.)
Repeat row 2 for the rest of the hat.
Here are the color changes:
*4 rows Coconut, 1 row grey, 4 rows coconut, 4 rows gray. Repeat from the * one time. Then work 4 more rows of Coconut, and one more row of grey, then 2 rows of coconut. (You may need to continue if you are making a larger hat.)
To change colors, on the last step of the stitch, stop and lay the new color over your hook, pull through, chain 2 and turn. Leave long-ish tails so you can sew the hat together and gather the top. You’ll want to cut the yarn after each color change.
For the ribbing:
Pull up a loop with the grey in the bottom corner of the foundation chain. Chain 3. Work 1 Double Crochet into the same space you pulled up the loop. Work 2 double crochets in each space the spicer stitch made on the underside of the chain. It is the skipped chain space from the first row of the pattern. Work one DC at the end of the row, ch 3 and turn.
Alternate working front post and back post DC around each post across the row. (See above video if confused.) Work final DC under the turning chains. Ch 3 and turn. Work the ribbing for a total of 4 rows.
Make sure you leave a long tail after changing colors, you will use these ends to sew the sides together. Match the stripes together and use those ends to sew the two side together and weave in the ends at the same time.
Weave the needle in and out along the top of the hat slowly gathering the hat in. Weave in the end.
Attach a pom pom of your choice! (I bought mine on Etsy.)

I hope you enjoy your hat! Come and show us! We’d love to share. Find us on Instagram or Facebook! Keep scrolling to the bottom of this page and click on the links to take you there.
Thank you all for crocheting along with me!
xo, Tiffany