After much trial and error, I am so happy to share my version of a crochet plaid blanket. I’m using the exact same technique of carrying the yarn through the work as I have for my other gingham blankets.
Here is a video clip showing how I carry yarn and pull it up when I need it:
If you have never done this type of crocheting before, I recommend doing a practice swatch until you get the hang of it. It won’t take long to learn, just some time to get the tension figured out.
Here is another video clip that explains what you are going to be doing:
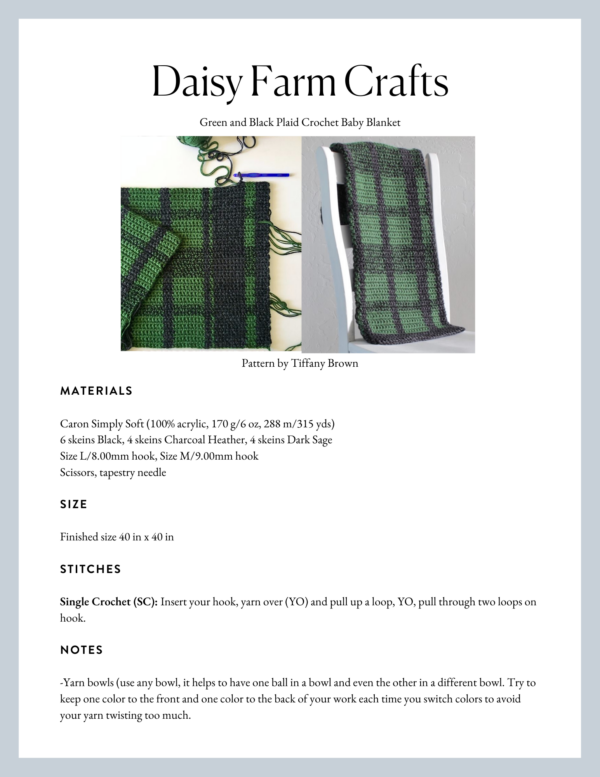
Materials
Caron Simply Soft (100% acrylic, 170 g/6 oz, 288 m/315 yds)
6 skeins Black, 4 skeins Charcoal Heather, 4 skeins Dark Sage
Size L/8.00mm hook, Size M/9.00mm hook
Scissors, tapestry needle
Size
Finished size 40 in x 40 in
Stitches
Single Crochet (SC): Insert your hook, yarn over (YO) and pull up a loop, YO, pull through two loops on hook.
Notes
-Yarn bowls (use any bowl, it helps to have one ball in a bowl and even the other in a different bowl.) Try to keep one color to the front and one color to the back of your work each time you switch colors to avoid your yarn twisting too much.
-Prepare your yarn by winding 2 skeins of dark sage together, (it works best to keep the balls about softball size instead of a huge ball. It’s better to have two or three smaller.) Wind together black and charcoal, and wind together black and dark sage. Again keep them all about softball size. Also, you might just want to wind one ball at a time and then wind more as you go. It’s up to you, but keep them about softball size.
-Please do a sample swatch if you have never crocheted in this manner. You want to make sure your tension is correct. If the M size hook is making your blanket turn out stiff like a rug, go up one more size. However, I still have found with this pattern, the starting chain must be done with a smaller hook size. I think it’s because there is no yarn being carried through on this row.
Pattern
Chain 77 in dark sage (green, and I’m going to call it green here on out) with your size L hook.
Row 1: SC in the second chain from the hook and in the next 4 chains with green for a total of 5 SC. Just before you finish the last SC in green, pull through with black, (actually black and charcoal combined but I’ll just be calling it black going forward.)
SC the next 3 in black, pulling through on the last stitch with green.
SC the next 9 in green, pulling through on the last stitch with black.
SC the next 2 in black, pulling through on the last stitch with green, (and I’ll stop telling you that now, just assume that is what you will be doing for each color change.)
SC the next 1 in green,
SC the next 9 in black,
SC the next 3 in green,
SC the next 4 in black,
SC the next 9 in green,
SC the next 3 in black,
SC the next 9 in green
SC the next 2 in black,
SC the next 1 in green,
SC the next 9 in black,
SC the next 3 in green,
SC the next 4 in black.
Chain 1 and turn, bringing the green around the side of the work. (refer back to the youtube clip to see how this is done if you are unsure.)
Row 2: Work SC in each space using the color of the row below.
Rows 3 – 9: Continue working as ROW 2.
Rows 10 – 12 (3 rows): Cut off the green, leaving a long tail to weave in later. Continue SC with black into the black stitches, but instead of using the solid green, use the black and green into the green spaces. Keep the same amount of stitches to create the vertical stripes.
Rows 13 – 21 (9 rows): Cut off the black and green yarn, and bring the black around the side and add in the green into the spaces of black and green.
Rows 22 – 30 (9 rows): Alternate between black and the black and green.
Rows 31 – 39 (9 rows): Alternate between black and solid green
Continue repeating the rows in this manner. (Essentially the solid green rows will always be 9, and the black and green rows will alternate between 9 and 3.) The black and charcoal will be used throughout the entire blanket and run through every row. After you finish doing the three rows of black and green 3 times, do one more 9 rows of solid green and you are finished.
Weave in all the ends before you start the border.
Border
I simply worked 5 rows of SC around the entire blanket, working 3 SC into each corner. I would join each round with a slip stitch, chain one and turn. I preferred pulling up a loop into any side of the blanket. But you can pull up a loop and start anywhere. I used the black and charcoal for the border.

This crochet plaid blanket looks so great after you block it. I hand washed mine and then rolled it in a towel to get as much water out as possible, then laid it out on a foam mat and secured the ends with pins, making sure the stripes were straight.

Feel free to make your own pattern of stripes. You don’t have to use as much black as me. I think the important detail is having black run through the blanket and have in alternate with the greens. I did a swatch using black and green for a solid row, no alternating, and it does not look good. But the vertical striping is completely flexible. Make your crochet plaid blanket what you’d like! If you’re looking for more ideas, I also have several gingham patterns in pink, light pink, purple, red, grey and black and white! Click on the colors or find them all here!
Thanks for stopping by, I hope you’ll come and find me on Instagram or Facebook. I’m called Daisy Farm Crafts on both platforms. And share this on Pinterest if you’d like! Get it on your wall so you don’t lose the pattern. Also, if you chose to purchase the PDF version, thank you very much! I really appreciate it. I appreciate you just being here too!
Tiffany
Click here or on image below for printable pattern