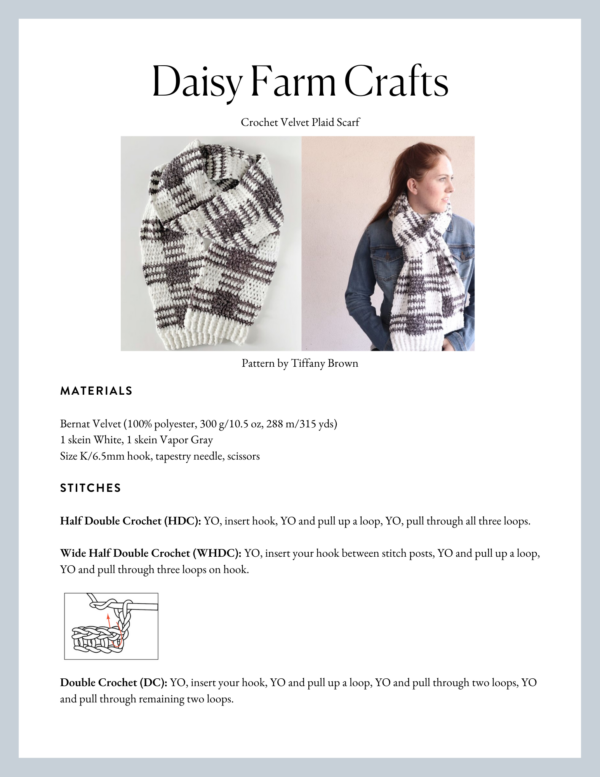
This project started as a practice swatch of a new way to create my gingham stitch technique. I wanted to see if instead of combining two balls of color together to create the third color, I could just make the rows striped. And then, I kept going with my swatch and it turned into a scarf because I really liked the look and I thought it looked great.

So look really closely at the picture above. I still am carrying yarn through the rows, and switching colors when needed. Now look even closer so you can see that there are bits of the grey showing through the white. I decided it added to the look I was going for and it didn’t bother me. I just want to warn you about it because I do hear from some of you wondering if it’s normal to see the yarn being carried. In this instance, using this yarn, yes, you will see the yarn being carried.
Plus, carrying this velvet yarn did not seem to add any bulkiness or weight. It turned out to be a win-win for me.
Now, I need to beg your forgiveness for this pattern. Just after I finished making it, I knew that it needed to be gifted to my Aunt who just had lost her daughter. I wanted to bring it to her and hope that something soft and warm would bring her comfort and let her know how much I love her.
So what that means is that I gave it away without measuring the length or width. You will have to make it as long as you wish. I do know that you only will need one ball of white and one ball of the gray.

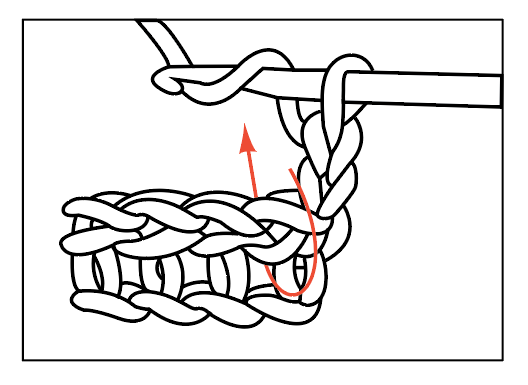
In the above picture, notice how I finished the ends of the scarf. This is a ribbing stitch which is alternating front post and back post double crochet. If you have never seen this stitch before, I have a quick video that will show you how it’s done. Don’t be afraid to try it. You just are inserting your hook around the posts of a regular double crochet and working a double crochet in a regular fashion.
Here’s the video:
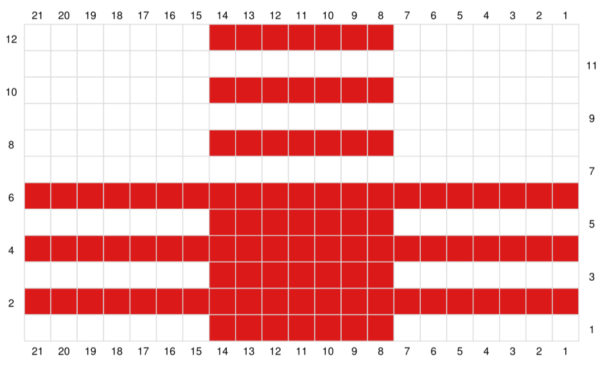
I have made a little graph to help you see the color changes. (Click on the picture to open a PDF you can print)
Materials
Bernat Velvet (100% polyester, 300 g/10.5 oz, 288 m/315 yds)
1 skein White, 1 skein Vapor Gray
Size K/6.5mm hook, tapestry needle, scissors
Stitches
Half Double Crochet (HDC): YO, insert hook, YO and pull up a loop, YO, pull through all three loops.
Wide Half Double Crochet (WHDC): YO, insert your hook between stitch posts, YO and pull up a loop, YO and pull through three loops on hook.
Double Crochet (DC): YO, insert your hook, YO and pull up a loop, YO and pull through two loops, YO and pull through remaining two loops.
Front and Back Post Double Crochet (FPDC & BPDC): A front post DC means you insert your hook from front to back around the post of the next DC and work your DC. A back post DC means you insert your hook around the post from the back to the front and work a DC.
Pattern
With white, chain 23.
Row 1: In the 3rd chain from the hook, half double crochet (HDC). HDC in each of the next 6 chains for a total of 7 HDC, however before finishing the last step of the HDC stitch, pull through with your colored yarn. HDC in each of the next 7 chains, carrying the white through the row and pulling through on the last step of the seventh HDC with white. HDC the last 7 chains, changing color in the last step of the last HDC. CH 2 and turn. (21 stitches)
Row 2: Bringing the white around the end of the row and still working with color, work WHDC, making sure you are crocheting over the white and bringing it along with you. Work WHDC in each space, the last stitch being worked between the last post and the turning chain, also pulling through on the last step of the stitch with white.
Row 3: Work the first 7 stitches with white, the next 7 with color, the last 7 with white, carrying yarn, changing colors always in the last step of the stitch, and always working your WHDC.
Row 4: Repeat Row 2.
Row 5: Repeat Row 3.
Row 6: Repeat Row 2.
Row 7: Work the entire row in all white, carrying the color along with you. Ch 2 and turn.
Row 8: work the first 7 stitches in white, work the next 7 in color, work the last 7 stitches in white.
Row 9: Repeat row 7.
Row 10: Repeat row 8.
Row 11: Repeat row 7.
Row 12: Repeat row 8.
For the remaining scarf, for as many rows as you wish, until you have the scarf as long as you wish, repeat rows 1 – 12.
Border
Work one DC into the tops of each HDC with white. CH 2 and turn. Next row, work alternating front post and back post DC around each of the DC posts, stopping at the CH 2. Work a DC under the CH 2, then CH 2 and turn. Repeat for 7 rows, or as wide as you wish.
Pull up a loop on the other end of the scarf and work DC into each stitch and make the ribbing as above.
Tie off and weave in all ends.
Tip: If you choose to work with velvet, it is slippery! When you are carrying the yarn, give the yarn being carried a tug before you change colors. But, it still will pop through here and there.
It’s a beautiful scarf when finished and very cozy.
If you’ve never carried yarn before, watching this video here might help you visualize it better:
Also, if you are unclear what I mean by working the HDC in between the posts I have a blog post that explains the technique. Click these highlighted words to see.

Thank you for stopping by! We are so happy that you have found our site. We are a mom and daughter team! I’m Tiffany and Hannah is my daughter. We love to share what we are making on our journey toward grandma-hood for me, and eventual mom-hood for Hannah!
You can read all about how we started Daisy Farm Crafts here if you are curious to learn more.
We are excited to be sponsored and using yarn from our friends at Yarnspirations.com. They sell the brands Caron, Bernat, and Paton, which I have been using for years, and to be able to work with them is a dream!
Come and find us on Instagram and share your finished work with us! If you have a public account and use the #daisyfarmcrafts on your post, I’ll be able to find them and share them in my stories! It’s so inspirational to see so many beautiful creations! Or, you can share them to my facebook page too!
Have a wonderful crochet day!
Tiffany
Click here or on image below for printable pattern