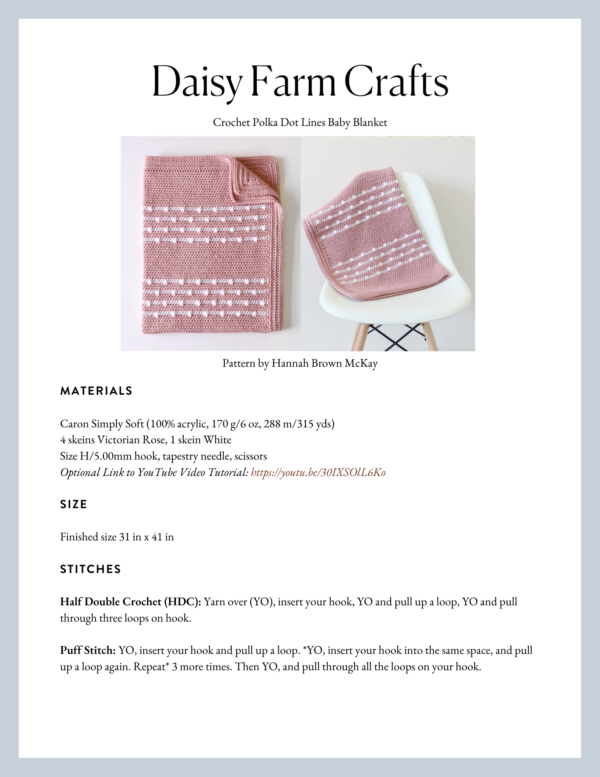
When I was experimenting with Bernat Velvet yarn for the first time, I wanted to make a blanket with dotted lines, but I wasn’t sure if I should alternate them or make them even. I ultimately decided to keep them even and created the Dotted Lines Velvet Blanket, but I was still curious how it would have turned out if the dots would have been off center, so I decided to make another version using Caron Simply Soft.
I had some of this lovely Victorian Rose yarn from our friends at Yarnspirations that I’ve been wanting to use and I’m excited to gift this blanket to a friend I made while we lived in North Carolina who is expecting a baby girl :).

This blanket uses half double crochet working in between the posts and a simple puff stitch. Thanks to my mom for working up a quick video demonstration of how to work these stitches! Watch below or click here to watch on YouTube.
Materials
Caron Simply Soft (100% acrylic, 170 g/6 oz, 288 m/315 yds)
4 skeins Victorian Rose, 1 skein White
Size H/5.00mm hook, tapestry needle, scissors
Size
Finished size 31 in x 41 in
Stitches
Half Double Crochet (HDC): YO, insert your hook, YO and pull up a loop, YO and pull through three loops on hook.
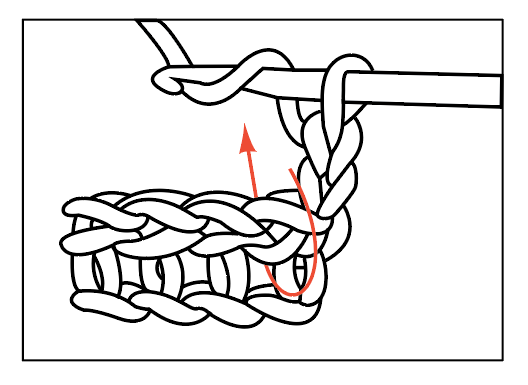
Wide Half Double Crochet (WHDC): YO, insert your hook between stitch posts, YO and pull up a loop, YO and pull through three loops on hook.
Puff Stitch: YO, insert your hook and pull up a loop. *YO, insert your hook into the same space, and pull up a loop again. Repeat* 3 more times. Then YO, and pull through all the loops on your hook.
Pattern
Chain 97 with Victorian Rose. (To make your blanket bigger or smaller, chain any multiple of 6, then add 1.)
Row 1: Starting in the 3rd chain from the hook, work 1 HDC in each chain. Chain 2 and turn.
Rows 2 – 15: Work 14 more rows of WHDC in Victorian Rose. Chain 2 and turn at the end of each row. On row 15, pull through with White on the last stitch (you should have 3 loops on your hook when you pull through). Chain 2 with White and turn.
Row 16: With White, work 1 WHDC in each of the first 5 spaces, then 1 puff stitch in the next space. After you complete your puff stitch, work 5 more WHDCs, then another puff stitch. Continue the pattern of 5 WHDCs, puff stitch, until you reach the end of the row. You should end with 5 WHDCs. On the last stitch of the row, pull through with Victorian Rose. Chain 2 and turn.
Rows 17 – 19: Work 3 rows of WHDC with Victorian Rose, chaining two and turning at the end of each row. (When you are crocheting over the puff stitches, you still want to work in between the posts, so just treat them like they are normal WHDCs and insert your hook on either side of them.) On the last stitch of row 19, pull through with White. Chain 2 and turn.
Row 20: Work 1 WHDC in each of the first 2 space, then 1 puff stitch in the next space. Then work 1 WHDC in each of the next 5 spaces, then 1 puff stitch in the next space. Repeat the pattern of 5 WHDCs, 1 puff stitch, until you reach the end of the row. This time you should have two WHDCs left when you reach the end of the row. Pull through with Victorian Rose on the last stitch. Chain 2 and turn.
Rows 21 – 23: Work 3 rows of WHDC with Victorian Rose, chaining two and turning at the end of each row. On the last stitch of row 23, pull through with White. Chain 2 and turn.
Row 24: Repeat row 16.
Rows 25 – 27: Work 3 rows of WHDC with Victorian Rose, chaining two and turning at the end of each row. On the last stitch of row 27, pull through with White. Chain 2 and turn.
Row 28: Repeat row 20.
Rows 29 – 43: Work 15 rows of WHDC in Victorian Rose.
Repeat rows 16 – 43 until you have four sets of white stripes and you end with 15 rows of Victorian Rose, or until you reach your desired length. When I finished my blanket, I wove in all my ends with a tapestry needle.

Border
For the border, I used another variation of HDC that we like to call Modified HDC, but we’ve also heard it called HDC front 2 loops only. Basically, you are working a normal HDC, but you are inserting your hook up through the 2 front loops instead of the two top loops.
Below is a video if you’d like to see how where to insert your hook for this stitch, or you can also watch the video at the beginning of this post that gives a quick demonstration of how to do the border.
To start the border, pull up a loop in any corner and chain 2. Work one regular HDC per stitch around the entire blanket, working 3 HDCs into each corner space. When returning to the starting corner, work two HDCs and slip stitch to the starting ch 2. CH 2 and turn.
Work one Modified HDC per stitch around the entire blanket, working 3 Modified HDCs in each corner. When returning to the starting corner, work two Modified HDCs and slip stitch to the starting ch 2. CH 2 and turn.
Work the border for a total of 4 rounds, or as many times as you desire. Slip stitch into final space and tie off and weave in the ends.
When I finished my blanket I laid it out flat and used a spray bottle filled with water to get it just wet enough to block it and spread the corners out evenly and left it overnight to dry.

Thanks so much for coming to read this pattern, I hope you enjoy making this blanket! When you finish your project, please come share a pictures with us on Facebook or Instagram using #daisyfarmcrafts, we’d love to see!
xo, Hannah

Click here or on image below for printable pattern