At this point, you may as well call it obsessed. I cannot stop creating new designs for gingham! I’m just so curious as to how each stitch will look while carrying yarn along. I am always thinking about what stitch might cover the yarn the best.
I’ve decided that if a gingham blanket has any drawback, that would probably be it. I wish there was a way to completely hide the yarn, but there isn’t, unless you want to make granny squares or long strips and join them together.

This is called tapestry crochet, and it gives me the seamless look that I like, and has limited the number of ends that would need to be woven in at the end of the project. For that reason, I’m willing to take the trade-off of little bits of color showing through.
Now, let’s talk about this stitch. I used a Herringbone Half Double crochet stitch.

I love how this stitch locked down the yarn being carried along right against the row. Work a few rows and you’ll see what I mean. (Because you yarn over and pull back through and then pull through the first loop on the hook, that made the yarn stay in the middle of the row, doing a better job of hiding it.)

Now I realize that this might be the first gingham blanket you are seeing! If this is so, and you need more information about how I am making this blanket, you need to read this post I wrote about How to Crochet a Gingham Blanket. I am hoping that will give you a great start into understanding how tapestry crochet works.
If you want more tips about gingham in general, then you might want to read this post about Frequently Asked Questions about Gingham Blankets That post might help clear up any concerns or confusion you might have.

These blankets really turn out so beautiful and actually are so much easier to make than you think! Don’t be afraid! My best tip is to do a practice swatch to learn how to carry the yarn and get your tension just right. You don’t want this to be too tight, or too loose. But with practice, in no time you will have it down.

And if you want to see the other gingham blankets I’ve made and shared the patterns for, you’ll want to read the post called 8 Free Gingham Blankets, (although there are nine or ten I think by now, I probably need to do an update on that post! But, you’ll get an idea of all the others I’ve made and you can choose from there.)
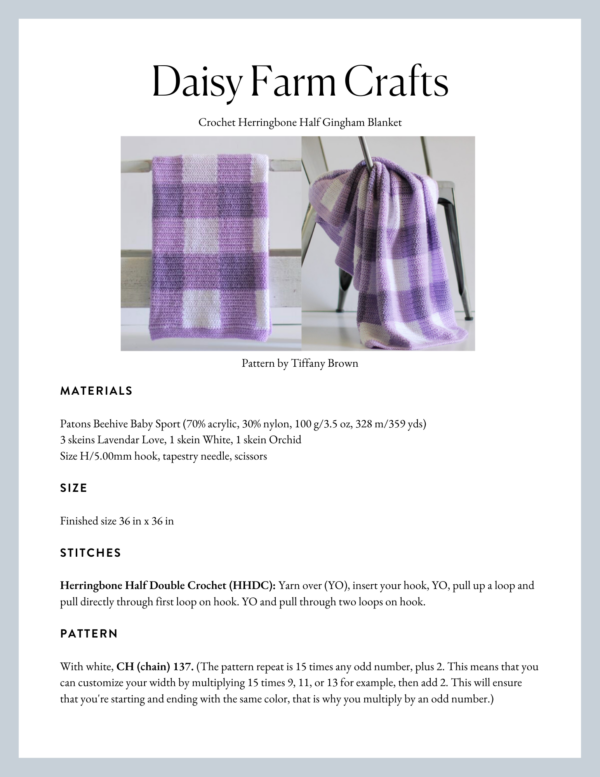
So let’s get to the details about this blanket!
Yarn! I used Patons Beehive Baby Sport from Yarnspirations.com. I have the opportunity this year to design a monthly project for them and I’d been eyeing this yarn ever since I made a pink gingham blanket using this very yarn. I noticed that they carried two shades of purple and knew that would look amazing for gingham.
But any size 3 weight yarn acrylic baby sport type yarn would be fine, just look for two shades that are pretty close in color. And if the acrylic has a bit of nylon in it, that seems to be even softer.
I used a size H hook and I use US terms when I explain this pattern.
Materials
Patons Beehive Baby Sport (70% acrylic, 30% nylon, 100 g/3.5 oz, 328 m/359 yds)
3 skeins Lavendar Love, 1 skein White, 1 skein Orchid
Size H/5.00mm hook, tapestry needle, scissors
Size
Finished size 36 in x 36 in
Stitches
Herringbone Half Double Crochet (HHDC): Yarn over (YO), insert your hook, YO, pull up a loop and pull directly through first loop on hook. YO and pull through two loops on hook.
Pattern
With white, CH (chain) 137.
(The pattern repeat is 15 times any odd number, plus 2. This means that you can customize your width by multiplying 15 times 9, 11, or 13 for example, then add 2. This will ensure that you’re starting and ending with the same color, that is why you multiply by an odd number.)
Row 1: In the 3rd chain from the hook, HHDC (Herringbone Half Double Crochet) and in the next 14 spaces for a total of 15 HHDC, the chain 2 at the first does not count as a stitch now and throughout, it is simply a turning chain. Pull through with lavender before you finish the 15th stitch. Carrying the white along, work the next 15 chain spaces with HHDC. Keeping the lavender yarn forward, just before finishing the 15th stitch, pull through with white.
(Keeping one strand to the front and one to the back will keep the yarn from twisting. I’ll post a video at the end of this post if you are unclear as to how to do this.)
Repeat across the row working HHDC in each stitch, carrying along the color not in use and pulling through with the new color on each 15th stitch. Chain 2 and turn when you get to the end of the row, bringing the lavender around the end with you. The chain 2 does NOT act as a stitch, work your first stitch into the top of the last HHDC you made of the row below.
Repeat row 1, switching colors in the 15th stitch of each block until you have worked 12 rows total. However, pull through on the last stitch with lavender.
Row 13: Cut the white yarn, leaving a long tail to weave in later. With lavender, HHDC the next 15 stitches, pulling through with orchid on the 15th stitch. Continue switching with the new colors making sure the lavender, lighter purple, is being worked over the white blocks and the darker orchid color is being worked over the lavender blocks of color. CH 2 and turn when you get to the end of the row.
Rows 14 – 24: Repeat row 13. When finished with this block of colors, cut the darker orchid color. The lavender color will be used throughout the entire blanket.
Rows 25 – 36: Repeat row 1 colors.
Continue switching colors until you have 9 blocks of color high. Each block of color is 12 rows.
Border
Weave in all ends before starting the border. In any corner, pull up a loop with lavender and chain 2. In the same stitch, work 2 HHDC, work HHDC into the top of each HHDC on the ends and work a total of 15 evenly spaced as possible HHDC into the sides per block of color. Work 3 HHDC into each corner. When completing the round, slip stitch to the chain 2 starting chain, chain 2 and turn.
To start the next round work 2 HHDC into the same join stitch. Now work one HHDC in each stitch around and 3 HHDC into the middle stitch of each corner. Join with a slip stitch to complete the round, chain 2 and turn.
Work 5 rounds for the border. Slip stitch to finish and weave in the ends.

To get a nice finished look, lay the blanket out on a towel or foam mat. Pin into a square and use a spray bottle to get the blanket damp and workable. Massage and finger press your blanket into as straight as a shape as possible adjusting the pins as needed. Let air dry.
Then take a great picture of your beautiful blanket and share on the Daisy Farm Crafts facebook page! No pressure, but I sure would love to share your blanket with others! If you know how to post it to my wall, it’s easy for me to share with the group. It’s been so fun to see everyone’s beautiful work!
If you are on Instagram, share your blanket by using the hashtag #daisyfarmcrafts. I will share blankets up in Instagram stories every Sunday!

Here’s a video about keeping the yarn from twisting:
And if it won’t load, here is a link to the video on YouTube
Thank you so much for stopping by!
Tiffany
Click here or on image below for printable pattern