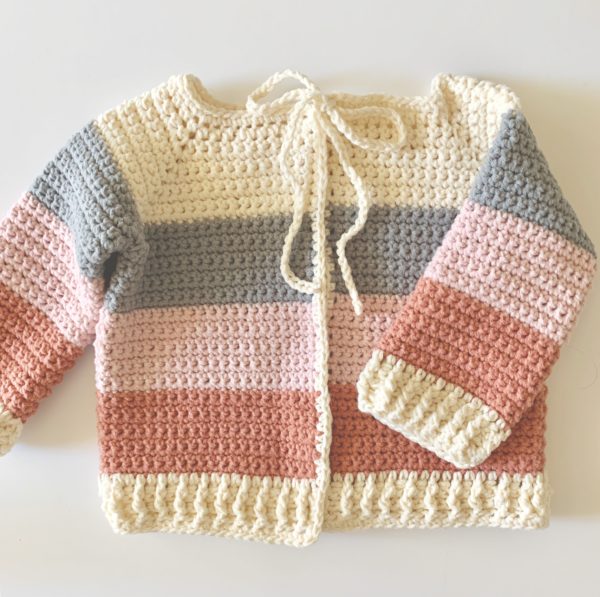
I’ve made three versions of this sweater using the same pattern, but different yarn for each one. I really wanted to experiment with yarn types to easily offer more sizes to this pattern.
This is the first one I made using Red Heart Amore:
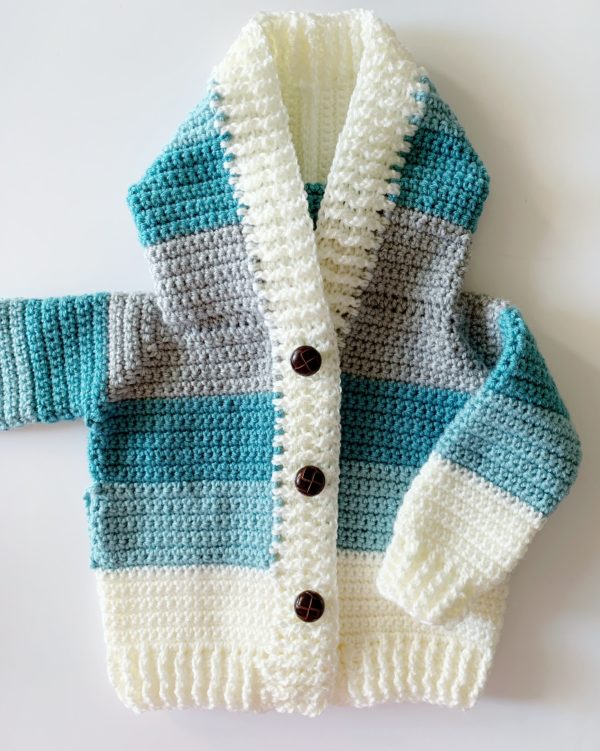
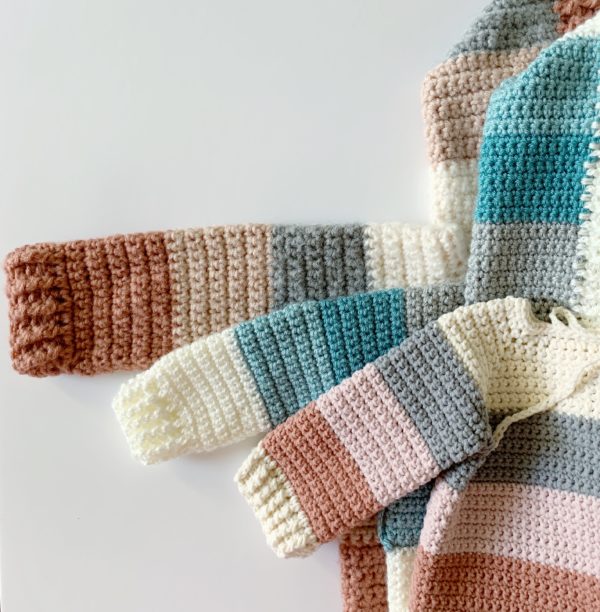
And here is another I made using a bulkier size 5 weight yarn Red Heart Dreamy:
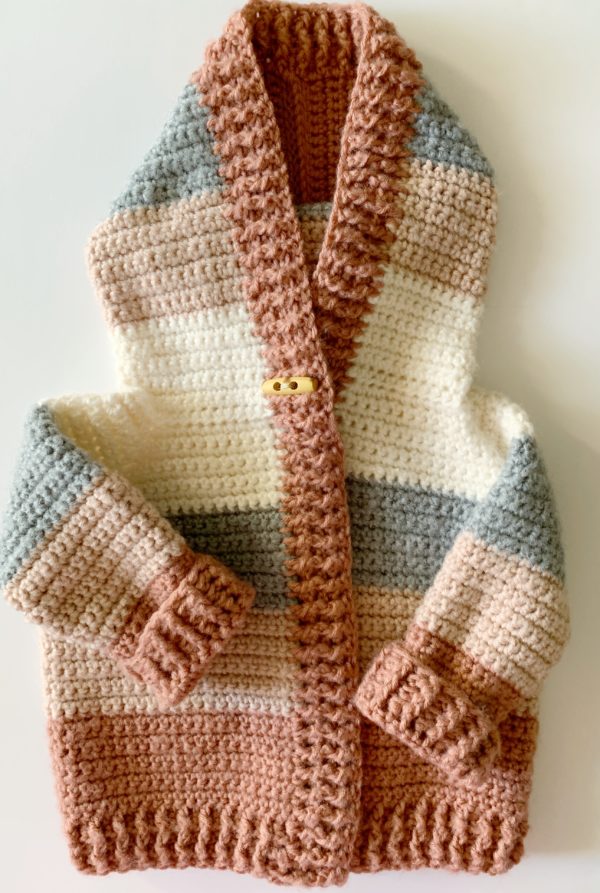
I was really surprised at how much bigger the bulky size 5 weight yarn increased the size of the sweater but happy I could get the pattern to work for an older child.
Here are ways to customize each sweater further. For instance, say you love the Red Heart Amore sweater but need it for a 12-18 month old child. What you need to do is take the child’s shoulder to shoulder measurement and when you are increasing and working on the neck area, work extra rows until you reach that measurement.
(I will say it helps if you are very familiar with the pattern first, I’d even suggest you make one as a practice and measure.)
Then you’ll want the measurement of the shoulder to the wrist, and neck to the waist. You’ll most likely be adding only two or three extra rows to achieve the extra length you need.
Also, you still could experiment with hook sizes with each yarn. You always can go up one size, (or down) to make the sweater just a bit bigger.
Overall, I really love this easy sweater so much and I loved working with each type of yarn. I left the hood off of the smallest version and substituted a tie closure instead of a button due to my choking concerns for small babies. Also, small babies are in car seats a lot and the hood adds bulk. You’ll probably have enough yarn leftover to make a hat instead.
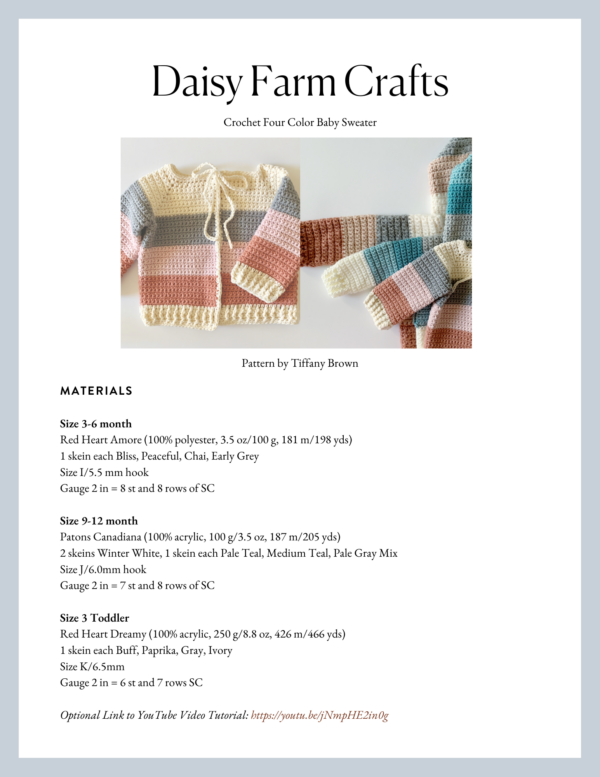
Materials
Size 3-6 month
Red Heart Amore (100% polyester, 3.5 oz/100 g, 181 m/198 yds)
1 skein each Bliss, Peaceful, Chai, Early Grey
Size I/5.5 mm hook
Gauge 2 in = 8 st and 8 rows of SC
Size 9-12 month
Patons Canadiana (100% acrylic, 100 g/3.5 oz, 187 m/205 yds)
2 skeins Winter White, 1 skein each Pale Teal, Medium Teal, Pale Gray Mix
Size J/6.0mm hook
Gauge 2 in = 7 st and 8 rows of SC
Size 3 Toddler
Red Heart Dreamy (100% acrylic, 250 g/8.8 oz, 426 m/466 yds)
1 skein each Buff, Paprika, Gray, Ivory
Size K/6.5mm
Gauge 2 in = 6 st and 7 rows SC
Stitches
Single Crochet (SC): Insert your hook, yarn over (YO) and pull up a loop, YO and pull through two loops.
Half Double Crochet (HDC): YO, insert your hook, YO and pull up a loop, YO and pull through three loops.
Double Crochet (DC): YO, insert your hook, YO and pull up a loop, YO and pull through two loops, YO and pull through remaining two loops.
Front and Back Post Double Crochet (FPDC & BPDC): A front post DC means you insert your hook from front to back around the post of the next DC and work your DC. A back post DC means you insert your hook from the back to the front and work a DC.
Pattern
Chain 58. (refer to each picture as to the color you start with. This sweater is worked from the neck down.)
Row 1: In 3rd chain from the hook, work 1 half double crochet (HDC). Work 1 HDC into each chain space (sp) across the row. Chain (ch) 1 and turn.
Row 2: In first stitch (st), work 1 single crochet (SC). Work 1 SC into the next 9 stitches (sts). Work 1 SC, CH 2, 1 SC, into next st. 1 SC into each of the next 7 sts. Work SC, CH 2, SC into next st. 1 SC into each of the next 18 sts. SC, CH 2, SC into the next st. 1 SC into each of the next 7 sts. Work SC, CH 2, SC into next st. 1 SC into each of the remaining 10 sts. CH 1 and turn.
Row 3: SC in each of the next 11 sts. “SC, CH 2, SC” into ch 2 sp. SC in each of the next 9 sts. “SC, CH 2, SC” into ch 2 sp. SC in each of next 20 sts. “SC, CH 2, SC” into ch 2 sp. SC in each of the next 9 sts. “SC, CH 2, SC” into ch 2 sp. SC in each of the remaining 11 sts. CH 1 and turn.
Row 4: SC in each of the next 12 sts. “SC, CH 2, SC” into ch 2 sp. SC in each of the next 11 sts.”SC, CH 2, SC” into ch 2 sp. SC in each of the next 22 sts.”SC, CH 2, SC” into ch 2 sp. SC in each of the next 11 sts.”SC, CH 2, SC” into ch 2 sp. SC in each of the remaining 12 sts. CH 1 and turn.
Row 5: SC in each of the next 13 sts. “SC, CH 2, SC” into ch 2 sp. SC in each of the next 13 sts.”SC, CH 2, SC” into ch 2 sp. SC in each of the next 24 sts.”SC, CH 2, SC” into ch 2 sp. SC in each of the next 13 sts.”SC, CH 2, SC” into ch 2 sp. SC in each of the remaining 13 sts. CH 1 and turn.
Row 6: SC in each of the next 14 sts. “SC, CH 2, SC” into ch 2 sp. SC in each of the next 15 sts.”SC, CH 2, SC” into ch 2 sp. SC in each of the next 26 sts.”SC, CH 2, SC” into ch 2 sp. SC in each of the next 15 sts.”SC, CH 2, SC” into ch 2 sp. SC in each of the remaining 14 sts. CH 1 and turn.
Row 7: SC in each of the next 15 sts. “SC, CH 2, SC” into ch 2 sp. SC in each of the next 17 sts.”SC, CH 2, SC” into ch 2 sp. SC in each of the next 28 sts.”SC, CH 2, SC” into ch 2 sp. SC in each of the next 17 sts.”SC, CH 2, SC” into ch 2 sp. SC in each of the remaining 15 sts. CH 1 and turn.
Row 8: SC in each of the next 16 sts. “SC, CH 2, SC” into ch 2 sp. SC in each of the next 19 sts.”SC, CH 2, SC” into ch 2 sp. SC in each of the next 30 sts.”SC, CH 2, SC” into ch 2 sp. SC in each of the next 19 sts.”SC, CH 2, SC” into ch 2 sp. SC in each of the remaining 16 sts. CH 1 and turn.
Row 9: SC in each of the next 17 sts. “SC, CH 2, SC” into ch 2 sp. SC in each of the next 21 sts.”SC, CH 2, SC” into ch 2 sp. SC in each of the next 32 sts.”SC, CH 2, SC” into ch 2 sp. SC in each of the next 21 sts.”SC, CH 2, SC” into ch 2 sp. SC in each of the remaining 17 sts. CH 1 and turn.
COLOR CHANGE
Row 10: SC in each of the next 18 sts. “SC, CH 2, SC” into ch 2 sp. SC in each of the next 23 sts.”SC, CH 2, SC” into ch 2 sp. SC in each of the next 34 sts.”SC, CH 2, SC” into ch 2 sp. SC in each of the next 23 sts.”SC, CH 2, SC” into ch 2 sp. SC in each of the remaining 18 sts. CH 1 and turn.
Row 11: SC in each of the next 19 sts. “SC, CH 2, SC” into ch 2 sp. SC in each of the next 25 sts.”SC, CH 2, SC” into ch 2 sp. SC in each of the next 36 sts.”SC, CH 2, SC” into ch 2 sp. SC in each of the next 25 sts.”SC, CH 2, SC” into ch 2 sp. SC in each of the remaining 19 sts. CH 1 and turn.
(Join for the armholes in row 12. This is where you could add a row or two to add for size, before you join the armholes.)
Row 12: SC in each of the next 20 sts. Work one SC into the ch 2 space, CH 2, skip over the next 27 stitches to the next ch 2 space, work one SC into the chain 2 space. (This will form an armhole). SC into each of the next 38 sts. Work one SC into the ch 2 space, CH 2, skip over the next 27 stitches to the next ch 2 space, work one SC into the chain 2 space. (This formed the second armhole.) SC in each of the remaining 20 sts. CH 1 and turn.
Row 13: SC into each st, including 2 SC around the ch 2 spaces. (86)
Rows 14-20: SC into each st, CH 1 and turn. (86)
COLOR CHANGE
Rows 21-30: As rows 14-20 with pink (86)
COLOR CHANGE
Rows 31-40: As rows 14-20 with mauve. (86)
RIBBED BOTTOM OF SWEATER:
ROW 1: Chain 3 and turn.(Turning chain counts as first stitch) DC into next st and into each stitch across the row. (85 DC plus turning chain)
ROW 2: Chain 3 and turn. Front Post Double Crochet (FPDC) around next stitch. Back Post Double Crochet around the next stitch. Alternate FPDC and BPDC around each stitch across the row. End the row with one DC worked underneath and around the turning chain.
SLEEVES:
With the color matching the armhole.
Look at the “v’s” of the stitch and make sure you will be working into them as if you just turned the work.
Round 1: Insert your hook in between the 2 SC under the arm. Pull up a loop and chain 1. Single Crochet 3 together (SC3tog) across the next space under the arm and the next 2 spaces working towards the first sc stitch. (The last leg of your sc3tog will be into the top of that first sc stitch.) Work 1 SC into each of the next 25 sts. SC3tog across the next stitch and two more spaces, the final leg will be in the starting ch 1 space where you pulled up a loop. Join with a slip stitch to the first SC. CH 1 and turn.
Round 2: SC into each of the next 27 sts. Join with a slip stitch to the starting SC. Ch 1 and turn.
Rounds 3 – 8: As round 2 with Grey. Rounds 9-18 with Pink, Rounds 19-28 with Paprika
RIBBED WRIST:
Round 1: *SC2tog over next 2 stitches, one SC in each of the next 4 stitches. Repeat from * around. End with SC2tog over 2 stitches, 1 SC. Join with slip stitch, chain 3 and turn.
Round 2: DC in each stitch around (22 DC and 1 Chain 3).
Rounds 3 – 5: Work alternating FPDC and BPDC around each post skipping the ch 3 turning ch. Do not turn, continue alternating FPDC and BPDC around for 3 rounds, keeping the stitches aligned on the same side of fabric of the row below. Slip stitch on the final round to beginning st. and tie off.
Weave in all ends.
FINISHING FOR THE SMALLEST SIZE:
Pull up a loop in the front bottom corner, ch 1 and sc in that space. SC into each space around the entire sweater, including each space around the neck and working 3 sc’s into each corner. Slip stitch to starting sc, tie off.
Pull up a loop in top neck edge and chain about 15 inches. Tie off and secure the ends. Repeat of the other side of the neck.
HOOD:
ROW 1: With Ivory, pull up a loop in front corner of the neck. CH 1 and SC into that first stitch. 1 SC into each stitch along the bottom of the starting chain, which is the neck edge. CH 1 and turn.
ROWS 2 – 40: Work SC into each stitch working your color changes every 10 rows.
After all the rows are worked, fold the sides together and slip stitch or sew together creating the hood.
Weave in all the ends before starting the ribbing.
RIBBING AROUND THE FRONT AND HOOD:
Start in the bottom front corner by pulling up a loop and chain 2. Work one DC in each space at the end of each row as you work up one side of the sweater, around the hood and down the other side of the sweater. Chain 2 and turn.
Rounds 2 – 5: Work alternating front post and back post double crochet around each DC. At the end of Round 5, tie off and weave in all ends.
Attach buttons, the ribbing is natural button holes, I like the toggle style the best.
If you need a video tutorial, please watch below:
Thank you for stopping by! I just love sharing what I’m making as I hopefully will be a grandma someday! I’m getting lots of crochet practice! We have a facebook group if you want to connect with others making Daisy Farm patterns. Come and find us and share your makes, we’d love to see!
xo, Tiffany

Click here or on image below for printable pattern