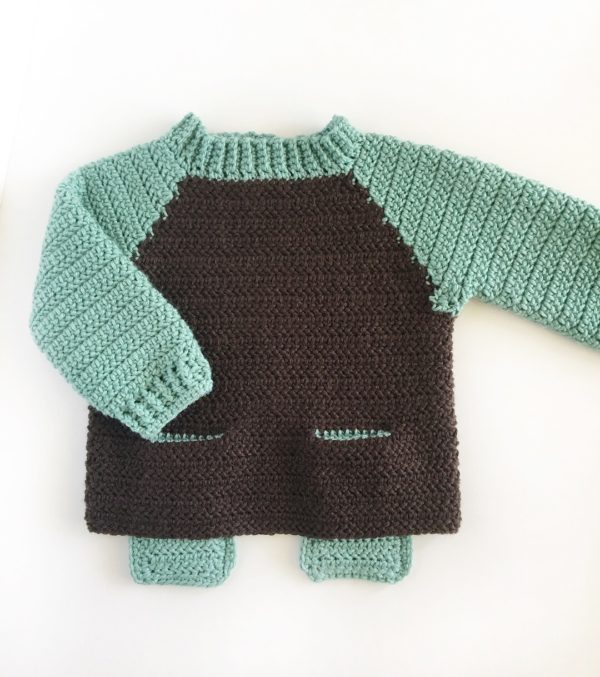
Have you crocheted a hat using back loop single crochet to make the brim? That’s how the neck on this crochet two pocket baby sweater is worked. Have you learned how to change colors while working a corner to corner blanket? That’s the technique I use for the color changes around the yoke. Do you know how to join the work under the arms to make the armholes? I use that technique too. And lastly, do you know how to work the herringbone half stitch (HHDC)? If so, you are ready to make this sweater.
(A few more skills that will be helpful to know: working HHDC together to decrease in the area under the arm, and also front post and back post DC to work the ribbing around the cuffs.)
The instructions and pattern make a size 2 toddler sweater. Suggestions to make it a different size would be to change the yarn weight and hook size. I made a second sweater with a light (3) yarn and it turned out to be a 3-6 month size. You also could make the collar larger and evenly space your stitch markers and work the pattern on your own.
Here is a YouTube clip of the Herringbone Half Double Crochet as a refresher: (This will show you how I’m using it in a blanket I’ve made, so disregard the turning instructions, just pay attention to how the stitch is made.)
Materials
This crochet two pocket baby sweater was made with Debbie Bliss Cashmerino aran in duck egg and chocolate. I used 4 balls of duck egg and 4 of chocolate. Other yarn types I’d recommend is I Love This Yarn from Hobby Lobby, (The sweater might turn out a bit larger with this yarn.) Or Caron Simply Soft.
Size I/5.5mm hook, tapestry needle, scissors
Stitch markers
Size
Finished size 2 toddler (US sizing)
Stitches
Single Crochet (SC): Insert your hook, yarn over (YO) and pull up a loop, YO, pull through two loops on hook.
Herringbone Half Double Crochet (HHDC): YO, insert your hook, YO, pull up a loop and pull directly through first loop on hook. YO and pull through remaining two loops on hook.
Pattern
(Tip: if you have chosen to work with a different yarn other than Debbie Bliss, you will need to have separate balls of yarn, about the size of your fist. Make 2 of Duck Egg and 3 of Chocolate)
Chain 6 with Duck Egg.
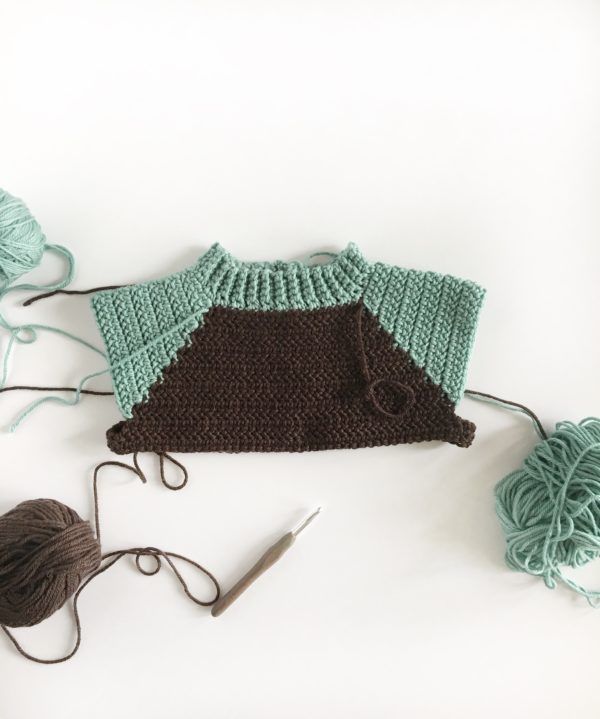
In the first chain from the hook and each chain across, work SC into the back loops. Chain 1 and turn. (5 SC) Repeat for 55 rows. Slip stitch the ends together to form a circle. Chain 1 and SC around the circle working one SC into each space. (56) pull up Chocolate in the last SC and cut off the duck egg.
With your stitch markers, mark 4 corners. The front and back will have equal amounts of stitches. The sides of the shoulders will match each other as well. It turns out roughly 20 for the front and back, and 10 for the shoulders. (18 in between the markers for the front and back, 8 in between the markers for the shoulders.) You will be working 3 HHDC into each corner.
With chocolate, chain 2, work HHDC to the first corner, work one HHDC in Chocolate, changing to Duck Egg for the middle stitch and the next, (in every corner you will be working duck egg for the middle stitch, remember you are working 3 HHDC into each corner), work with the duck egg to the next corner and change back to chocolate for the last stitch of the 3 HHDC in the corner. Leave the strand of duck egg behind (you will pick it back up on the next row.) Work across the front with Chocolate repeating the color changes for the next two corners. Join in the chain 2 turning chain, (this will always act as a HHDC) Chain 2 and turn.
Repeat the above for the next 13 rows. On the 14th row we will be joining for the armholes.
Tip: After you finish each round, take the time to untwist your yarn.
On the 14th row, you are done using the Duck Egg. HHDC in Chocolate in each stitch across to the first corner, work one HHDC into the corner, chain 6, skip over all the duck egg, forming the armhole, HHDC into the next corner space, and continue HHDC into each stitch around to the next corner. Skip over the next duck egg spaces to form the other armhole. Finish around to the beginning, slip stitch into the chain 2 turning chain, chain 2 and turn.

Work the body, (HHDC in each stitch, SL ST into turning chain, chain 2 and turn) in chocolate for the next 12 rows. On the 25th row you will be making the spaces for the pockets. You will need your stitch markers again.
Find the middle stitch in the front. A good way to do this is to look at the neck and find the middle stitch there and then find the middle stitch on the 25th row. Estimate the side stitch by laying the sweater flat and then evenly space your pockets using the markers. Make the pockets 10 chains wide.
On the 26th row, when you get to the first marker, chain 10 and skip over 10 HHDC and then HHDC into the marked space. HHDC to the next marked space, chain 10, skip over 10 HHDC, finish HHDC around, slip stitch into the top of the CH 2, CH 2 and turn.
Work HHDC into each stitch and into each of the 10 chains. Continue until you have 36 rows total or until you feel your sweater is long enough.
Sleeves
Tip: Pay close attention to which direction the stitches are going. You want to pull up a loop as if you had chained 2 and turned. This will ensure you are matching the work in the body.
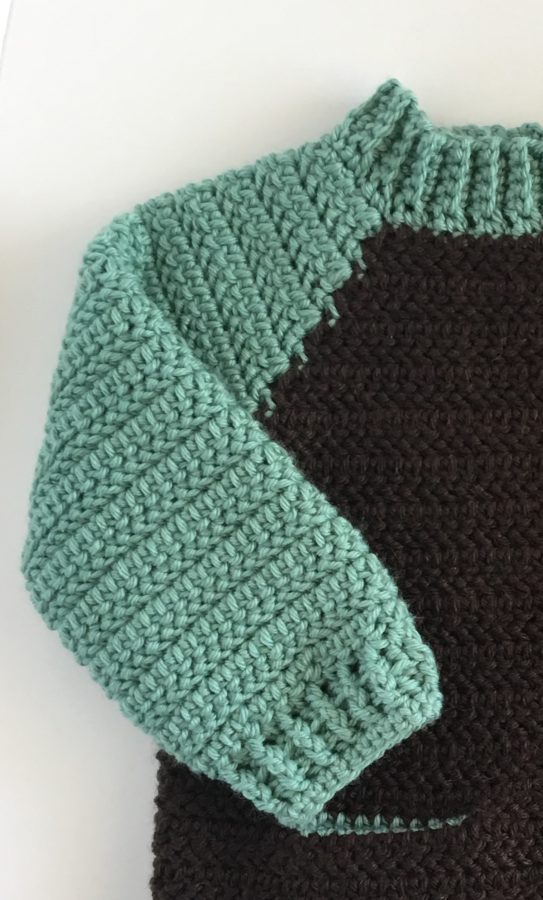
Pull up a loop in Duck Egg in the middle of the armpit, on the 6 chains. Chain 2. In the same space work 1 HHDC. HHDC together over the next 5 stitches, decreasing. Work HHDC 2 together over the next two spaces. HHDC into each stitch around stopping in order to mirror the start of the round with 2HHDCtog and 5HHDCtog, and 1 HHDC. Slip Stitch into the top of the HHDC (skip over the chain 2 just this round.)
Stop here and count how many stitches you have going around. The goal is to get it to 32. Figure out how many stitches you need to decrease to get it to 32 this round. Keeping in mind you need to mirror each side. So if you need to decrease the first three stitches, end by decreasing the last three stitches. Always end each round by slip stitching into the top of the chain 2, chaining 2 and then turning.
Work the sleeves for 17 more rows, or to however long you’d like. On the 18th row, decrease by working a pattern of HHDC2tog, HHDC into the next 3 stitches, repeating around. You want to reduce to about 26 stitches around.
On the next row, work one DC in each stitch around. Slip Stitch into the top of the turning chain, chain 3 and turn.
On the next row, *alternate FPDC with BPDC around, ending your last stitch as a slip stitch into the top of the turning chain, chain 3 and turn. Repeat * for the next row. Chain 1 and turn.
SC into each stitch around, slip stitch into the turning chain, tie off, weave in ends.

Pockets
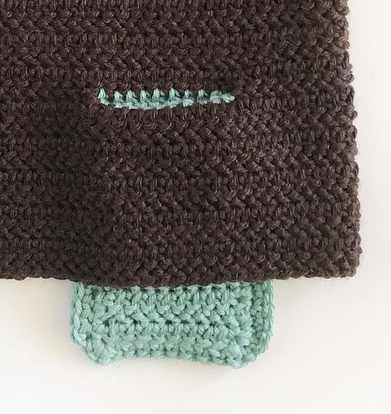
The pockets are constructed by making two flaps, one back and forth across the upper side, one back and forth across the lower side and then tucking them inside the hole and underneath the sweater, crocheting them together and finishing them with a round of SC.
Pull up a loop on the upper end of the pocket hole, chain 2. Work across ten stitches, chain 2 and turn. The chain 2 will count as the first HHDC in each row. Work back and forth for 13 rows. (or however many you need to have them hang lower than the bottom edge of the sweater.)
Pull up a loop on the lower end of the pocket hole, chain 2. Work across ten stitches, chain 2 and turn. The chain 2 will count as the first HHDC in each row. Work back and forth for 13 rows. Tie off.
Pull the flaps through the hole and to the inside of the sweater. Match the sides together, work around of slip stitch then chain 1 and work back through the slip stitch spaces a round of SC. Tie off and weave in the ends.
Do the same on the other side.

Done!
Congratulations of finishing this crochet two pocket baby sweater! And a big shout out to you if you could understand how I wrote it all down! Yahoo!
If there were some confusing bits, email me! I will help you out the best I can. It was easier than you thought to make though, wasn’t it? I bet yours turned out great! I’d love to see, so come and find me on Facebook or Instagram! Post a picture, use the #daisyfarmcrafts or leave a comment on my Facebook page. It’s so fun to connect.
Thank you for stopping by!
xo, Tiffany
