Hey there, it’s Nico, one of Tiffany’s daughters and this velvet throw is the first crochet blanket I’ve made!
About 3 months ago when I was visiting home one weekend, I attempted my first crochet stitch. My mom started out really easy with me and I just tried single crochet. I thought I would pick it up faster than I did but I am grateful that I spent time just practicing. I made swatch after swatch, taking them out every time because they were too tight or too loose or crooked all the way up and down. I think I did this 10 times and then finally did one that looked pretty even and wasn’t a complete lopsided mess.
Before I left my mom’s house I loaded up my suitcase with as much yarn as I could and when I got home I practiced again. I got about 25 rows in and realized my blanket looked like a Christmas tree skirt (which unfortunately is not good). So I took it allllll out again.
More practice. I loved the baby velvet so I was determined to figure out how I could make it right. Then my mom showed me that I could go between the loops for half double crochet.
A miracle! My rows straightened out and I was off to the races. I am not a planner when it comes to crafts. I like to do as I feel and just evaluate as I go. I picked colors and switched when I felt like it. I love the balance between large and small sections.
And now that I’ve finally got the hang of it, crochet is fun! You get to watch a lot of tv and keep your hands busy. 🙂 And you get an amazing blanket at the end. Win win!
My mom and sister have made a few blankets with Bernat Baby Velvet and while we’re still figuring out the best way to work with it, here’s a few FAQs that my mom wrote up from her latest Baby Velvet Diamond Blanket:
Is it hard to work with? Yes and no. We are finding that if you keep your tension tight, maybe by going down a hook size, it can help to keep loops from pulling loose. (You almost have to try it to see what I’m talking about.) Otherwise, it is very soft and smooth. Your hook glides through easily. The only other thing that is hard is that the yarn is prone to tangling, so we recommend avoiding pulling your yarn from the middle of the skein – instead pull it from around the outside.
Is it washable? Yes, it is washable. We put this finished blanket in a laundry bag, put it in the washing machine on delicate, and then laid it flat to dry. After it was dry it was in good condition. No new loops had pulled out. (The ones before washing still there, due to not keeping the tension tight.)
What is the best stitch to use? We have been experimenting a lot and so far we really like HDC worked in between each post and under all three loops the HDC makes. It is hard to see where to insert your hook into the tops of stitches with velvet. We also like the front post or back post DC. Any stitch basically that eliminates working into the top of a stitch is turning out to be our favorite.
How are you weaving in the ends? At first, we were doing it traditionally with a tapestry needle. But we also are noticing that within a ball of velvet ends are tied together into tight knots and if a color change is not needed, we are tying ends together by knotting it twice or more, then clipping it close and crocheting on. The knots are not noticeable with velvet. But there still are times where we need to weave them in and we are making the tails very very long and weaving in and out as much as possible to make sure they stay put.
Is it heavy when finished? The answer to this depends on the stitch you use. In general, if you use the half double crochet worked in between the posts, the blanket is slightly lighter than 4 weight acrylic. But if you use the front post and back post double crochet, the blanket is going to turn out heavier because that stitch makes a tighter, dense blanket and uses more yarn.
I hope that answers a few of the concerns you might have. These are things we have noticed working with velvet. In the long run, we have decided to overlook our loops that pull out here and there, because the blanket is so incredibly soft and luxe.

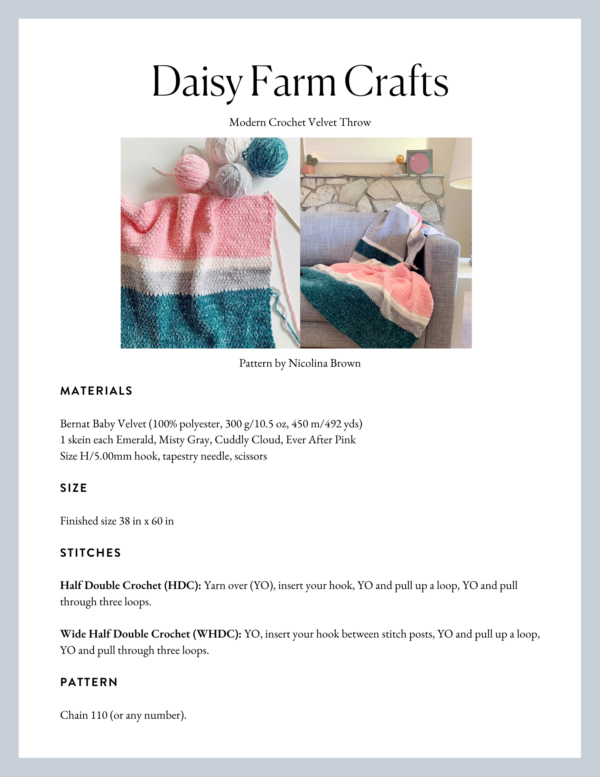
Materials
Bernat Baby Velvet (100% polyester, 300 g/10.5 oz, 450 m/492 yds)
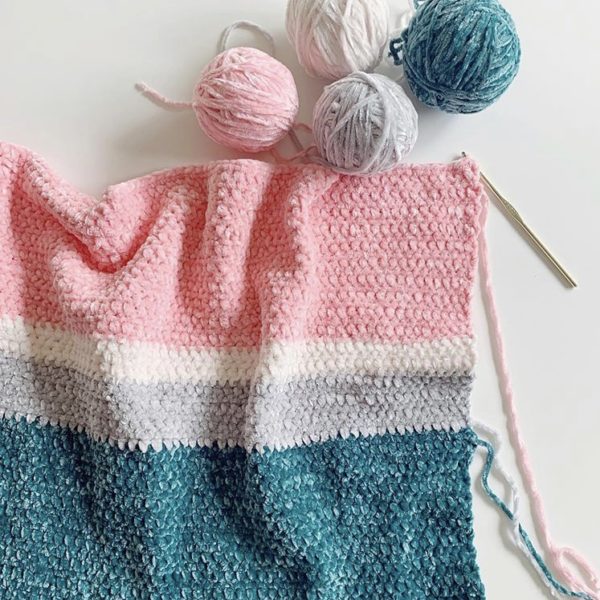
1 skein each Emerald, Misty Gray, Cuddly Cloud, Ever After Pink
Size H/5.00mm hook, tapestry needle, scissors
Size
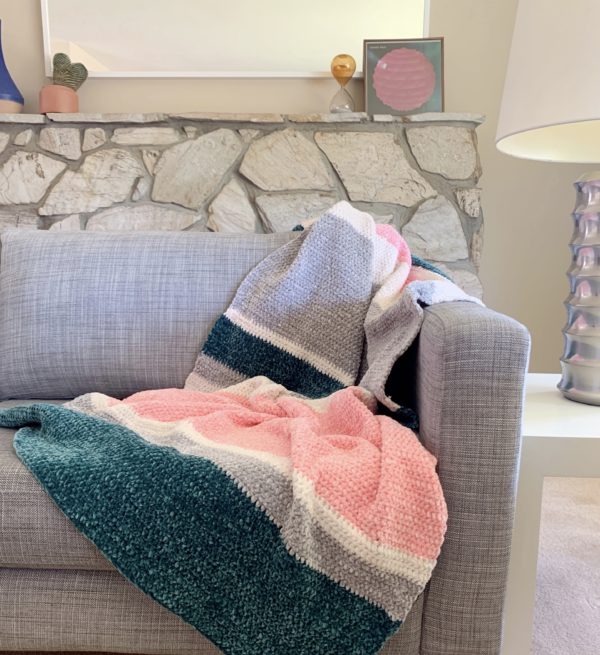
Finished size 38 in x 60 in
Stitches
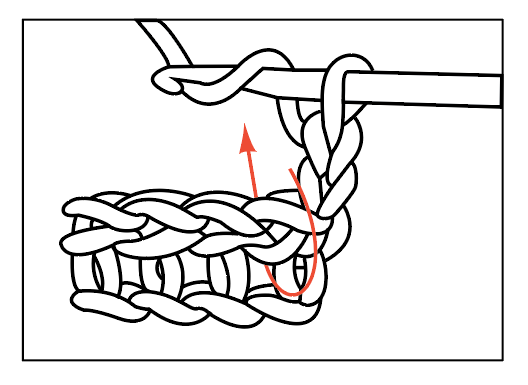
Half Double Crochet (HDC): Yarn over (YO), insert your hook, YO and pull up a loop, YO and pull through three loops.
Wide Half Double Crochet (WHDC): YO, insert your hook between stitch posts, YO and pull up a loop, YO and pull through three loops.
Pattern
Chain 110 (or any number).
Row 1: Starting in the 3rd chain from the hook, work 1 HDC in each chain. CH 2 and turn.
Row 2: Work 1 WHDC in each space across the row. Be sure not to miss the last space – between the last post and the turning chain. CH 2 and turn.
Repeat row 2 for the rest of the blanket. Always chain 2 and turn at the end of each row.
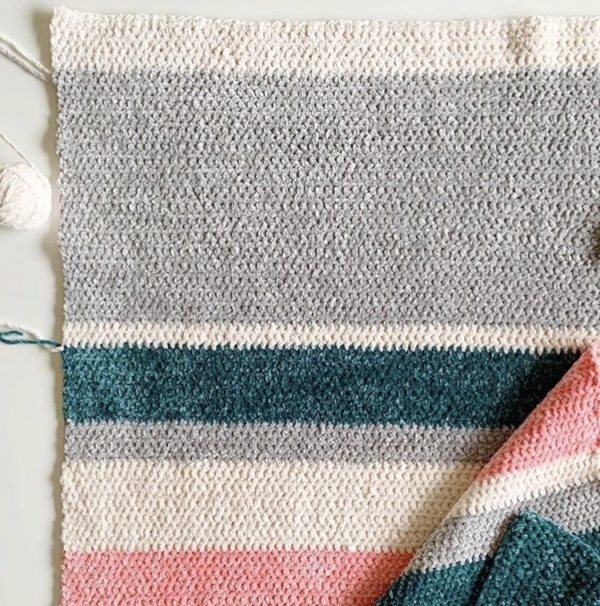
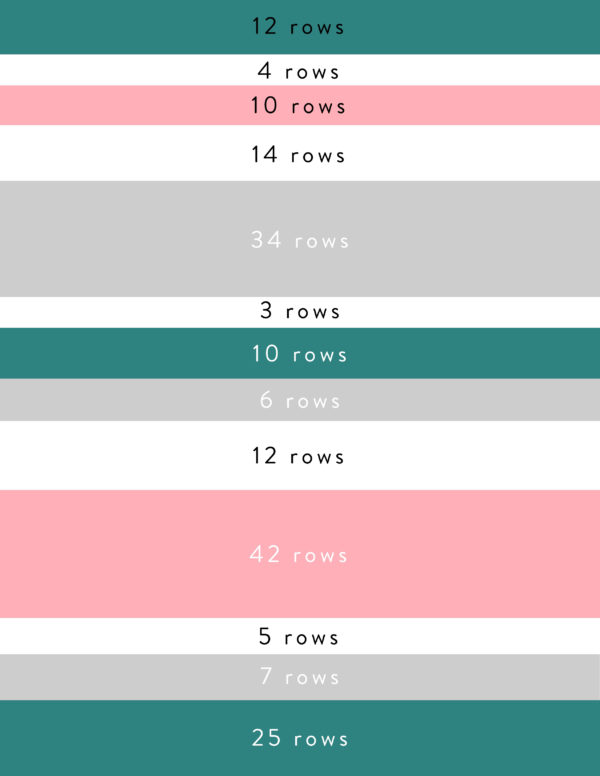
Here is the color pattern I used: 25 rows of Emerald, 7 rows of Misty Gray, 5 rows of Cuddly Cloud, 42 rows of Ever After Pink, 12 rows of Cuddly Cloud, 6 rows of Misty Gray, 10 rows of Emerald, 3 rows of Cuddly Cloud, 34 rows of Misty Gray, 14 rows of Cuddly Cloud, 10 rows of Ever After Pink, 4 rows of Cuddly Cloud, 12 rows of Emerald.
When switching colors, you want to pull through with the new color on the last stitch of the row, when you still have three loops on your hook. Pull through with the new color and chain 2 and turn. Then cut the old color, leaving about a 6 inch tail that you can weave into your blanket later.
When you’ve finished your blanket, tie off the last stitch and weave in all your ends with a tapestry needle.
Here’s a quick video to show you how to weave in ends:
Thanks so much for visiting Daisy Farm Crafts! I hope you enjoy making this blanket! When you’re finished with your project please come share a picture with us on Facebook or Instagram using #daisyfarmcrafts, we’d love to see!
Click here or on image below for printable pattern