It’s almost spring so my mind naturally turns to all things bunnies! I had my first baby on April 2, (Hannah, for those of you who follow along on Instagram and know her infertility story,) and I thought it would be fun to have a modern crochet bunny blanket added to the pattern library here on the farm and of course, always in hopes that maybe a springtime baby might join our family someday.
A while ago I saw a picture of a bunny peeking up from the bottom of the frame and I really liked the look. So, having a super talented graphic designer daughter as well, (she is baby number 2, who also is a spring baby) I asked my daughter Nicolina to see if she could make a bunny graph for me with my design in mind.
She whipped out a graph for me just like that. But, I had to do some tweaking to get the sizing all worked out. I knew I wanted to use Bernat Softee Chunky Baby yarn because I wanted this project to work up fast. (Big yarn will do that! It’s a 5 weight.) And I also wanted to work this as a graph-gan instead of Corner to Corner type of crochet. (It’s referred to as C2C in the crochet circles and one of the masters of it is Sarah over at RepeatCrafterMe.com, she also has an adorable C2C bunny blanket on her site you might want to check out too! Plus, she has great links for C2C tutorials if you are a beginner and want more instruction.)
It did take me three attempts to get it all sorted out. At first, I thought I might have to settle and have it just be a pillow, which still is an option for you if you like, just don’t make it as wide. But I really wanted this to be a blanket.

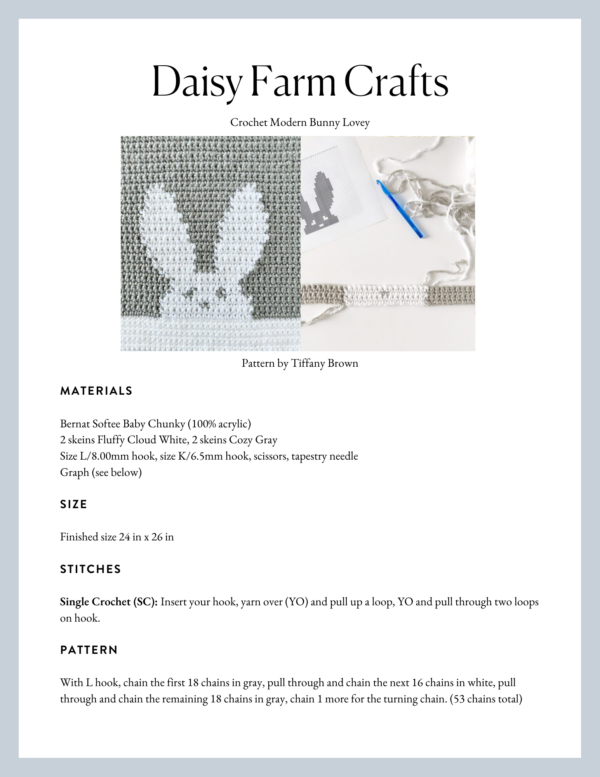
Notice in the above picture how the starting chain is the two colors. I didn’t start with an all gray base chain. I started the color change in the starting chain. The reason is I knew I was going to frame it with an all white border and I did not want a row of gray showing at the bottom. Also please note that I am carrying yarn through the bunny portion using the same method as my gingham blankets. This is called tapestry crochet. You’ll want to become very familiar with this technique before starting the blanket if you’ve never done this before.
Please watch this video of how to keep one color to the front of your work and one color to the back. This same technique is used in this blanket and you will find it very helpful.
Here’s one more picture of the bunny close up:

In this picture you can see how my decision to change colors in the base chain worked out. Of course, if you are not picky, and don’t mind having a row of gray in between the bottom of the bunny and the white border, then by all means, just make your base chain gray. In the long run, the little baby who ends up loving your blanket will never even know. Also if you look closely, you can see that I am carrying the gray yarn through the bunny portion but I am not carrying the white yarn through on either side of the bunny. I just drop the white yarn, finish the end of the row just using gray, turn the work, continue back toward the bunny with just gray and pick up the white yarn again when I get to the bunny.
Also note that if you choose to use this graph as a C2C, but use size 4 weight yarn, I’m estimating based on my other C2C’s I’ve done that your blanket would turn out somewhere in the 36 to 40 inch square range. If you use the chunky weight yarn, it will be even bigger.
Okay I think that is enough explaining, let’s get to the pattern.
Materials
Bernat Softee Baby Chunky (100% acrylic)
2 skeins Fluffy Cloud White, 2 skeins Cozy Gray
Size L/8.00mm hook, size K/6.5mm hook, scissors, tapestry needle
Size
Finished size 24 in x 26 in
Stitches
Single Crochet (SC): Insert your hook, yarn over (YO) and pull up a loop, YO and pull through two loops on hook.
Pattern
With L hook, chain the first 18 chains in gray, pull through and chain the next 16 chains in white, pull through and chain the remaining 18 chains in gray, chain 1 more for the turning chain. (53 chains total)
Now start following the graph working from the bottom up. The base chain row is not shown on the graph. Click either the picture or the link to print the pdf of the bunny graph
Use a Single Crochet (SC) stitch to work the graph.

When you are finished with all 52 rows, weave in all the ends that you have so far before you start the border.
Border
Change to a K size hook, (one size smaller) and start on a corner that will have you work down one side. Pull up a loop with the white yarn, and work one SC per row. Work SC-CH-SC into each corner. When you return to the starting corner, work one SC, CH and join to the first SC you made with a slip stitch, CH 1 and turn, and change back to your L size hook. Work one more SC into the corner space and now continue around in the opposite direction. Always work SC-CH-SC into the corner CH space.
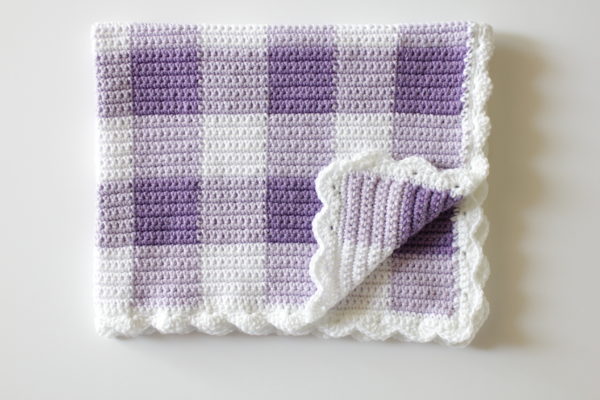
Hopefully, this method of switching to a smaller size hook for the first row of the border will help you make the border straighter. You are also free to put what ever border you wish. I think a shell border like the one worked in the purple gingham blanket would be nice,
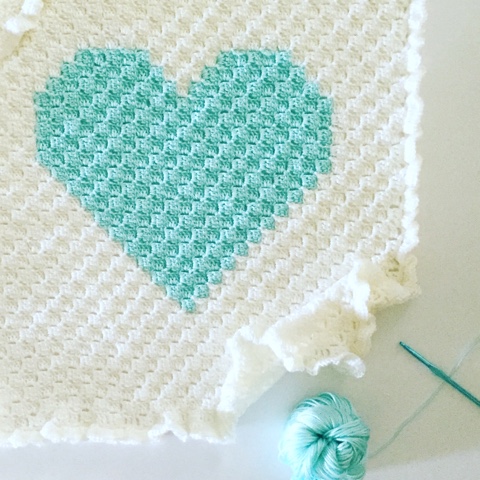
or the ruffle border that is worked in the C2C heart blanket would look really well too.
I hope your modern bunny lovey turns out amazing any way you choose to finish it! I’d love to see all the different colors you use too so share a picture of your completed blanket to my page on Facebook, or tag me on Instagram! I’d love to share with others your finished blanket. Sharing is so fun and gives others in the crochet community new ideas so don’t be shy!
Love to you all and thank you so much for being a follower of us here on the Daisy Farm!
xo,
Tiffany
P.S. We sometimes like to pair our blankets with books to give as gifts, and I think the *Runaway Bunny by Margaret Wise Brown would be a great accompaniment.
*as an Amazon associate, I earn from qualifying purchases.
Click here or on image below for printable pattern