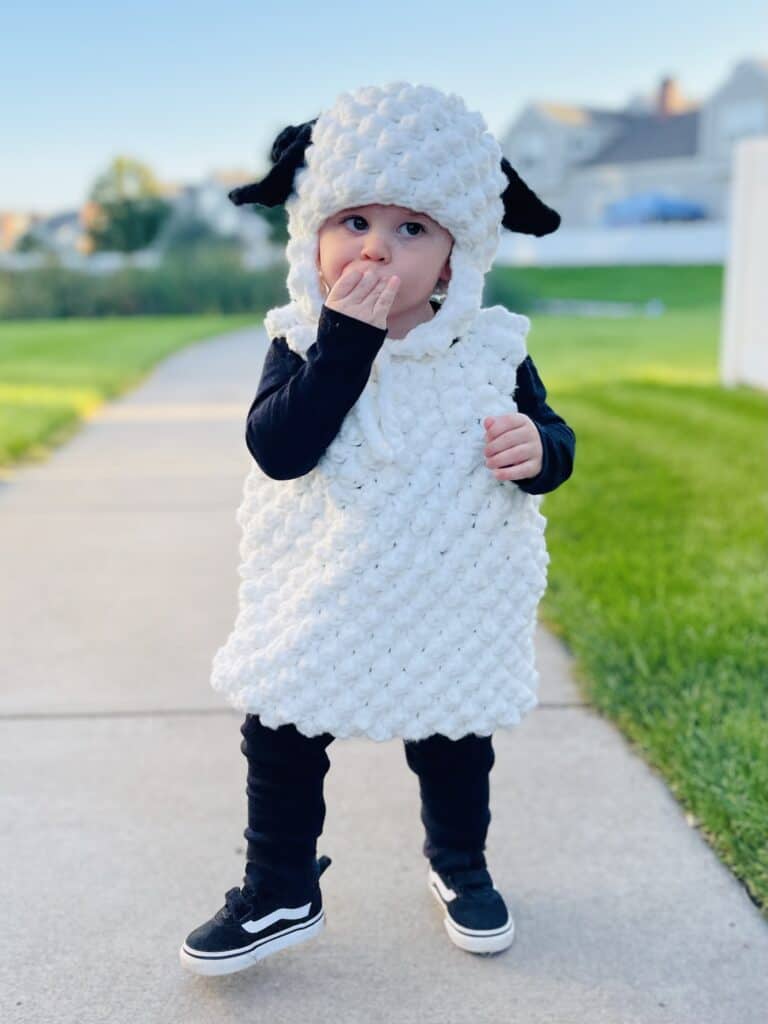
I would have to say, the number one reason I do love to crochet and am so glad I have been sharpening my skills through the years, is for this picture right here. I can’t believe I figured out how to crochet baby James a sheep costume!
I am having way too much fun as a grandma. My only wish was that I was able to fly over and try it on him myself. But as we were strapped for time, I made this and sent it over to Hannah and she was able to get photos for me so I can share them with you in hopes you’ll have time to make one before Halloween.
It took me only about a few days. The hat took longer than the body, but just because of paying attention to the increases.
I have shared sneak peeks on our Instagram and Facebook channels, and several of you commented that this would make an excellent costume for the Nativity plays this Christmas too, so I might be making more for my Nativity box.

The above photo is the first time she tried it on James and if you notice, it is sitting a bit wide across his shoulders. I had her weave a piece of yarn through the top stitches around the neck, and then tie it in a bow in the back to cinch it closed. And then it fit great.
And, before I sent it to her, I had Jack, who is almost 3 and wearing a 3t try it on and it fit him perfectly through the shoulders, I just would have needed to make it about 4 inches longer.
You also can make it wider if you’d like when you join for the armholes. You simply will add more stitches to the chain and then on the next round add more [bobble and SC] stitches.
I made a video tutorial for both the body and the hat, however, they are going to be separate. This post is for the body and a separate post is for the hat.
For the black undergarments, we purchased black leggings and a long-sleeved black t-shirt. Hannah already had black tennis shoes but black socks and black shoes can finish the look.
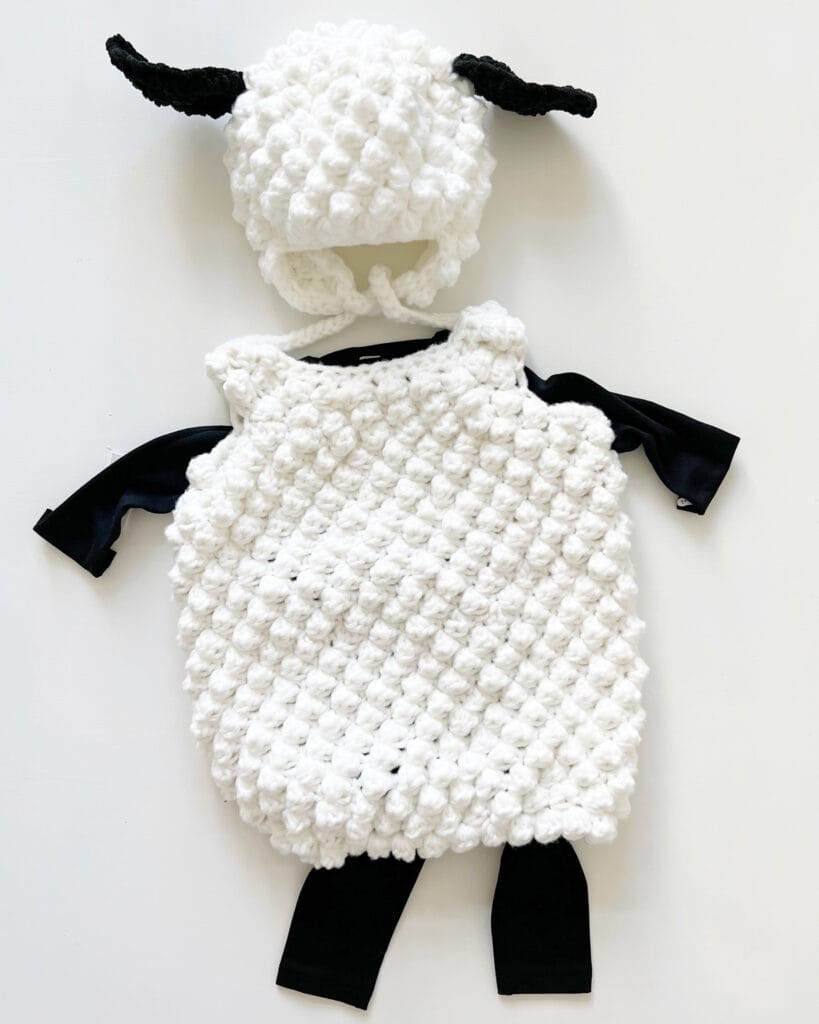
This is made with Bernat Forever Fleece yarn which is a super bulky 6-weight yarn. If you have trouble finding it, I think a nice substitute would be Bernat Blanket yarn.
This is made from the top down, you’ll start with a foundation HDC, and then work a few rows of increase, join for the armholes, and then work until you have enough length. Making it larger than 3T you’d have to increase for another round, but I’ve kept it as multiples of 5 so I think it would be easy to figure it out.
Please watch the video tutorial for extra help.
I can’t wait to see your little sheepies for Halloween!
Stitches
Double Crochet Bobble:*YO, insert hook, YO and pull up a loop, YO and pull through 2 loops. Repeat from * 2 more times, inserting hook into the same stitch each time. YO and pull through all loops on hook.
Single Crochet SC: Insert hook, YO and pull up a loop, YO and pull through 2 loops.
Foundation HDC: Chain 2. YO, insert hook into first chain. *YO and pull through one loop (this is the foundation chain), YO and pull through 3 loops (this is the HDC). YO, insert hook into the foundation chain. Repeat from *
Materials
Bernat Forever Fleece:(100% polyester, 280 g/9.9 oz, 177 m/194 yds)
Please tap name of yarn for more specs and to purchase on Yarnspirations.com
2 balls in White Noise for the body, 1 ball for the hat
Size 9 mm hook, tapestry needle, scissors, stitch markers, 1/4 inch elastic
pipe cleaners (for the hat)
Blanket Yarn in Black for the ears (More specs on the hat are in this post here)
Pattern
This pattern is worked top-down and in continuous rounds, joined, but no turning, after the increase rows, no joining.
ROW 1: Foundation HDC for 35 sts.
ROW 2: Mark every 7th stitch with a stitch marker, starting the counting from the first st. Begin in the first st with a SC. Bobble into the next stitch. Alternate SC and Bobble to each marked st. In each marked stitch work either SC, Bobble, or Bobble and SC, whichever will continue the pattern. You are always working alternating SC, Bobble. Mark the increase st after you make it. Join with a slip stitch to the first SC you made of the round. CH 1. (40)
(Tip: always mark the first SC you make each round.)
ROW 3: Every 8th stitch should be marked in this round when you marked the increase stitch in ROW 2. Begin the round with SC into the first SC of the round when you joined. Bobble into the next stitch. Alternate SC and Bobble to each marked st. Increase in each marked stitch as in Row 2. Join with a SL ST to the first SC of the round. CH 1. (45)
(For sizes larger than 3T, this is where you would continue increasing the rounds until you have the shoulder width needed. Just keep replacing the stitch markers in the increase st.)
ROW 4: (Joining for the armholes) Place stitch markers in st numbers 8, 15, 31, and 38. Begin the round with a SC. Bobble stitch into the next st. Alternate SC and Bobble to the first marked st. *CH 10, skip over all the stitches in between the next marker. In the next marked stitch, work SC (or next st in SC, Bobble pattern). Work the alternating SC and Bobble in each st to the next marked st. CH 10, skip over stitches to the next marker, work next st in pattern and alternate to the end of the round. Join with a SL ST to the first SC of the round. CH 1.
ROW 5: (Going forward for all remaining rows, Bobble will be worked into SC, and SC into Bobble) Begin in the first SC with a Bobble, SC into the next st. Alternate sts around, working 8 alternating stitches around the Ch 10 from the previous round that made the arm hole. (If you want more width in the body of the sheep, work 10 alternating stitches around the CH 10). Do not join at the end of the round. Work SC into the next Bobble of the round.
ROW 6 to the length needed: Continue working rounds until 16 inches in length from the neck down for about a size 24 months/2T.
Cut a piece of elastic the length of the circumference of the bottom, tie in a knot, then crochet over the elastic on the last round. Pull the elastic in tighter to puff the body out. Tie off and weave in the ends.
To cinch the neck in further, make a long chain, weave it in and out of the foundation chain of the neck and tie it in the back. (This will also help for smaller sizes.)
Please watch the video tutorial for more help:
Please tap here for the Hat pattern.
Thank you for stopping by!
Click here or image below for free printable pdf.
![]()