A few weeks ago I decided to make some holiday looking hot pads to give as gifts and I thought it would be fun to try some different designs using the Herringbone Half Double Crochet Stitch. Even though my mom has used this stitch in quite a few different projects, I’ve actually never used it before and it was a fun one to learn! It’s a simple variation of double crochet that makes the stitch tighter and makes a nice flat texture that I thought would work well for a hot pad.
As with most crochet, there are a few different ways you can work this stitch in terms of turning at the end of the rows and I explain each way below so you can choose which way you like best.

I love the look of this herringbone stitch when it is worked back and forth. The herringbone half double crochet flattens out a regular double crochet with one simple little change. You simply are yarning over, inserting your hook into the stitch, yarning over again and pulling through, but pull through the next loop too, (that is what is setting it apart from a regular double crochet.) Then, yarn over one more time, and pull through the remaining two loops on the hook. Chain 2 and turn at the end of every row.
When working this stitch I chose to count the chain 2 as a stitch, so when I started a new row, I worked into the 4th chain from the hook. Then when I got to the end I worked one stitch into the top of the turning chain of the row below. If you don’t like working into the top of the turning chain, you can choose to not count the chain 2 as a stitch and work into the 3rd chain from the hook when you are starting a new row. Then when you get to the end of the row you can just work into the last HHDC and turn.
Neither way is right or wrong, it just depends on your personal preference! I prefer to count the chain 2 as a stitch because it helps make my sides neater, and my mom prefers the other way because it allows her to work faster and she usually covers up her sides with a border anyway. If you’re not sure which way to choose, this is a great project to practice since it’s so small. If you want to my mom’s way of working the stitch, here is a video that shows how she turns and starts a new row:
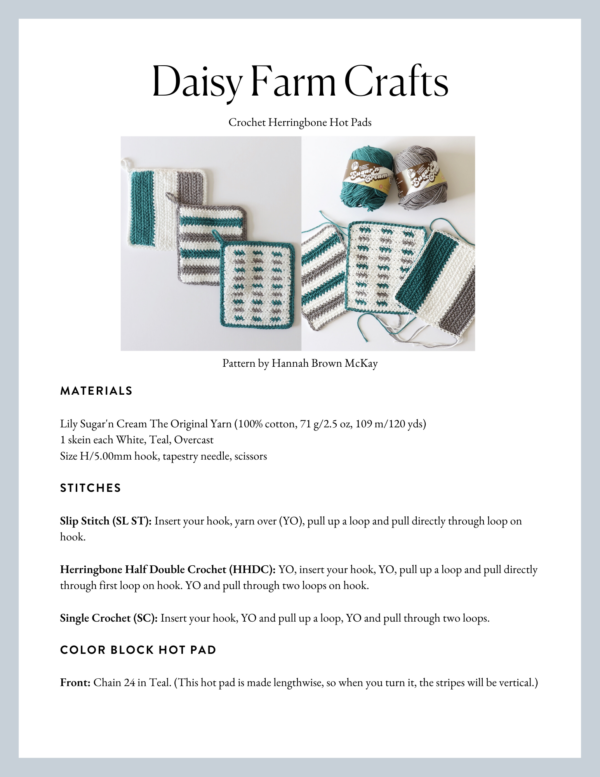
Materials
Lily Sugar’n Cream The Original Yarn (100% cotton, 71 g/2.5 oz, 109 m/120 yds)
1 skein each White, Teal, Overcast
Size H/5.00mm hook, tapestry needle, scissors
Stitches
Slip Stitch (SL ST): Insert your hook, yarn over (YO), pull up a loop and pull directly through loop on hook.
Herringbone Half Double Crochet (HHDC): YO, insert your hook, YO, pull up a loop and pull directly through first loop on hook. YO and pull through two loops on hook.
Single Crochet (SC): Insert your hook, YO and pull up a loop, YO and pull through two loops.
Color Block Hot Pad

Front: Chain 24 in Teal. (This hot pad is made lengthwise, so when you turn it, the stripes will be vertical.)
Work 6 rows of HHDC in Teal, chaining two and turning at the end of each row. When you get to the last stitch of the 6th row, pull through with White. Then chain 2 and turn.
Work 6 rows of HHDC in White, chaining two and turning at the end of each row. When you get to the last stitch of the 6th row, pull through with Overcast. Then chain 2 and turn.
Work 6 rows of HHDC in Overcast, chaining two and turning at the end of each row. When you finish the 6th row, tie off.
Using White, pull up a loop in any corner and chain one, then slip stitch around the edge of the square, chaining one when you get to the corners and making sure the side you want to be showing at the end is facing you. When you reach the corner you started with, slip stitch into the corner and tie off and weave in any loose ends.
Set the square aside.
Back: Chain 24 in White.
Work 18 rows of HHDC in White, chaining two and turning at the end of each row. When you finish the last row, tie off and weave in any loose ends.
Put the two squares together, making sure the correct sides are facing outward. Using White, pull up a loop in the corner where you’ll want your hanging loop to be at the end. Chain one, and single crochet the two squares together, placing your hook through the slip stitch border. Chain one when you get to each corner. When you get back to the corner you started with, slip stitch into the first single crochet, then chain 10. Slip stitch again into the first single crochet to make a loop to hang your hot pad.
Striped Hot Pad

Front: Chain 21 in White.
Rows 1-2: HHDC in White, chaining 2 at the end of each row.
Rows 2-4: HHDC in Overcast, chaining 2 at the end of each row.
Rows 5-6: HHDC in White, chaining 2 at the end of each row.
Rows 7-8: HHDC in Teal, chaining 2 at the end of each row.
Rows 9-10: HHDC in White, chaining 2 at the end of each row.
Rows 11-12: HHDC in Overcast, chaining 2 at the end of each row.
Rows 13-14: HHDC in White, chaining 2 at the end of each row.
Rows 15-16: HHDC in Teal, chaining 2 at the end of each row.
Rows 17-18: HHDC in White, chaining 2 at the end of each row.
Tie off and weave in any loose ends.
Using Overcast, pull up a loop in any corner and chain one, then slip stitch around the edge of the square, chaining one when you get to the corners and making sure the side you want to be showing at the end is facing you. When you reach the corner you started with, slip stitch into the corner and tie off and weave in any loose ends.
Set the square aside.
Back: Chain 21 in Overcast.
Work 18 rows HHDC in Overcast, chaining two and turning at the end of each row. When you finish the last row, tie off and weave in any loose ends.
Put the two squares together, making sure the correct sides are facing outward. Using Overcast, pull up a loop in the corner where you’ll want your hanging loop to be at the end. Chain one, and single crochet the two squares together, placing your hook through the slip stitch border. Chain one when you get to each corner. When you get back to the corner you started with, slip stitch into the first single crochet, then chain 10. Slip stitch again into the first single crochet so that it makes a loop to hang your hot pad.
Dotted Lines Hot Pad

(This hot pad uses tapestry crochet, which means on some rows you will be carrying the yarn as you work instead of cutting it. If you are not familiar with this type of crochet, you can watch a short video below that demonstrates the technique. The video is for a gingham blanket, but the technique of carrying the yarn is the same).
Front: Chain 22 in White.
Row 1: HHDC in White. Chain 2 and turn.
Row 2: *Work 3 HHDC in White. On the 3rd stitch, pull through with Teal. Work 3 HHDC in Teal, carrying the white across the top of your work and crocheting over it as you go. On the third stitch, pull through with white. Repeat* to the end of the row, where you’ll end with 3 white HHDC’s.
Row 3: Cut the Teal yarn, and work 1 row of HHDC in White.
Row 4: *Work 3 HHDC in White. On the 3rd stitch, pull through with Overcast. Work 3 HHDC in Overcast, carrying the white across the top of your work and crocheting over it as you go. On the third stitch, pull through with white. Repeat* to the end of the row, where you’ll end with 3 white HHDC’s.
Row 5: Cut the Overcast yarn, and work 1 row of HHDC in White.
Repeat Rows 2 through 5 until you have 19 rows total. The last row should be white.
Using Teal, pull up a loop in any corner and chain one, then slip stitch around the edge of the square, chaining one when you get to the corners and making sure the side you want to be showing at the end is facing you. When you reach the corner you started with, slip stitch into the corner and tie off and weave in any loose ends.
Set the square aside.
Back: Chain 22 in Teal.
Work 20 rows of HHDC in Teal, chaining 2 at the end of each row. When you finish the last row, tie off and weave in any loose ends.
Put the two squares together, making sure the correct sides are facing outward. Using Teal, pull up a loop in the corner where you’ll want your hanging loop to be at the end. Chain one, and single crochet the two squares together, placing your hook through the slip stitch border. Chain one when you get to each corner. When you get back to the corner you started with, slip stitch into the first single crochet, then chain 10. Slip stitch again into the first single crochet so that it makes a loop to hang your hot pad.
Here is the video that shows how to carry yarn while you crochet:
Thank you so much for coming to read this pattern! Whenever you’re finished with your project, I hope you’ll came share a picture with us on Instagram or Facebook, we’d love to see!
xo, Hannah

Click here or on image below for printable pattern