Recently, we shared a look back on 2016, and this blanket pattern was the most requested across all our socials, so we thought we’d re-share the post. Happy Crocheting! XO, Tiffany

Ahhh! Oh, how my obsession with gingham is continuing and I’m still so in love! I used the corner to corner stitch to work the center portion of this crochet gingham heart blanket and then added 6 rounds of a block stitch for a giant border.
Here’s why: working the gingham pattern, with the multiple color changes can be challenging. It is not beginner friendly, or sit with your work in your lap friendly either. It is sit-at-a-table, pay-close-attention, check and re-check the graph, friendly. In order to lessen my time sitting at the table, I opted to scale down my corner to corner portion to only one white block around the whole heart.
(Now, don’t look too close, but yes, I did make a mistake and failed to get one row of white blocks above the heart. I stopped increasing one short, and thought I could make up the difference with the border but I couldn’t. So that is why my heart looks closer to the top border. And oh how I wish I would have noticed the mistake right away, but it was ten rows too late and that is just past my willingness to undo.)
(And maybe here is a good place to introduce myself to you if you aren’t a regular follower on Instagram or Facebook. I’m sharing what I’m making in hopes to be a granny someday. I’m not a professional crochet designer, I just love crochet and creating the ideas I see in my head. I hope that one of these blankets I make and design will be THE ONE that catapults me into granny status, but until then, I’m just practicing, but also writing it all down in case maybe one of my daughters would like to replicate what I’ve done.)

I previously have written a post explaining how to start a corner to corner crochet blanket and you can read that here if you’d like. But, if that post does not help you out, I want to encourage you to go to Youtube and search for all the different videos that teach C2C crochet. Someone I’m sure has done a better job than I could at showing you how it works. And once you know the basics, then you will understand how I tweaked the stitch to create a bit thicker, and chunkier looking C2C blanket that you are seeing here.
I do have a video clip of the different way I am choosing to work the C2C for this crochet gingham heart blanket.
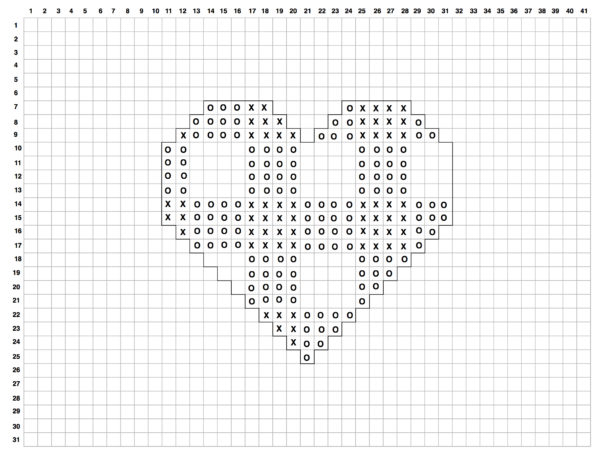
I used Caron Simply Soft with a size K hook, using the tweaked cluster version of the C2C and if you put a line around the heart, leaving one row of white blocks around it, the blanket turns out to be 20X17 inches (approximately).
That is why I added 6 rows of the block stitch around the whole blanket. The finished blanket was approximately 32 in x 30 in.
So, if you work the entire graph as a C2C, using a K hook with the same Caron Simply Soft yarn and use the clusters, I am estimating that your blanket would be about 36 x 28. (This estimation is based on a blanket I made last year.)
(If you click here, you can print the graph.)
I am going to explain how I made the blanket shown. Again if you just want to do the whole graph as C2C, you could just do one or two rounds of the border, it would work the same way.
Materials
Caron Simply Soft (100% acrylic, 170 g/6 oz, 288 m/315 yds)
2 skeins White, 1 skein Strawberry, 1 skein Soft Pink
Size K/6.5mm hook, tapestry needle, scissors
Pattern
Print the graph.
Pencil around the heart leaving one row of white blocks around the heart. The X symbol is for the darker color (strawberry), the O is for the medium color, (soft pink), and white is white. Color the boxes to keep track of the colors more easily.
Make small balls of yarn about fist size. Make a least 3 of each color to get started, you can make more as you go. Here’s a tip: don’t just pull from the skein, you will be trading colors often and having the skein attached will be a pain. Working with small balls of yarn is much easier when you get to the middle and have five or so different balls attached.
Chain 6, in the 4th chain from hook, DC, then DC2tog cluster in next ST and in the next. Then CH 6, in the 4th chain from the hook DC, then DC2tog cluster in remaining 2 CH spaces.
You should have 2 little squares, now here is where it is tricky– flip the first square so that the starting tail is in the bottom left hand corner, the tops of those DC’s line up with the last DC you made and slip stitch into the first chain three space you made.
Chain three and DC 1 time and then DC2tog 2 times all in the same space. You just made the third square, the very first square you made should be horizontal, with the tail hanging bottom left. The other two squares are vertical.
Now, chain 6, DC in 4th CH from hook and work the DC2tog clusters in remaining 2 CHs, (just like above, this is how each square is made.)
Turn, but this is tricky again, slip stitch under the three chains of the previous square. Also you are twisting the square you just made so the DC are facing the opposite direction (horizontal vs vertical) Take the time here to wrap your mind around that and finding those three chains and turning will be easier.
CH 3, DC, 2 clusters, slip stitch into next chain three space. Continue increasing.
Here are some tips for changing colors:
This is where the little balls of yarn will come in handy. You will be changing color and then not fastening off, but picking up and using the yarn when you turn and come back around. So, you will join with a new color, crochet the number of squares on the pattern, join another color when needed, and continue in this manner.
If you are confused at this point. You probably need to go and find the Youtube videos that so many other crocheters have made and then come back. I’m really giving instructions to crocheters very familiar with C2C.
How to decrease:
According to your pattern you will get to the point where you will need to not add any more rows, but decrease. When you get to that point, don’t chain 6 and create a new square, instead, turn, slip stitch across the square you just made and then slip stitch into the ch 3 space, CH 3 and dc, work 2 clusters and make a square right next to that one.
Here’s a picture of the work about mid-way. Do you see how I drew a line around the heart? That is all I am working with the C2C.

And here is a picture three-quarters of the way. It gets messy! But it’s a glorious mess. This blanket is worth it!
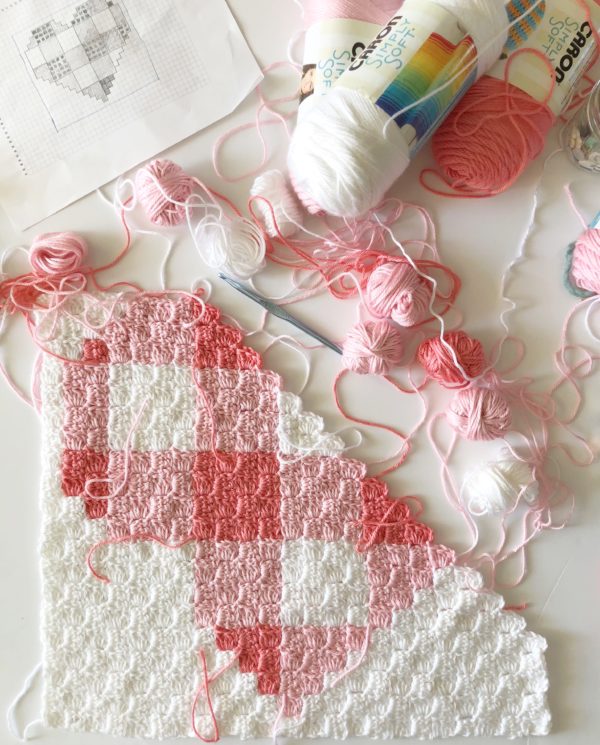
When you finish, you need to weave in all those ends. And there are a lot! It took me about an hour to get them all woven in so just get comfy and get it done.
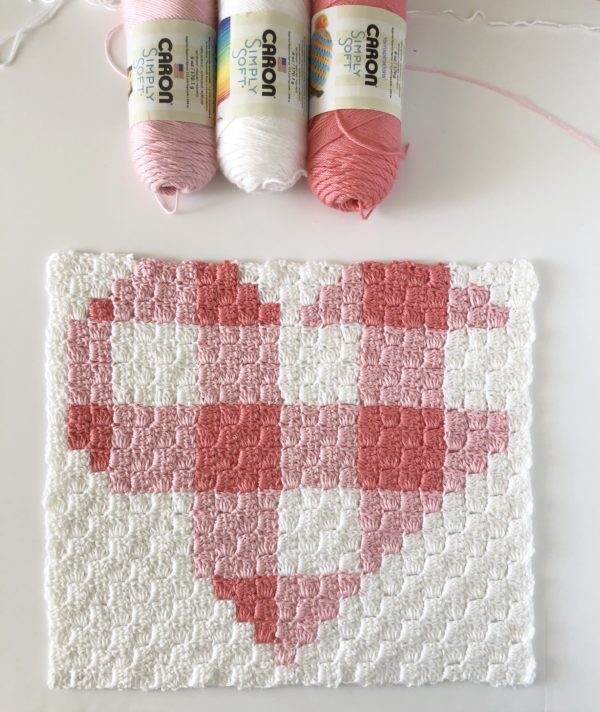
Now can you see my mistake? Ah! I wish I would have seen it earlier. Oh well. Future grandchild won’t see it when he or she is all cuddled up in my arms anyway.
Border
In any corner, pull up a loop in a ch-3 space. I usually slip stitch and then work a SC. You can use whatever method you use.
Chain 2, SC in the space between the blocks, CH 2, SC in the space between the blocks. Keep going across the whole top of the blanket. When you get to the corner work the SC into the CH 3 space, and CH 3 around the corner. Work the next SC in between the next blocks. Repeat this all the way around the blanket and back to where you pulled up a loop, slip stitch into the first SC you made to start the round.
Continuing in the same direction, insert your hook under the chain 2 space, and work one slip stitch.
Then chain 3, work 1 DC2tog cluster and 1 DC all in the chain 2 space. In the next chain 2 space, work 1 DC, 1 cluster, 1 DC. Repeat to the corner working in the chain 2 spaces. When you get to the last one and need to turn the corner, you need to make a box using the post of the last DC you just made. So, insert your hook under the post of the DC, (the post is vertical part of the stitch) slip stitch and chain 3, then work a cluster and one more DC. Now you can continue down the other side working under the chain 2 spaces with a DC, DC2TOG cluster, DC.
As you finish the last side and are back to where you started, remember to work one last block around the post of the last DC.
Slip stitch under the Chain 3 space that started the round. *Chain 2, sc in between the blocks, repeat. (I found when I got to the corners, I still needed to work 3 chains as I was turning the corner, it’s totally up to you. Also, you will be working a SC under the chain 3 space as the last stitch before you turn the corner.) Slip stitch into the chain 2 space that started the round.
After working this round, you should have a good idea of how the border is worked. I worked the first three rounds all in white. Then when I finished those rounds, I slipped stitch and pulled through with a new color. The color rounds are worked with SC, Ch 2. Then switch back to the white to make the blocks. I always crocheted in the same direction.
You are free to do your own color scheme. I did one row of soft pink, one row of strawberry and then back to soft pink.
I finished the entire blanket with one more row of all SC, working 3 SC into the corners, to finish.
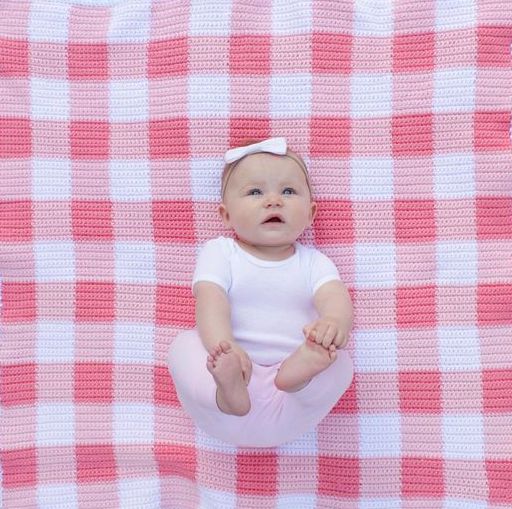
I hope your crochet gingham heart blanket turns out sooo beautiful! I love these particular colors in the Caron Simply Soft to make gingham. It turns out so pretty! Here’s another blanket I made using it.
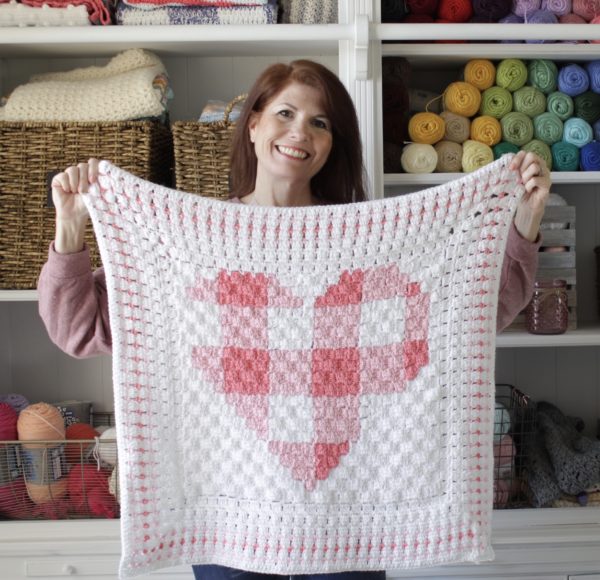
And then here’s me, showing off my project like a third grader for show and tell. Please show me yours! Come and tag me on Instagram with your blanket. I’d love to see! I’m @daisyfarmcrafts.
Good luck with your project!
Tiffany