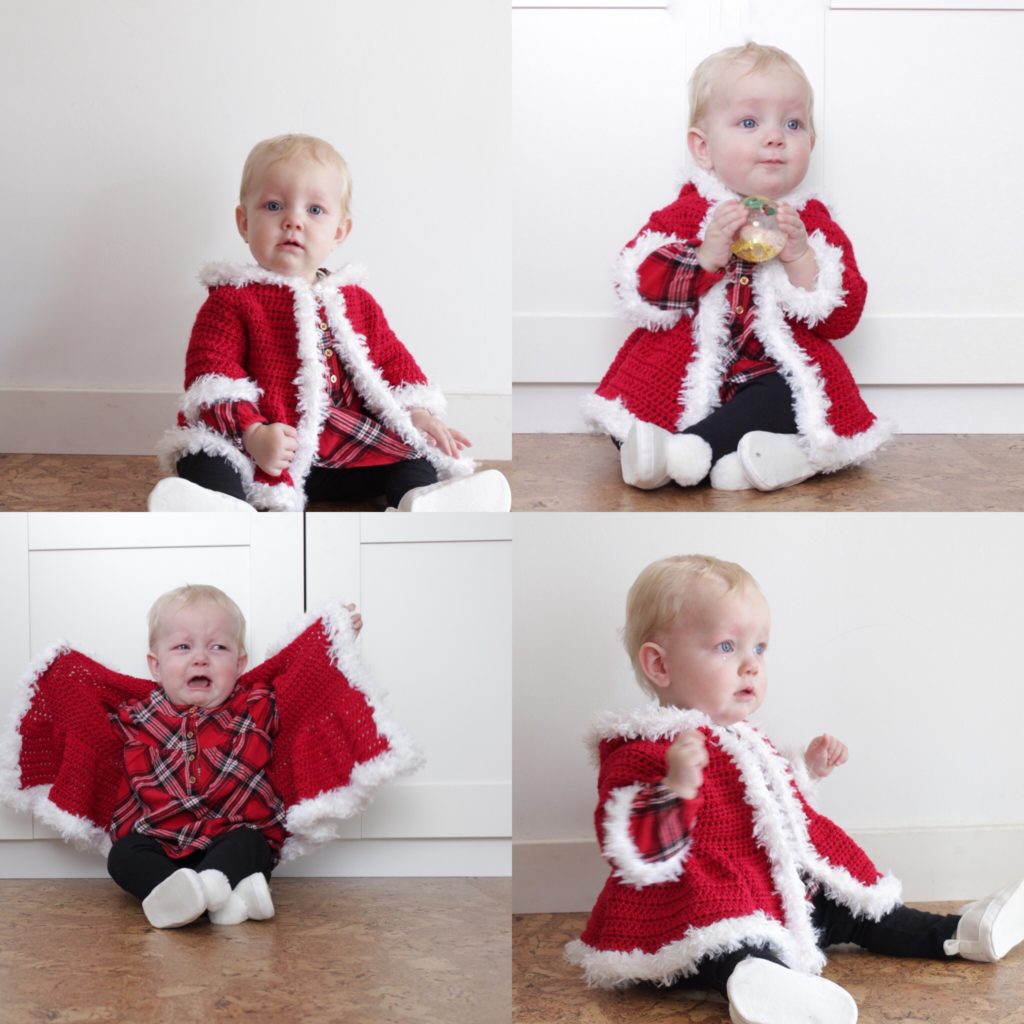
Luckily for me, I have a neighbor who lets me make things for her sweet baby. This is Gigi:

I made this crochet Christmas baby sweater over the weekend and I’m going to explain how I did it and I hope you can follow along. It’s very basic and all HDC. I think the finishing touch of the fur makes all the difference.
But please forgive me for not giving you exact counts. I tend to not crochet that way. I’d rather tell you how and why I’m doing the stitches and where they are going instead of exact counts.
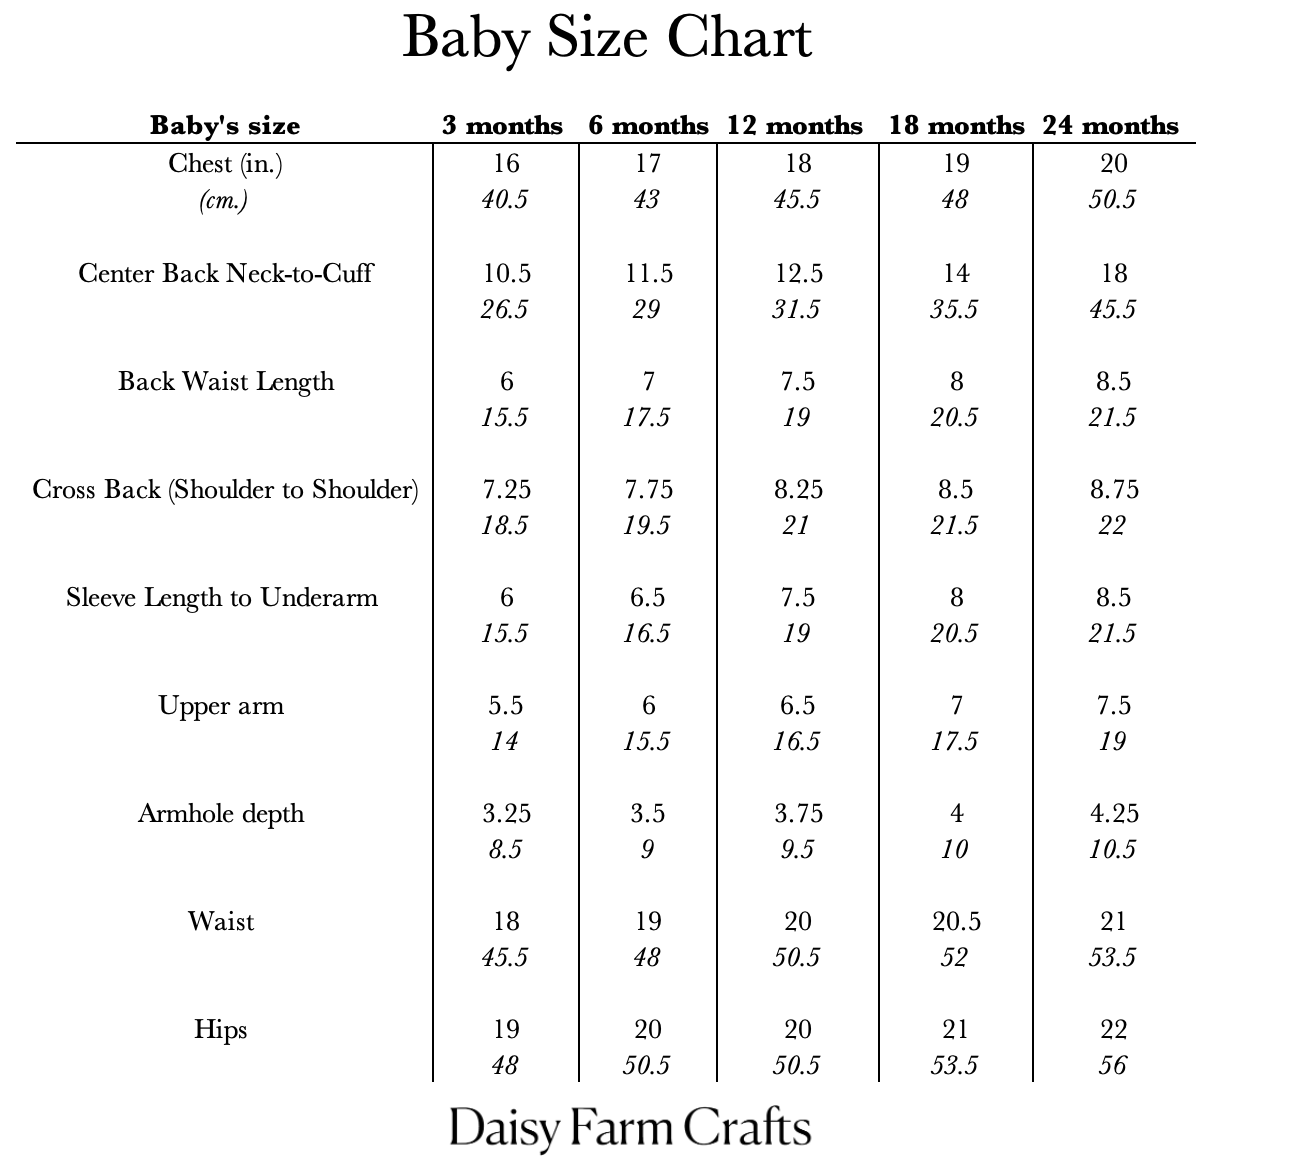
Here are some ideas for you to consider if you need this pattern much bigger than I have made it. (It’s a size 9-month-old.) Measure the child you are going to make it for from the shoulder to shoulder, neck to waist, and shoulder to arm.
I think this pattern could be adjusted as for as big as 24 month old if you continue increasing in the neck/yoke area until the shoulder measures the width you need. And you easily could add length to the bodice, hood, and sleeves by adding more rows.
One other idea is to use chunkier yarn, and/or a bigger hook.
One last idea is to take a similar pattern that you already have for the size you need, make it all in red and add fur.
Gigi is modeling the first version of a crochet Christmas baby sweater I made. I used China Silk yarn from Hobby Lobby and after the photo shoot with her, drooling and doing typical baby stuff, I am no longer recommending the yarn.
It’s not colorfast and when Gigi was upset and started to cry a little the red bled onto the white fur and turned it pink. I’m still giving Gigi the sweater but I’m afraid it will only be for her to wear Christmas Eve.
So, I made a second sweater using Caron Simply Soft in Autumn Red and the sizing remained the same. The only difference is a little bit of drape that is missing. It’s just a touch stiffer, but not by much.
I think with more wear it will soften and be fine. And I know that Caron Simply Soft is colorfast and will not bleed onto the white fur.
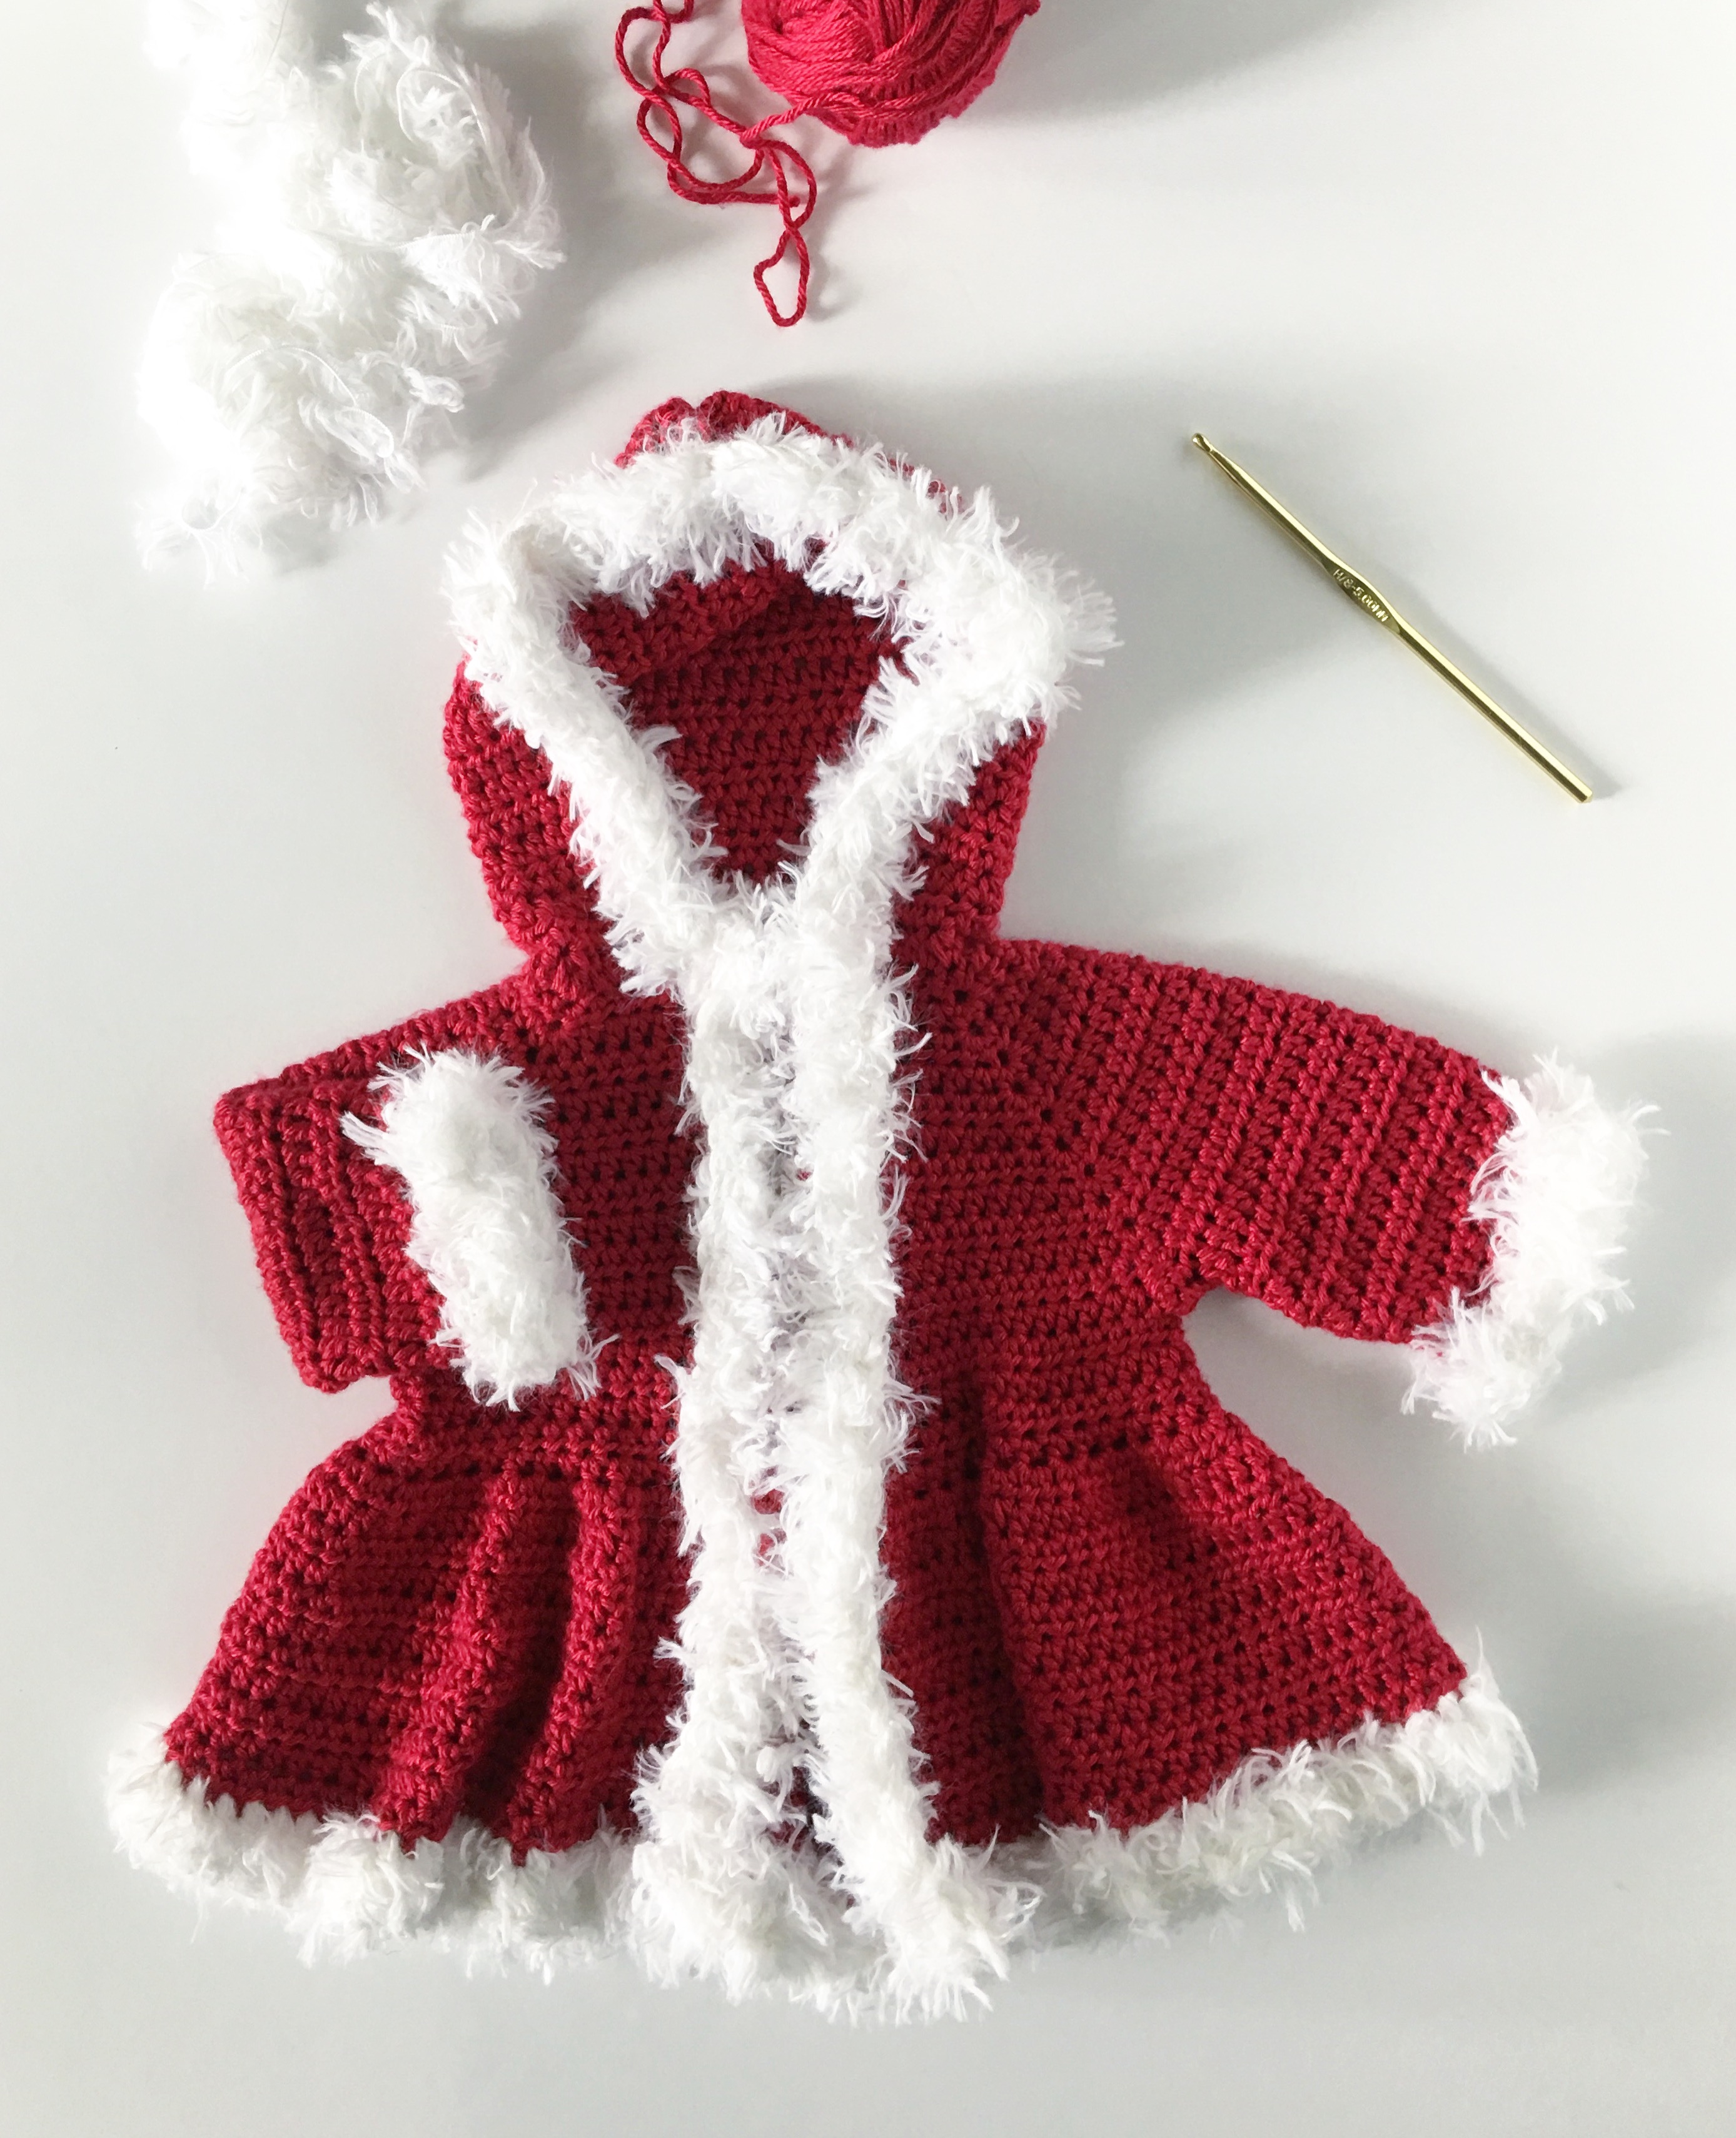
You will need to find white fur. I bought a skein at Hobby Lobby and it was called Snuggle Up. I combined it with a white strand of Size 2 weight cotton so it would be easier to crochet with and I highly recommend you do the same. It gives the fur more structure.
POST UPDATE: For the fur, Bernat Pipsqueak yarn is a great yarn for the fur as well.
Materials
2 skeins of Autumn Red Caron Simply Soft
1 skein of white fur
Size H/5.00mm hook, tapestry needle, scissors
A clasp (I picked one up at Hobby Lobby in the sewing section, picture at the end of the pattern.)

Pattern
Gauge = 4 HDC per 1 inch. Size of sweater is 9 -12 months in US sizing (I’ve added in suggestions to size it down to 3-6 months or size up to 18-24 months, but also refer to the chart above for sweater sizing suggestions.)
Chain 46
ROW 1: Work 1 HDC in the third chain from the hook.Work 1 HDC in each chain across. (44 HDC)
Chain 2 and turn, (chain 2 does not count as a stitch now and throughout the pattern.)
ROW 2: Work 1 HDC in each of the next 8 sts. Work 3HDC into the next st, 1 HDC in each of the next 5 sts, 3 HDC in the next st, 1 HDC in each of the next 14 sts, 3 HDC in the next st, 1 HDC in each of the next 5 sts, 1 3 HDC in the final 8 spaces. CH 2 and turn.
Tip: If you prefer to mark your corners ahead of time, you will be marking the 9th, 15th, 30th, and 36th stitches (sts.)
Another tip: After working 3 HDC into one stitch, mark the second HDC, this will be the corner stitch that you will work 3 HDC into in rows 3-8.
ROW 3-8: Work 1 HDC into each stitch and 3 HDC into the center HDC of each corner. Increase in this manner for 8 rows for a 6- 9 month size. (For a smaller size, work 7 rows, for a larger size work 10 rows or even more. Refer to the Baby Size Chart for shoulder to shoulder measurements and work your increase to the size you need. The starting chain should be enough for up to 18-24 months.)
On the 9th row (or after you worked to the size you need,) work 1 HDC in each st. to the corner. Work 1 HDC into the corner st, chain 4, and then work 1 HDC in the next corner, skipping over all the stitches in between to form the armhole.
See video below if you are unclear on how to do this. (In the video I work only 2 chains in between, but I’ve decided it works better for size to work 4.) (Also I say “into the chain 3 space, I meant to say in the space where you work 3 HDC.” You want to work up to that stitch, chain 4, then HDC into the next corner stitch.)
After joining for the two armholes, work 1 HDC in each st to the end of the row, ch 2 and turn.
Bodice: Work 1 HDC in each stitch including each of the 4 chains that joined for the armholes. If they have pulled too tight, working around them is fine, instead of into them. Ch 2 and turn.
Repeat instructions for the bodice for 8 rows or as many as needed if you adjusted the size. (it should hit about the high waist so the skirt will flare out from there.)
Skirt row 1: Work 1 HDC in each of the first 5 sts, work 2 HDC in each stitch except the last 5 sts of the row. 1 HDC in each of the last 5 sts. Chain 2 and turn.
Row 2- until you have the length needed: Work 1 HDC in each stitch, CH 2 and turn.
Sleeves
Round 1: Pull up a loop in the center of the armhole chains. CH 1 and then HDC into the same space.
Tip: Make sure you are working in the right direction. You want to work into stitches that are going in the opposite direction as if you had chained and turned.
Work 1 HDC into each stitch, including each chain that made the bottom of the armhole. Join with a slip stitch to the first HDC of the round, chain 1 and turn.
Tip: Count how many stitches you have made, so you can make the same amount for the next sleeve.
Round 2 – until you have the length needed: Work 1 HDC in each stitch, join with a slip stitch to first HDC of the round, CH 1 and turn.
Round 1 for the wrist: CH1 and turn, work 1 SC into stitch, *SC2tog over the next 2 stitches, SC in the next 3 stitches. Repeat around. (You are reducing to bring the wrist part in a little before you put the fur on.) Work one more SC into the last space, join with a slip stitch into the first SC, CH 1 and turn.
Round 2 – 3 for the wrist -Work SC into each stitch, joining with a slip stitch to the first st. Ch 1 and turn. . Do this for two more rows. On the last round, slip stitch and change to the fur.
FUR: Chain 2. Work 1 DC in each stitch around. Tie off and weave in ends.
Hood
Row 1: Pull up a loop in the front corner of the sweater of the neck and chain 2. (Either side it doesn’t matter.) Work HDC into that first stitch and each stitch to the first corner. *HDC3tog over the corner space. Work HDC in each stitch to the next corner and repeat from * to the end of the neck edge. Ch 2 and turn.
Row 2 – 21: Work 1 HDC in each stitch, CH 2 and turn after each row.
SEW HOOD TOGETHER: Fold the top edge of the hood in half, matching the two corners to form the hood. Use your tapestry needle to sew it closed.
Weave in all the ends before you start the fur.
FUR EDGING: In the bottom front corner of the sweater, either side, pull up a loop and chain 3. Work DC up one side, around the hood, down the other and around the bottom of the sweater. Join with the starting chains, tie off and weave in the ends.
Finish with sewing a clasp across the neck area.

Here is a free printable version below:
Adorable Christmas Sweater for Babies! Gauge = 4 HDC per 1 inch. Size of sweater is 9 -12 months in US sizing (I've added in suggestions to size it down to 3-6 months or size up to 18-24 months, but also refer to the chart above for sweater sizing suggestions.) Chain 46 ROW 1: Work 1 HDC in the third chain from the hook.Work 1 HDC in each chain across. (44 HDC) Chain 2 and turn, (chain 2 does not count as a stitch now and throughout the pattern.) ROW 2: Work 1 HDC in each of the next 8 sts. Work 3HDC into the next st, 1 HDC in each of the next 5 sts, 3 HDC in the next st, 1 HDC in each of the next 14 sts, 3 HDC in the next st, 1 HDC in each of the next 5 sts, 1 3 HDC in the final 8 spaces. CH 2 and turn. Tip: If you prefer to mark your corners ahead of time, you will be marking the 9th, 15th, 30th, and 36th stitches (sts.) Another tip: After working 3 HDC into one stitch, mark the second HDC, this will be the corner stitch that you will work 3 HDC into in rows 3-8. ROW 3-8: Work 1 HDC into each stitch and 3 HDC into the center HDC of each corner. Increase in this manner for 8 rows for a 6- 9 month size. (For a smaller size, work 7 rows, for a larger size work 10 rows or even more. Refer to the Baby Size Chart for shoulder to shoulder measurements and work your increase to the size you need. The starting chain should be enough for up to 18-24 months.) On the 9th row (or after you worked to the size you need,) work 1 HDC in each st. to the corner. Work 1 HDC into the corner st, chain 4, and then work 1 HDC in the next corner, skipping over all the stitches in between to form the armhole. Bodice: Work 1 HDC in each stitch including each of the 4 chains that joined for the armholes. If they have pulled too tight, working around them is fine, instead of into them. Ch 2 and turn. Repeat instructions for the bodice for 8 rows or as many as needed if you adjusted the size. (it should hit about the high waist so the skirt will flare out from there.) Skirt row 1: Work 1 HDC in each of the first 5 sts, work 2 HDC in each stitch except the last 5 sts of the row. 1 HDC in each of the last 5 sts. Chain 2 and turn. Row 2- until you have the length needed: Work 1 HDC in each stitch, CH 2 and turn. Round 1: Pull up a loop in the center of the armhole chains. CH 1 and then HDC into the same space. Tip: Make sure you are working in the right direction. You want to work into stitches that are going in the opposite direction as if you had chained and turned. Work 1 HDC into each stitch, including each chain that made the bottom of the armhole. Join with a slip stitch to the first HDC of the round, chain 1 and turn. Tip: Count how many stitches you have made, so you can make the same amount for the next sleeve. Round 2- until you have the length needed: Work 1 HDC in each stitch, join with a slip stitch to first HDC of the round, CH 1 and turn. Round 1 for the wrist: CH1 and turn, work 1 SC into stitch, *SC2tog over the next 2 stitches, SC in the next 3 stitches. Repeat around. (You are reducing to bring the wrist part in a little before you put the fur on.) Work one more SC into the last space, join with a slip stitch into the first SC, CH 1 and turn. Round 2 - 3 for the wrist -Work SC into each stitch, joining with a slip stitch to the first st. Ch 1 and turn. . Do this for two more rows. On the last round, slip stitch and change to the fur. FUR: Chain 2. Work 1 DC in each stitch around. Tie off and weave in ends. Row 1: Pull up a loop in the front corner of the sweater of the neck and chain 2. (Either side it doesn't matter.) Work HDC into that first stitch and each stitch to the first corner. *HDC3tog over the corner space. Work HDC in each stitch to the next corner and repeat from * to the end of the neck edge. Ch 2 and turn. Row 2 - 21: Work 1 HDC in each stitch, CH 2 and turn after each row. SEW HOOD TOGETHER: Fold the top edge of the hood in half, matching the two corners to form the hood. Use your tapestry needle to sew it closed. Weave in all the ends before you start the fur. FUR EDGING: In the bottom front corner of the sweater, either side, pull up a loop and chain 3. Work DC up one side, around the hood, down the other and around the bottom of the sweater. Join with the starting chains, tie off and weave in the ends. Finish with sewing a clasp across the neck area.Crochet Christmas Baby Sweater

Materials
Instructions
Sleeves
Hood
Merry Christmas!
Tiffany