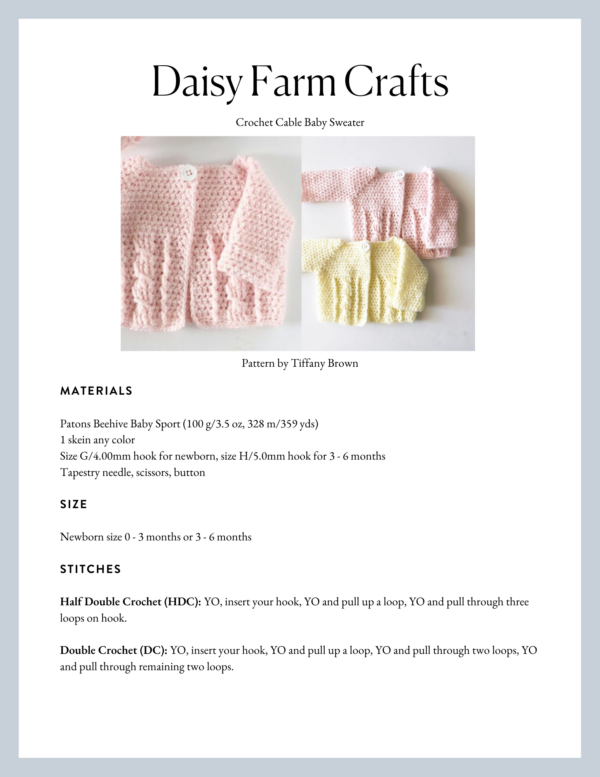
These two darling cable sweaters are for twin girls! I just gifted them this morning at the baby shower, so when the twins arrive in January, I hope to be able to have pictures to add to this post of tiny baby girls. These crochet cable baby sweaters are newborn size…teeny! They probably could fit a baby doll, but they were an experiment of using the exact same stitch count of a different cable sweater I had made, but with much smaller weight yarn.

Isn’t that amazing the difference size you can make just by switching up the yarn and hook size? The pattern for the red sweater has just a few adjustments on the sleeve width and of course the collar. It is a size 18month sweater. I will have my neighbor baby Gigi model it for me this coming week and then I’ll post the pattern for that.
But, if you are really good at sweater making, you still could use the pattern I’m releasing here. The starting counts are the same.
With all that being said however, please be patient with me as I explain and write this pattern and share with you. I am by no means an expert pattern writer, especially of sweaters. There are so many steps to describe. I really am suggesting that this sweater is for intermediate makers and you need to have a firm idea of how to join under the arms, and you also need to be comfortable making cables. Or at least be familiar with the idea of working around the posts of stitches.
I do have a little video help to show you the twist of the cable, so I don’t want to scare anyone away from this pattern if you are ready to take the next step in your crochet journey. These are very easy cables and doable if you are comfortable with front post and back post double crochet.
However, I never want to discourage anyone from attempting a project. Sometimes you have to jump in and learn. I learned sweater making from Wooly Wonders Crochet and her fabulous YouTube tutorials and if you click the highlighted words, it will take you to a very beginner friendly cardigan to teach you the very basics of increasing in the corners and joining under the arms. And be sure to click around her whole YouTube site in case there is a different sweater you think might be a better fit for you to learn. But the Christmas one I am linking too is definitely beginner friendly.

Materials
Patons Beehive Baby Sport (100 g/3.5 oz, 328 m/359 yds)
1 skein any color
Size G/4.00mm hook for newborn, size H/5.0mm hook for 3 – 6 months
Tapestry needle, scissors, button
Size
Newborn size 0 – 3 months or 3 – 6 months
Stitches
Half Double Crochet (HDC): YO, insert your hook, YO and pull up a loop, YO and pull through three loops on hook.
Double Crochet (DC): YO, insert your hook, YO and pull up a loop, YO and pull through two loops, YO and pull through remaining two loops.
Front and Back Post Double Crochet (FPDC & BPDC): A front post DC means you insert your hook from front to back around the post of the next DC and work your DC. A back post DC means you insert your hook around the post from the back to the front and work a DC.
Front Post Treble Crochet (FPTC): Insert your hook from front to back around the post and work a treble crochet: YO twice, insert your hook, YO and pull up a loop, YO and pull through two loops, YO and pull through two loops again, YO and pull through remaining two loops.
Pattern
Chain 46.
ROW 1: HDC in third chain from hook. 1 HDC in each chain. (44 HDC)
(Starting in row 2 and throughout the rest of the pattern, the HDC’s are worked in between each other.)
ROW 2: CH 2 and turn. (Does not count as a stitch now and throughout.) 1 HDC in each of the next 8 spaces. 3 HDC in the next space. 1 HDC in each of the next 5 spaces. 3 HDC in the next space. 1 HDC in each of the next 14 spaces. 3 HDC in the next space. 1 HDC in each of the next 5 spaces. 3 HDC in the next space. 1 HDC in each of the last 8 spaces. (last stitch will be worked between the HDC and the CH 2.)
ROW 3: CH 2 and turn. 1 HDC in each of the next 8 spaces. 2 HDC in the next space. 2 HDC in the next space. (You are working in between the 3 HDC’s of the row below. 2 HDC in each space.) 1 HDC in each of the next 6 spaces. 2 HDC in the next and 2 HDC in the next. 1 HDC in each of the next 15 spaces. 2 HDC in the next and 2 HDC in the next. 1 HDC in each of the next 6 spaces. 2 HDC in the next space and 2 HDC in the next. 1 HDC in each of the next 9 spaces.
ROW 4: CH 2 and turn. 1 HDC in each of the next 10 spaces. 3 HDC in the next space. (This is the space between the sets of 2 HDC’s). 1 HDC in each of the next 9 spaces. 3 HDC’s in the next space. 1 HDC in each of the next 18 spaces. 3 HDC in the next space. 1 HDC in each of the next 9 spaces. 3 HDC in the next space. 1 HDC in the remaining 10 spaces.
ROW 5: CH 2 and turn. 1 HDC in each of the next 10 spaces. 2 HDC in the next space and 2 HDC in the next. 1 HDC in each of the next 10 HDC. 2 HDC in the next space and 2 HDC into the next. 1 HDC in each of the next 19 spaces. 2 HDC in the next and 2 HDC into the next. 1 HDC in each of the next 10 spaces. 2 HDC in the next and 2 HDC into the next. 1 HDC in each of the remaining 11 spaces.
ROW 6: CH 2 and turn. 1 HDC in each of the next 12 spaces. 3 HDC in the next space. 1 HDC in each of the next 13 spaces. 3 HDC in the next space. 1 HDC in each of the next 22 spaces. 3 HDC in the next space. 1 HDC in each of the next 13 spaces. 3 HDC in the next. 1 HDC in each of the 12 spaces.
ROW 7: CH 2 and turn. 1 HDC in each of the next 12 spaces. 2 HDC in the next and 2 HDC in the next (remember that these are worked into the 3 HDC that make the corner.) 1 HDC in each of the next 14 spaces. 2 HDC in the next and 2 HDC in the next. 1 HDC in each of the next 23. 2 HDC in the next and 2 HDC into the next. 1 HDC in each of the next 14 spaces. 2 HDC in the next space and 2 HDC in the next. 1 HDC into each of the next 13 spaces.
ROW 8: CH 2 and turn. 1 HDC in each of the next 14 spaces. 3 HDC in the next space. 1 HDC in each of the next 17 spaces. 3 HDC in the next space. 1 HDC in each of the next 26 spaces. 3 HDC in the next. 1 HDC in each of the next 17 spaces. 3 HDC in the next space. 1 HDC in each of the next 14 spaces.
ROW 9: CH 2 and turn. 1 HDC into each of the next 14 spaces. 2 HDC in the next space and 2 HDC into the next. 1 HDC into each of the next 18 spaces. 2 HDC in the next space and 2 HDC into the next. 1 HDC into each of the next 27 spaces. 2 HDC into the next space and 2 HDC into the next. 1 HDC into each of the next 18 spaces. 2 HDC into the next space and 2 HDC into the next. 1 HDC into each of the next 15 spaces.
ROW 10: Ch 2 and turn. 1 HDC in each of the next 16 spaces. 3 HDC in the next space. 1 HDC into each of the next 21 spaces. 3 HDC in the next space. 1 HDC in each of the next 30 spaces. 3 HDC in the next space. 1 HDC into each of the next 21 spaces. 3 HDC in the next space. 1 HDC in each of the last 16 spaces.
ROW 11: (We will be joining to make the armholes in this row.) CH 2 and turn. 1 HDC in each of the next 16 spaces. 2 HDC in the next space. SKIP over the next 24 spaces, find the second space of the chain 3 in the next corner, work 2 HDC in that space. (It helps to bring the fabric together and match the corners up so the space is easy to work into.) 1 HDC in each of the next 31 spaces. 2 HDC into the next. SKIP over the next 24 spaces, (bring the corners together and look for the second space of the 3 HDC’s that make up the corner.) 2 HDC in that space. 1 HDC in each of the last 17 spaces.
ROW 12: CH 2 and turn. 1 HDC in each of the 71 spaces across the row. (The armholes will have one HDC. It’s kind of a gap, but just put 1 HDC there.)
ROW 13: CH 2 and turn. 1 HDC in each of the next 3 spaces. Work 1 DC around the post of the next stitch, inserting your hook from the front to the back, popping the post forward. (FPDC-this is the symbol for front post double crochet that I will use going forward to describe this action.) Work 1 HDC in each of the next 2 spaces. (tip: make sure you are inserting your hook to the left of the HDC and under the 3 loops. The popped out FPDC will make it look like you are going into that space next to it, don’t. Look to the next HDC and work to the left of that stitch.) Work 1 FPDC around the posts of the next 4 spaces. Work 1 HDC in each of the next 2 spaces. (please use the tip above. You can easily add stitches here without meaning too.) Work 1 FPDC around the next HDC post. (And it’s right next to the HDC you just made. 1 HDC in each of the next 45 spaces. 1 FPDC around the very next post. 1 HDC in each of the next 2 spaces. 1 FPDC around each of the next 4 posts. 1 HDC in each of the next 2 spaces. 1 FPDC around the very next post. 1 HDC in the remaining 3 spaces.
ROW 14: CH 2 and turn. 1 HDC in each of the next 3 spaces. 1 BPDC around the post (make sure you are inserting your hook from the back to make the post pop out on the same side as the row below.) 1 HDC in the next 2 spaces. 1 BPDC around each of the next 4 posts. HDC in each of the next two spaces. 1 BPDC around the next post. HDC in each of the next 45 spaces. 1 BPDC around the next post, HDC in the next 2 spaces. BPDC around the next 4 posts, HDC in the next 2 spaces. BPDC around the next post. HDC in the last 3 spaces.
ROW 15: (CABLE TWIST ROW-see video clip at the very end of the post if you need a visual.) CH 2 and turn. HDC in each of the next 3 spaces. *FPDC around the next post. HDC in the next 2 spaces. SKIP over the next three posts and work 1 Front Post Treble Crochet (FPTC) around the last post. Work 1 FPTC around the next post (3rd), 1 FPTC around the next (2nd), and 1 FPTC in the next (1st). Twist the work over, HDC in the next 2 spaces. FPDC around the next post*. HDC in the next 45 spaces. Repeat from * to *. HDC in last 3 spaces.
ROW 16, 17, 18: Repeat row 14, with the exception on row 17 you would be working FPDC–keeping in mind the popping of the posts forward to keep the cables on the same side of the sweater.
ROW 19: Repeat row 15 CABLE TWIST ROW. (Tip: the cables should be facing you.)
ROW 20, 21, 22: Repeat row 14.
ROW 23: Repeat row 15 CABLE TWIST ROW
ROW 24, 25, 26: Repeat row 14.
ROW 27: 1 SC in each stitch across the bottom, turn and work a few extra SC in the corner (I’ll leave it up to you how many you need,) work up the front of the sweater, work extra SC in the corner. Around the neck, work the SC in between the HDC’s and skip a space when you get to the inside corners and skip one stitch in the inside corners of the neck. Continue working SC down the other side and back around to the first SC, slip stitch to join, tie off.
Sleeves
ROW 1: In the armholes, with the V’s of the stitches facing in the direction as if you just chained and turned, pull up a loop to the left of the one HDC that is in the bottom of the armpit. CH 1 and work a HDC3tog with the first leg of it in the space you pulled up a loop and the next leg in between the first and second post that begins the arm and the third leg in the next space.
Tip: HDC3TOG is Yarn Over, insert your hook into the first designated space, YO and pull back through, YO, insert your hook into the next designated space, YO and pull back through, YO, insert your hook into the next designated space, YO and pull back through, YO, and pull through all loops on your hook.
Work 1 HDC in each of the next 19 spaces. HDC3TOG the last 2 spaces and the space in the armpit. SL ST to the starting HDC3TOG.
(Try not to get confused by the post of stitches that belong to the body. The goal is to fill gaps with HDTOG’s and to decrease the number of spaces to 21. This might be a make it work situation, use your best judgment and decrease in any manner that you may have learned. The good thing is that it’s the armpit.)
ROW 2: CH 1 and turn. 1 HDC in each of the next 21 spaces. SLST to the starting HDC.
ROWS 3 – 17: Repeat ROW 2.
Finishing
Tie off and weave in ends. Attach button. (WARNING, attach the button extremely well so it’s not a choking hazard for the baby. OR, feel free to leave it off entirely if you are worried. This easily can just be a little jacket.)
Good luck! I hope your sweater is a success! Come and show it off to me by posting a picture to my facebook Daisy Farm Crafts wall and inspire others at the same time! It’s wonderful to share and to keep crochet alive! Or, use the hashtag #daisyfarmcrafts on Instagram and I share pictures every Sunday up in my stories.
xo, Tiffany