Last year, I made the above sweater for my niece Lucelia and meant to write out the pattern but you know how life goes in the fall…before I knew it, I was rushing toward Thanksgiving, then Christmas, and oh! I just remembered, my son was married a few days just before the New Year! Okay, no wonder it never was written down. But, never fear, I have an abundance of nieces and Lucelia happens to have a little sister Olivia. So this fall, I’ve made a new sweater for her, except in pink! So I’m going to call this the Color Block Sweater and you can make it in any color you wish.

I tweaked a few things on this sweater and also, have a confession. I forgot to crochet some buttonholes! And I’d already gone around the hood and back down the other side so I had to be a little clever on adding some button loops. But the pattern I wrote out has you skip a few stitches for button holes. You don’t want to make the loops I don’t think.
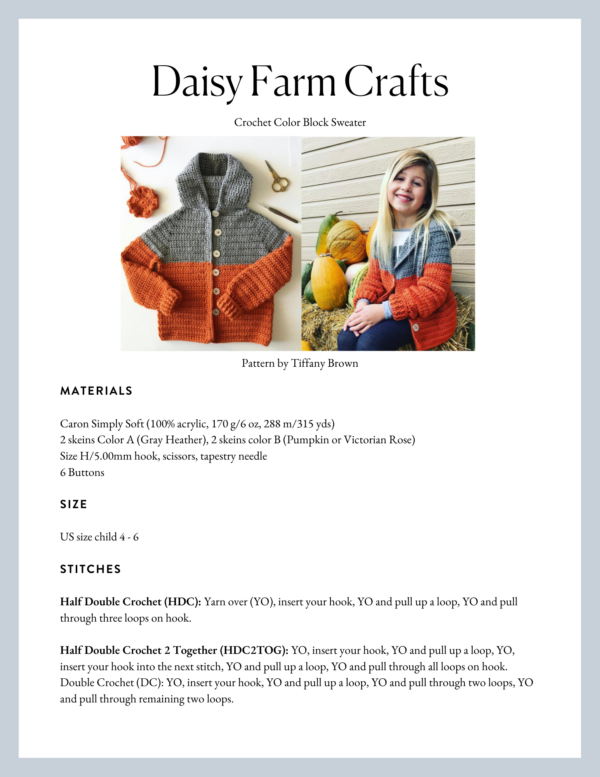
I don’t have a picture yet of my niece Olivia, I will need to get this in the mail to her, but here is Lucelia last year in hers:

I’m going to rate this pattern as intermediate but I never like to dissuade anyone if they are up for a challenge. As I was writing out the instructions, I couldn’t help think that if we were all on a crochet show like The Great British Baking Show, this would be your technical challenge! You are going to follow the written instructions and go for it, and at least you have a picture to refer too. Those poor bakers have not a clue what they are making. (Can you tell what I listen to as I crochet?)
But, you do need to have the crochet basics down. It helps if you know how to join a round and turn. And it helps if you know how to make ribbing with front post and back post double crochet.
I have video helps and tips that I will mention throughout the pattern, so don’t count yourself out if you really want to make this, just don’t expect perfection of yourself. I’ve made a lot of sweaters, so don’t compare your first one to my 15th if you know what I mean. (Don’t be hard on yourself if the first one doesn’t turn out. Be proud of it and then make another, I’ve found that the second time through goes twice as fast.)
This sweater fits about a size child 4 – 6 in US sizes. My niece is in kindergarten and age 5. My tips to make it smaller is to use lighter weight yarn, or if you know how to adapt patterns, join the armholes two rows earlier than in the pattern. If you want to make it bigger, go up a hook size to an I or even a J. I think that would make it a 6-6x size. That’s all I got for ya. Maybe next year, as these girls grow, I’ll make bigger sweaters for them!
Let’s get to it!
Materials
Caron Simply Soft (100% acrylic, 170 g/6 oz, 288 m/315 yds)
2 skeins Color A (Gray Heather), 2 skeins color B (Pumpkin or Victorian Rose)
Size H/5.00mm hook, scissors, tapestry needle
6 Buttons
Size
US size child 4 – 6
Stitches
Half Double Crochet (HDC): Yarn over (YO), insert your hook, YO and pull up a loop, YO and pull through three loops on hook.
Half Double Crochet 2 Together (HDC2TOG): YO, insert your hook, YO and pull up a loop, YO, insert your hook into the next stitch, YO and pull up a loop, YO and pull through all loops on hook.
Double Crochet (DC): YO, insert your hook, YO and pull up a loop, YO and pull through two loops, YO and pull through remaining two loops.
Double Crochet 2 Together Cluster (CL): YO, insert your hook into the stitch, YO and pull up a loop, YO, pull through first two loops on the hook, YO and insert your hook into the same stitch and pull up a loop, YO, pull through first two loops on the hook, YO and pull through all remaining three loops on the hook.
Front and Back Post Double Crochet (FPDC & BPDC): A front post DC means you insert your hook from front to back around the post of the next DC and work your DC. A back post DC means you insert your hook around the post from the back to the front and work a DC.
Pattern
BODY
Chain with color A, (CH) 66.
Row 1: 1 Half Double Crochet (HDC) in 3rd chain from the hook, 1 HDC in each remaining chain space. (64 HDC)
Row 2: CH 2 and turn. 1 DC in first space, (as it sits right next to your turning chain this acts as your first cluster.) 1 CL in each of the next 10 spaces. In next space work [1 CL, 1 CH, 1 CL], 1 CL in each of the next 8 spaces. In next space work [1 CL, 1 CH, 1 CL], 1 CL in each of the next 22 spaces. In next space work [1 CL, 1 CH, 1 CL]. 1 CL in each of the next 8 spaces. In next space work [1 CL, 1 CH, 1 CL]. 1 CL in each of the remaining 11 spaces.
Tip: place a marker on the CH 1 spaces if you have a hard time identifying them. We will be working 3 HDC in each CH 1 space.
Row 3: CH 2 and turn. Work 1 HDC into the top of each of the next 12 CL. Work 3 HDC, around the CH. 1 HDC into the top of each of the next 10 CL. Work 3 HDC, around the CH. 1 HDC into each of the next 24 CL, 3 HDC around the CH. 1 HDC into each of the next 10 CL, 3 HDC around the CH. 1 HDC in each of the remaining 12 CL.
Tip: place a marker in the middle of the three HDC’s you worked around the CH spaces. We will be working [1 CL, 1 CH, 1 CL] into the middle of the three HDC stitches.
Row 4: CH 2 and turn. Work 1 DC into first HDC of row below. Work 1 CL in each of the next 12 HDC. In next, work [1 CL, 1 CH, 1 CL]. Work 1 CL in each of the next 12 HDC, in next work, [1CL, 1 CH, 1 CL]. Work 1 CL in each of the next 26 HDC, in the next work [1 CL, 1 CH, 1 CL]. Work 1 CL in each of the next 12 HDC, work [1 CL, 1 CH, 1 CL] in next. Work 1 CL in each of the remaining 13 HDC.
Row 5: CH 2 and turn. 1 HDC in each of the next 14 CL. 3 HDC in CH. 1 space. 1 HDC in each of next 14 CL, 3 HDC in CH 1 space. 1 HDC in each of next 28 CL, 3 HDC in CH 1 space. 1 HDC in each of next 14 CL, 3 HDC in CH 1 space, 1 HDC in each of the remaining 14 HDC.
Row 6: CH 2 and turn. Work 1 DC into the first HDC. Work 1 CL into each of the next 14 HDC. Work [1 CL, 1 CH, 1 CL] in next HDC. Work 1 CL into each of the next 16 HDC. Work [1 CL, 1 CH, 1 CL] into next HDC. Work 1 CL into each of the next 30 HDC. Work [1 CL, 1 CH, 1 CL] into next space. Work 1 CL into each of the next 16 HDC. Work [1 CL, 1 CH, 1 CL] into the next. Work 1 CL into each of the remaining 15 HDC.
Row 7: CH 2 and turn. 1 HDC in each of the next 16 CL, 3 HDC in CH 1 space. 1 HDC in each of the next 18 CL, 3 HDC in CH 1 space. 1 HDC in each of the next 32 CL, 3 HDC in CH 1 space. 1 HDC in each of the next 18 CL, 3 HDC in CH 1 space. 1 HDC in each of remaining 16 CL.
Row 8: CH 2 and turn. 1 DC in first HDC. 1 CL in each of the next 16 HDC. [1 CL, 1 CH, 1 CL] in next HDC. 1 CL in each of the next 20 HDC. [1 CL, 1 CH, 1 CL] in next HDC. 1 CL in each of the next 34 HDC. [1 CL, 1 CH, 1 CL] , 1 CL in each of the next 20 HDC, [1 CL, 1 CH, 1 CL] in next HDC. 1 CL in each of the remaining 17 HDC.
Row 9: CH 2 and turn. 1 HDC in each of the next 18 CL, 3 HDC in CH 1 space. 1 HDC in each of the next 22 CL, 3 HDC in CH 1 space, 1 HDC in each of the next 36 CL, 3 HDC in CH 1 space, 1 HDC in each of the next 22 CL, 3 HDC in Ch 1 space, 1 HDC in each of remaining 18 CL.
Row 10: CH 2 and turn. 1 DC in first HDC. 1 CL in each of the next 18 HDC. [1 CL, 1 CH, 1 CL] in next HDC. 1 CL in each of the next 24 HDC. [1 CL, 1 CH, 1 CL] in the next HDC. 1 CL in each of the next 38 HDC. [1 CL, 1 CH, 1 CL], 1 CL in each of the next 24 HDC. [1 CL, 1 CH, 1 CL] in the next HDC. 1 CL in each of the next 19 HDC.
Row 11: CH 2 and turn. 1 HDC in each of the next 20 CL. 1 HDC in the CH 1 space. CH 2. SKIP over the next 26 CL and work 1 HDC into the CH 1 space. 1 HDC in each of the next 40 CL. 1 HDC in the CH 1 space. CH 2, Skip over the next 26 CL and work 1 HDC in the CH 1 space. 1 HDC each of the next 20 CL.
Row 12: CH 2 and turn. 1 DC in first HDC. 1 CL in each of the next 20 HDC, (tip: the 20th HDC the CL needs to work into looks like it’s part of the chain.) Work 2 CL around the CH 2. 1 CL in each of the next 42 HDC. (Same tip as before, make sure you find the 42nd HDC.) Work 2 CL around the CH 2. 1 CL in each of the remaining 21 HDC.
Row 13: CH 2 and turn. 1 HDC in each of the next 88 CL.
Row 14: CH 2 and turn. 1 DC in first HDC. 1 CL in each of the next 87 HDC.
Change to color B by pulling through the last step of the CL stitch in row 14.
Rows 15 – 35: CH 2 and turn. Repeat Rows 13 and 14. (You will end with a row of HDC after your 10th row of color B clusters.
Sleeves
Row 1: In the arm pit, (make sure you look at the little v’s and that you are going in the direction as if you turned the row), pull up a loop and CH 2 in between the bottoms of the 2 sets of clusters worked around the ch 2 space. HDC2tog working the first half of the stitch around the chain 2, and the second half in the first CL. 1 HDC into the tops of each of the next 23 CL. In the last (24th) CL, Work the first half of a HDC2tog, and work the second half around the chain 2. Work 2 more HDC around the ch 2, and join with a SL ST (slip stitch) to starting chain 2.
Row 2: CH 2 and turn. 1 DC in the very first space, (combines with turning chain to count as a CL) 1 CL in each of the next 26 HDC. Join with a SL ST to the first starting CH 2.
Row 3: CH 2 and turn. 1 HDC into each of the next 27 CL. SL ST to the first HDC.
Row 4: Repeat row 2. (Hint, there will be 27 CL, 26 of them regular, 1 is combined with the turning chain.) Pull through with color B on the last step of the CL in this round.
Rows 5 – 24: Repeat row 3 and 2. End on a round of HDC.
Row 25: CH 3 and turn. DC in each HDC. Slip Stitch to CH 3. CH 3 and turn
Rows 26 – 31: RIBBING, Work alternating fpdc (front post double crochet) and bpdc (back post double crochet) around each DC. Join with a slip stitch to the turning chain on each round and turn. You will have a total of 26 front post and back post DC with one chain 3 turning chain in each round. Always chain 3 and turn.

*if you need more help with ribbing, I’ve made a short clip on Instagram
Hood
Row 1: With color A, pull up a loop in the space of the starting chain of the neck. 1 HDC in that same space and in each of the next 11 spaces. SKip next space, (this will be the corner), 1 HDC in each of the next 8 spaces. Skip next space, 1 HDC in each of the next 22 spaces, Skip next space, 1 HDC in each of the next 8 spaces, Skip next space, 1 HDC in each of the remaining 11 spaces.
Row 2: CH 2 and turn. 1 DC in first HDC, 1 CL in each of the next 60 HDC.
Row 3: CH 2 and turn. 1 HDC in each CL across the row.

Rows 4 – 24: Repeat row 2 and 3. Match the two corners, right sides together, and seam together with slip stitches, tie off.

Before starting the placket, evenly space the buttons and mark on the left side of the sweater as it faces you, where you’d like to place the button holes.
Edging and Placket
Row 1: With color B, pull up a loop in the bottom right corner, as the sweater is laying flat in front of you. So make sure the right side is facing out. Work up the edge with evenly placed HDC, pull through with color A when you reach the color change. Continue working evenly spaced HDC up the side, around the hood, down the other side of the sweater. Change to color B when needed.
Row 2: CH 2 and turn. Work HDC in each stitch back up the right side of the sweater, however, pay attention to your button markers, estimate how many chains you’d need for the size buttons you bought and simply, skip one HDC and chain, then continue into the next HDC switching color when needed, around the hood, and back down the left side.
Row 3: CH 2 and turn. Work HDC in each stitch, changing color, and stopping at the neck and before the hood begins.
Row 4: CH 2 and turn. Work HDC in each stitch, back down the left side. Tie off and weave in all ends.
Finishing: If you’d like to add one more row along the bottom of the sweater of SC that makes a nice finish.
I hope you love your sweater! Feel free to share a picture with me on my Facebook page, or use the hashtag #daisyfarmcrafts on Instagram and I will share in my stories! It is so motivating for others to see your beautiful work!
As always, all my love to you dear followers of the Daisy Farm. Thank you for being on the road with me as I crochet my way into being a granny someday…fingers are always crossed for my sweet Hannah.
xo, Tiffany
Click here or on image below for printable pattern