After finishing this Berry Stitch Blanket, I had extra yarn and decided to put it to good use and make a crochet even berry stitch baby hat. Wouldn’t this set make a great baby shower gift?
When you use chunky yarn, with a bigger hook, you can’t help but zip through this project.
So let’s have a chat about the yarn I am using. This is called Bernat Roving, it’s soft brushed acrylic with a touch of wool to give it a nice matte finish. To me, it gives off that modern look of yarn that seems to be coming popular lately. It’s very similar to Patons Roving Wool, but with the acrylic added, it gives it a fluffy-er appearance. I just love it.
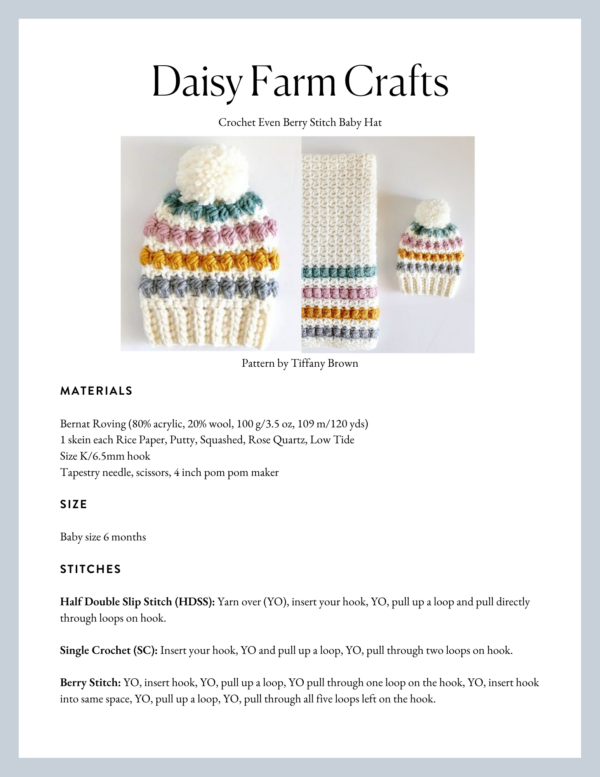
For the baby hat I used 1 skein each of Bernat Roving in Rice Paper, Putty, Squashed, Rose Quartz, and Low Tide. (If you’ve done the blanket, you’ll have plenty of the color, you’ll just need one Rice Paper.)
So now let’s talk about this little hat. I based the measurements off of a standard 6-month-old head. (14 inches circumference.)
I started with the band using a back loop only, half double crochet slip stitch. If you haven’t learned that yet, here is a video clip:
The crochet even berry stitch baby hat is worked in a spiral after you join the band with a tapestry needle and make an initial row of mesh stitch, (a mesh stitch is alternating SC, CH, Skip over one chain, SC, repeat. And on the next row, you always work your SC into a SC and a CH over the chain space.)
(If you are just here for the hat and have not made the blanket, you’ll want to learn the berry stitch, watch clip below.)
Now before you get started, you do need to know what the back of this cute little hat looks like, and you’ll be using your tapestry needle to help get the rows at the joining part more even because they are worked in a spiral. Leave the tails a little long of the color sections and you can use it strategically! This is why I love yarn and crochet. It’s pretty forgiving and really you can make it look better if your stitches didn’t quite work out.

Let’s get to the pattern!
Materials
Bernat Roving (80% acrylic, 20% wool, 100 g/3.5 oz, 109 m/120 yds)
1 skein each Rice Paper, Putty, Squashed, Rose Quartz, Low Tide
Size K/6.5mm hook (you could go up one size to the L and the hat would be about a nine-month size with no adjustment to stitch counts)
Tapestry needle, scissors, 4 inch pom pom maker
Size
Baby size 6 months
Stitches
Half Double Slip Stitch (HDSS): Yarn over (YO), insert your hook, YO, pull up a loop and pull directly through loops on hook.
Single Crochet (SC): Insert your hook, yarn over (YO) and pull up a loop, YO, pull through two loops on hook.
Berry Stitch: YO, insert hook, YO, pull up a loop, YO pull through one loop on the hook, YO, insert hook into same space, YO, pull up a loop, YO, pull through all five loops left on the hook.
Pattern
Chain 6. (Leave a fairly long tail that you can use to sew the band together.)
Work in the second chain from the hook and each stitch across a half double slip stitch (HDSS). (5 stitches made) Chain 1 and turn.
In the next 4 stitches, work in the back loop only the half double slip stitch. In the very last space, go under both loops. (this will make a neater appearance for when you work around the band for the hat part.) Chain 1 and turn.
Repeat working the half double slip stitch in the back loops, (except for the last stitch, work under both loops) for 30 rows. (You’ll know it’s 30 for sure if the tail is at the bottom. You’ll be joining the two ends with your tapestry needle by working up towards the loop.)
Match the ends together and sew them together as neatly as possible. You are free to do your own join method as well. I prefer the tapestry needle to get as hidden a finish as possible. Leave the tail hanging and don’t sew it in quite yet. It’s going to be your place marker for each round.
Work 36 SC around the edge of the band. Now you only have 30 spaces to do this so work in the extra that you need as you go. Get them as evenly spaced out as possible. There is no good way to tell you to do this. Just make it work. The 36th SC should be lined up with the tail. And that’s how you’ll know you are at the end of the round each time. (If not, just get a stitch marker and mark the 36th SC)
Do not join. Chain 1 and skip the first SC, SC into the second one. Chain 1, skip the next stitch, SC into the next. This is the mesh stitch. Continue with this pattern around. When you get back to the 36th space, it should be a SC, pull through with Putty just before you finish the stitch. The next space should be a chain space and that is where you will work the first berry stitch.
Berry Stitch round: Work a berry stitch into each chain 1 space, and a SC into each SC space around. In the last SC of the round, pull through with Rice Paper. (18 berries)
Mesh Stitch Round: Continuing in the same direction, CH 1 and begin the mesh stitch by alternating SC, Chain 1, Skip over one, SC. This time though you will be skipping over the Berry you made. So make sure you are working the SC into the SC and chaining one and skipping over the berry. When you get to the end of the round, continue on and work one more round. There are 2 rounds of Mesh Stitch in between each Berry Round. In the last SC pull through with Squashed.
Berry Stitch Round with Squashed: Repeat the instructions above for the berry round.
Work two rounds of Mesh stitch in Rice Paper following the instructions above, pulling through with Rose Quartz in the last SC.
Start the Berry Stitch round in Rose Quartz. Remember to pull through the last SC with Rice Paper.
Work 2 more rows of mesh stitch in Rice paper, then work one Row of Berry stitch in Low Tide.
Then to finish, work two more rows of mesh stitch in Rice Paper, tying off with a long tail you will use to gather the top of the hat with your tapestry needle. Just work in and out of the chain spaces and gently pull the top of the hat together. Work a few more stitches to close up the top.
Weave in all the ends. And here is where you will make the berries stitches line up a little bit better with your needle. If they look crooked to you, just add a bit of yarn color below or above. You’ll see what I mean. Here is your make it work moment!
Now make the giant pom pom with your maker and attach to the top. With this yarn, I did pull the pom pom tight with a string and the yarn. This yarn can pull apart since it is not twisted so adding a piece of string, or another sturdy yarn will help to hold the pom in place. I trimmed my pom down to look tighter and not so much like a mop head, but you can do what you like.
And that’s it! Now you have a cute set to give as a great gift!

Let me know if something doesn’t make sense to you, or anything at all. If you are a beginner I really would like to suggest you start with the blanket just so you can get the berry stitch all worked out and practiced.
And one final tip, if you think about the pattern for this crochet even berry stitch baby hat, you are always working a SC into a SC and a Berry into a chain space. And you are always chaining over a berry. You also are always changing color in the last SC stitch of the round. If you do all these things, your hat will turn out great!
Come and find me on Instagram! Just click on the row of pictures at the very bottom of this page and it will take you straight there. Let’s be crochet friends! And show me your hat. I’d love to see other color combinations!
xo,
Tiffany
Click here or on image below for printable pattern