My sweet 4 year old niece Ruby decided to practice her hairstyling skills without any lessons. Whoops! We all know what happens right? Ruby has no bangs! Ruby actually about gave herself a crewcut!
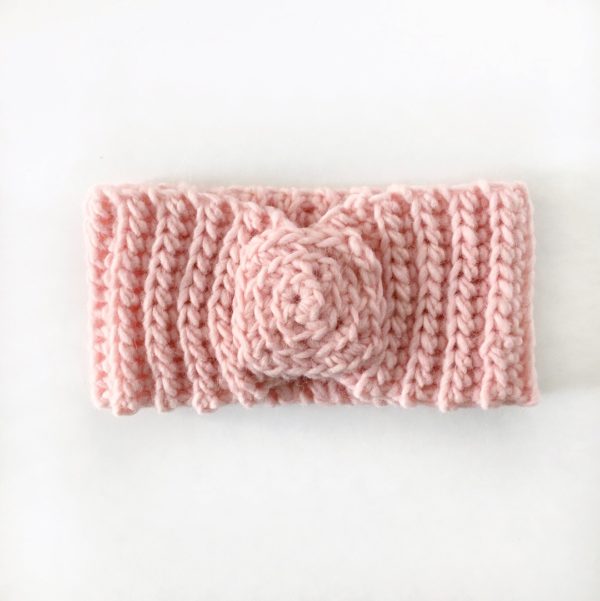
So I swooped in to help save the day and whipped up a pretty cute crochet pink headband to help her along until her hair grows back.
I used Paton’s Alpaca Blend yarn in Peony. It’s a size 5 weight yarn. I used a J size hook. You will be able to make it with one skein. (Probably several!) I made the headband to fit 20-inch head circumference which is about a 4 to 5-year-old head size on average.

This crochet pink headband is made with the Back Loop Half Double Slip Stitch. I’m not sure of its official name, so I’m just describing it as how I’m making it. I am yarning over as if I was making a half double crochet, then I am inserting into the back loop, and then I pull through all the stitches like a slip stitch.
Here is a video clip to demonstrate:
Stitches
Half Double Slip Stitch (HDSS): Yarn over (YO), insert your hook, YO, pull up a loop and pull directly through loops on hook.
Pattern
Chain 15. (Leave a long tail so you can use it to sew the ends together and gather when you are finished.)
Row 1: Starting in the third chain from the hook, work 1 HDSS in each stitch across. (13) Chain 2 and turn. This does not count as a stitch.
Row 2: Work HDSS in the back loop of each stitch across.
Repeat row 2 for a total of 46 rows.
Tie off. Use a tapestry needle to secure the two ends together forming a circle. Then work the yarn back through the stitches gathering the headband together. Tie the two ends together.
Button:
(leave a long tail so you can sew it onto the headband.)
Make a magic ring chain 1 and work 8 sc into the loop. Join with a slip stitch in the back loop to the first SC to form a circle and pull the tail to tighten the circle. Going in the same direction, chain 1 and then work 1 SC, 1 CH, 1 SC into the same stitch you joined. *Work 1 SC into the back loop of next space. Then 1SC, 1CH, 1SC, into next. Repeat * 2 times. Work 1 SC then join in the back loop of the first SC (not the chain.)
Continue in the same direction and always in the back loop, work 1 SC, 1CH, 1SC into the back loop of the chain 1 space. *SC next 3 stitches. In the corner chain space, work 1 SC, 1 CH, 1 SC. Repeat * 2 times.
*SC to the next corner. Work 1 SC, 1 CH, 1 SC. Repeat * around the square until you have the size you would like. Slip stitch to finish and tie off.
With your tapestry needle sew your square button to the gathered part. Weave in all the ends and you are finished!
I hope your crochet pink headband turns out cute! I’d love to see! Come and find me on Instagram @daisyfarmcrafts or on Facebook. I have a page called Daisy Farm Crafts. Let’s be crochet friends.
Thanks for stopping by!
xo, Tiffany

