I’m liking this idea of creating little hats to go along with the blankets I’ve made. Especially when they use the same stitches. So in case you are seeing this post before you’ve seen the red buffalo check blanket I made just last week, here’s what I’m referring to:

All I’ve done for the hat is made the squares a bit smaller in size. I felt that looked better for a hat. I used the exact same border though, for the rim of the hat. This is a back loop only half double crochet stitch. There is a full video tutorial on the blanket where I demonstrate how to make it.
Hat construction can be very easy when you decide to sew up one side and gather the top together. I’ve taken pictures as I went about making this hat so you can have a clear idea of how to put it all together.

I started by making a rectangle of the pattern. Notice that the first and last blocks of color are different. So when, or if, you’d like to customize the size of your hat, keep that in mind and make the number even. After you make the rectangle, then I went and added the ribbed border. I switched to one size smaller hook, and I wish I would have switched even one more down. So play around with this, you want it tighter because it needs to fit snug around the head.

With a tapestry needle, I used the ends that were needing to be woven in as my “thread” to sew the hat together. Do this as neatly as possible, and then weave in the rest. (This is my favorite part about this hat, the join really is hardly noticeable.)

(You can see how I wish my ribbing was a bit tighter. Why I don’t go back and fix at the time, I’ll never know! I should! But oh, well, I solved my issue by rolling up the brim…)
Take the last tail and gather the top of the hat together:
Isn’t that soooo easy? Next, add a pom pom.

I used a 4 inch pom pom maker and then trimmed the pom down to be tighter. So not so mop head looking. And, I think I’m lucky I made the hat a bit tall for a baby head but since I like the brim rolled up, it turned out fine.
And now I have a cute hat to pair with the blanket all ready to gift away!
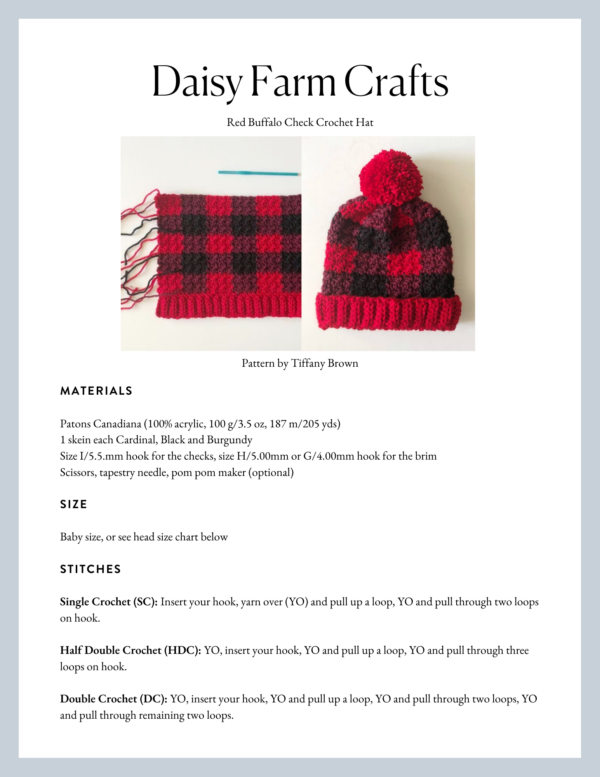
Materials
Patons Canadiana (100% acrylic, 100 g/3.5 oz, 187 m/205 yds)
1 skein each Cardinal, Black and Burgundy
Size I/5.5.mm hook for the checks, size H/5.00mm or G/4.00mm hook for the brim
Scissors, tapestry needle, pom pom maker (optional)
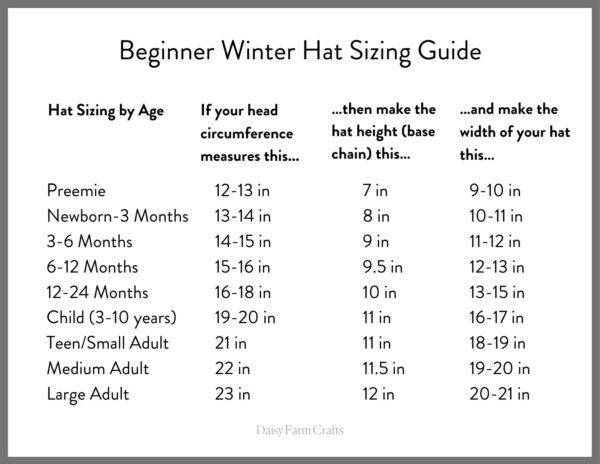
Size
Stitches
Single Crochet (SC): Insert your hook, yarn over (YO) and pull up a loop, YO and pull through two loops on hook.
Half Double Crochet (HDC): YO, insert your hook, YO and pull up a loop, YO and pull through three loops on hook.
Double Crochet (DC): YO, insert your hook, YO and pull up a loop, YO and pull through two loops, YO and pull through remaining two loops.
Pattern
For baby hat size, CH 49 with red, (Each block of color is 6 stitches x 8 blocks = 48 + 1 for the turning chain.)
Row 1: SC in the second chain from the hook. DC in the next. Alternate SC and DC in the next 4 chain spaces, for a total of 6 chains worked. Before finishing the last step of the DC, pull through with burgundy. Alternate SC and DC for the next six chains, carrying the red yarn along and working over it. Change colors after every 6 stitches. (This will always be a DC.) CH 1 and turn.
Rows 2 – 4: Repeat row 1. SC will always be worked into the tops of DC, and DC into the tops of SC. Always ch 1 and turn.
Rows 5 – 8: Cutting off red, work burgundy into red stitches and black into the burgundy. Continue to work SC into the tops of DC and DC into SC, always chain 1 and turn.
Keep repeating the color changes until you have 5 blocks high.
BRIM of Hat
With a smaller hook, pull up a loop in the corner of the foundation chain. CH 8. HDC in the third chain from the hook and in each chain space for a total of 6 HDC. Work one slip stitch into each of the next 2 chain spaces on the foundation chain. Turn, skip over the slip stitches and work one HDC into each of the back loops. CH 2 and turn. Work one HDC into each back loop back to the foundation chain. One slip stitch into each of the next two spaces. Continue repeating and making the ribbing to the end.
Tie off leaving a long tail. Sew the two sides of the hat together using the ends and then weaving in the extra.
Gather the top of the hat with the long tail.
Make a pom-pom, and attach.
Enjoy your hat!
Here is a link to the YouTube video for the Buffalo Check Blanket if you’d like to see the border illustrated or the stitch. (The counts will be different, but the stitch is exactly the same.)
Now, if you’d like, come on over to my Facebook page and in the box that says “write something on the page” leave me a picture of your hat! I love to share all the beautiful items you are making from Daisy Farm Crafts patterns! It’s been so fun to share and also very motivating for others to see your work.
Or, if you are on Instagram, you can tag your pictures using #daisyfarmcrafts and I share those pictures up in stories every Sunday.
I receive comments all the time that seeing everyone else’s work is the fun part about being a follower of the Farm! Yay! I love that too! I completely honored and incredibly humbled that you all love what we make and want to make it for important people in your own lives.
It gives me great hope that one day soon, one of these baby blankets will actually be for my own grand baby!
Have a wonderful crochet day!
All my love, Tiffany
Click here or on image below for printable pattern