
This is my beautiful Instagram friend Elizabeth from Australia! We have been following each other’s accounts for almost three years and last year sometime I asked her if she would be willing to make the pink gingham blanket in a knitted version for me. She is one of those talented women who can both crochet and knit! I think that’s like being able to write with both hands.
She has blown me away with the elegant design of her gingham. She sent it to me last week and it’s so very beautiful in real life.
Our biggest dilemma we talked about with this design is how to make the look as seamless as possible. On the front we did achieve that, but with the back we had to compromise and go with a more textured join which we both agreed still looked really nice.
She used the same yarn as my original pink gingham blanket, Caron Simply Soft and I have to say, the feel of it knitted is so very soft! Elizabeth, who usually works with high-end Australian Merino Wool, commented that this was one of the nicest affordable acrylic yarns to work with.
Here’s a picture of my crocheted version:
I love the border on hers and the tassels were quite the finishing touch!
Elizabeth has very generously wrote down her pattern to share with you here on the website. I wanted it for myself as well, because I do want to learn how to knit someday. But also, because I want my future grandchildren, (the future owners of all these blankets), to be able to know the story behind each blanket. I want them to know the pattern and also a little bit about the person who made the blanket.
Elizabeth is a very kind, young mom of two boys, who owns her own crochet and knitting business called Elizabeth Park Collections. She expertly crafts scarfs, bonnets, and many other beautiful projects for her customers. She usually has a waiting list of at least six weeks. If you are on Instagram, I think you’ll find her account to be so inspiring. It was to me!
I’m so lucky to have found a friend clear across the world!
You also can find her on Facebook. Reach out to her on any of those platforms to inquire about ordering.
Thank you so much, Elizabeth for sharing your wonderful pattern! I hope to do it justice someday. (She promises me that it is the most basic of knit stitches.)
xoxo,
Tiffany
(A PDF version of her pattern is available in her ETSY Shop.)
An Original pattern and design by Elizabeth Jackson of Elizabeth Park Collections
Find me on Instagram and Facebook @elizabethparkcollections
I began knitting as a young girl, being taught by my Mum but it wasn’t until I had children of my own that I discovered the calming and soothing benefits of knitting. I taught myself to crochet via youtube and after being diagnosed with Post Natal Depression, a close friend gave me the gentle nudge to start making for others. Fast forward 3 years, and you find me here; still knitting and crocheting beautiful heirloom pieces but also dabbling in designing and pattern writing.
Yarn
Yarnspirations Caron Simply Soft yarn in Soft Pink – 2x 170g balls (colour A)
Strawberry – 3.5x 170g balls (colour B)
White – 3.5x 170g balls (colour C)
Terminology
St = stitch LH = Left Hand or Left Hand side
YHF = Yarn Held in Front RH = Right Hand or Right Hand side
YHB = Yarn Held in Back
SSKW = Slip Stitch Knit Wise
Equipment
Blanket
– 8mm circular needles or straight needles (whichever you are most comfortable using)
Edging
– 8mm/9mm double point needles
Darning needle
Scissors
Stitch markers
Tension/Gauge
Each coloured square should measure approx.. 4”x 4” or 10.5cm x 10.5cm
Finished Measurements
The whole blanket should be approximately 36” x 37” (91cm x 95cm) not including the tassels
Notes
Yarn is double stranded (or held double as stitched) – knit as you would normally with just 1 strand, but with 2. It gives a chunkier texture and lofty feel to the blanket. This blanket is knit using Garter Stitch. This is when you knit each row. There is no purl stitching in this blanket. This blanket is knitted in long panels and then sewn together to create the Gingham effect.
Cast on using whichever method you prefer. I have used the ‘Long tail cast on’.
Pattern for panels
When changing colours, ensure the colour change happens with the RIGHT SIDE facing you. You will notice there is a little line on the WRONG side. To keep the edges neat for sewing up and edging, slip knit wise the 1 st stitch of each row. To do this, slip the RH needle into the 1 st stitch on the LH needle as if to knit, and slide off onto the RH needle. That’s it. It is that simple.
Panel A
Cast on 14 stitches using colour A (lighter of the two pinks – light pink) HELD DOUBLE.
Row 1: SSKW, knit all sts to end of row.
Row 2: Repeat Row 1. Place a stitch maker IN one of the stitches on the row you’ve just knitted. (so in a bump of a st and NOT on the needle) – this makes it easy to identify which side is the front and which is the back.
Row 3-20: knit all sts, ending on a wrong side.
Row 21: with two strands of colour B (darker of the two pinks – strawberry), knit across the entire row (and knit the 1st st instead of slip stitching it)
Repeat Row 1-21, alternating between the light and dark colours in row 21.
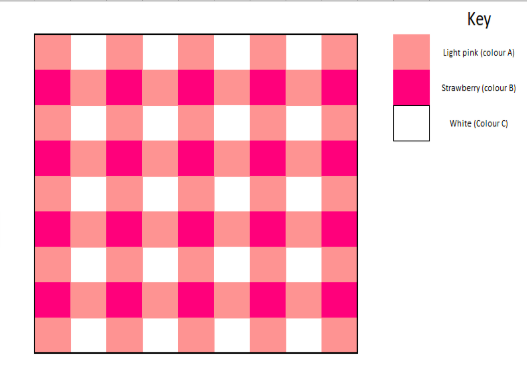
Each panel needs to have 9 coloured squares in total, 5x light pink and 4x dark pink) – SEE GRAPH
Panel B
Cast on 14 stitches using colour C (white) HELD DOUBLE.
Row 1: Slip 1st knit wise, knit all sts to end of row.
Row 2: Repeat Row 1. Place a stitch maker IN one of the stitches on the row you’ve just knitted. (so in a bump of a st and NOT on the needle) – this makes it easy to identify which side is the front and which is the back.
Row 3-20: knit all sts, ending on a wrong side.
Row 21: with two strands of colour A (lighter of the two pinks – light pink), knit across the entire row (and knit the 1st st instead of slip stitching it)
Repeat Row 1-21, alternating between the white and light pink in row 21
Each panel needs to have 9 coloured squares in total, 5x white and 4x light pink) – SEE GRAPH
Continue knitting until you have 5x Panel A’s and 4x Panel B’s
Finishing
Sewing the panels together:
Lay all panels RIGHT SIDE up and make sure all panels are the same length. (remember the RIGHT SIDE of each panel is the side without the little lines appearing when you’ve changed colour) Starting with Panel A, start to join them together with Panel A’s RH side and Panel B’s LH side. You can use any method to join the panels together, I preferred to use the “Mattress Stitch” method.
Continue joining all the panels together until all panels are joined ending with the last Panel A. You will have joined the last Panel B to the LH side of the last Panel B. (see graph) You will notice the gingham pattern emerging as you sew the panels together.
Weave in all the ends.

Icord edging
When knitting the icord edging, always make sure you pull the 1st stitch tight to ensure the icord wraps around the edge of the blanket.
I knitted the icord using every stitch in the sides and the bottom of the blanket. Make sure you maintain a balanced tension when knitting the icord; if you are too tight, the edging and blanket will be distorted. Too loose a tension and the icord won’t cover the blanket edging.
With your 9mm double point needles (or 9mm circular needles if you prefer) cast on 4st.
1. With the WRONG SIDE of the blanket facing towards you, using the same needle as the Cast On stitches (your working needle), put it through any side edge stitch (see photo), then yarn over and pull through the yarn-over. Now you have 5st on your working needle.
2. Push all 5st to the opposite end of the needle (be careful not to push them off the other end)
3. Knit the 1st st and pull the working yarn tight. Knit the next 2st, then knit through the back loop of the next 2st – decreasing back down to 4 st.
4. Repeat Step 1, 2 and 3 until you reach the first corner.
Corners when Icording
1. When you reach a corner, knit a total of 3x icord stitches in the corner stitch. Then continue as above.
Once you have come back around to the place you started your icord, we will now graft the ends
together for a seamless and invisible join.
1. Finish on Step 3 of the above icord steps – making sure you have 4st on your needle.
2. Cut yarn with about 20cm or 8 inches of length spare. Thread onto a darning needle.
3. Push all 4st to the opposite end of the needle. (continued overleaf)
4. Put darning needle purlwise through the 1st st and pull yarn through. Let this st drop off the needle (3st left on the needle)
5. Find the 1st V stitch in the beginning icord section. Slide the darning needle from right to left under the V of the stitch. Pull yarn through. DO NOT PULL TIGHT.
6. Put the darning needle purlwise through the LH side of the 1st st V and through the 2nd st on the needle. Pull yarn through and drop the 2nd stitch off the needle.
7. Repeat steps 5 and 6 once more and then step 5 again once more.
8. Put darning needle purlwise through the LH side of the 4th st – the one you just dropped off the needle to finish the graft.
9. Now use the darning needle only to move and manipulate the grafted stitches to
ensure the join is invisible.
10. Once happy with the join, weave in the end of the working yarn and cut.
Making Tassels
Cut a piece of cardboard measuring approx. 15cm x 15cm (or 6inches x 6inches).
Cut 16x pieces of yarn approx. 60cm in length. These will be to go around the tassel to hang and to make the head.
With the yarn held double (two strands at a time) wrap it around the cardboard 70x times.
Don’t wrap it too tightly, otherwise the cardboard may warp. Cut the yarn at the bottom of the cardboard. With two of the strands 60cm in length, slide one end under the wrapped yarn. Pull both ends up to the top making sure they are even in length. Tie a knot tightly – this might be tricky, you may want to call upon a friend to help.
Slide the tied wrapped yarn off the cardboard.
Holding the knotted ties at the top, smooth over the bottom section. With another two pieces of long 60cm lengths, tie up the head section.
Weave in all the ends from the head section back into the bottom of the tassel. Cut along the folded pieces at the bottom of the tassel. Give it a little shake to loosen the strands. Make another 3 tassels.
Disclaimer: While Elizabeth Park Collections does its best to ensure every pattern is accurate, we request that the
designer be contacted for clarification/to answer any queries – elizabethparkcollections@gmail.com
