
I continue to be totally in love with using Bernat Blanket Tiny yarn for my baby blankets. I love how soft and squishy it is. I’ve also been wanting to figure out a way to use Pipsqueak Yarn, that wouldn’t involve too much actual crocheting, because it really is a tough one to see the stitches made.
The dots on this blanket, made with Pipsqueak, are sewed on, after I finished crocheting the blanket using half double crochet, working in between the posts (which we also like to call wide HDC). This stitch is exactly like normal HDC, but you are inserting your hook in between the posts of the row below instead of the tops of the stitches. You can see how to do this in the video below or click here to watch it on YouTube:
And I love how the border turned out! It’s a very simple version of my polka dot border where I just am using a DC5TOG cluster stitch separated by slip stitches.

Here’s a written out version of the DC5TOG stitch: Yarn Over (YO) insert your hook into the designated space, YO and pull back through. YO and pull through 2 loops on hook. *YO, insert your hook again into the same designated space, YO and pull back through. YO and pull through 2 loops on hook. Repeat the instructions from the * 3 more times. Then, YO and pull through all loops on your hook, there should be 6.
I also have a video that you can watch if you are interested in learning how to make the edge. (Please note: this video is for a different blanket and I put 3 slip stitches between the clusters, but in this blanket, I made 4 slip stitches in between.)

Materials
3 skeins Bernat Baby Blanket Tiny in White
1 skein Bernat Pipsqueak in Pink
Size H/5.00mm hook, scissors, tapestry needle
Safety pins
Size
Finished size 30 in x 30 in
Stitches
Half Double Crochet (HDC): YO, insert your hook, YO and pull up a loop, YO and pull through three loops on hook.
Wide Half Double Crochet (WHDC): YO, insert your hook between stitch posts, YO and pull up a loop, YO and pull through three loops on hook.
Double Crochet 5 Together (DC5TOG) Bobble: YO insert your hook into the designated space, YO and pull back through. YO and pull through 2 loops on hook. *YO, insert your hook again into the same designated space, YO and pull back through. YO and pull through 2 loops on hook. Repeat the instructions from the * 3 more times. Then, YO and pull through all loops on your hook, there should be 6.
Pattern
Chain 102 with White. (There is no pattern repeat, feel free to chain any number to the size you want.)
Row 1: Starting in the 3rd chain from the hook, work 1 HDC in each chain. CH 2 and turn.
Row 2: Work 1 WHDC in each space across the row, making sure not to miss the last space between the last post and the turning chain. CH 2 and turn.
Add remaining rows until your blanket is square by repeating Row 2.
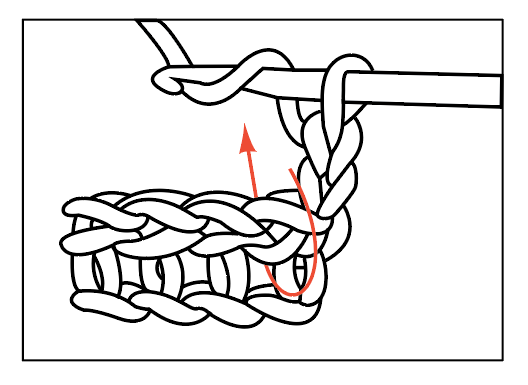
Border
After finishing your last row of the blanket, chain 2 and turn the blanket to work down a side. HDC one stitch per one row. Work 3 HDC into the corner space. Continue working with HDC in between the posts across the bottom. Work 3 HDC into the corner space. Work up the side in the same manner as before crocheting 3 HDC into the corner space. Work HDC’s across the top. Finish with 3 HDC in the corner and join with a slip stitch to starting chain 2. CH 2 and work in the same direction around the blanket 4 more times for a total of 5 rounds of border.
Pom Pom Round: Continuing on in the same direction, slip stitch the next 4 spaces. *CH 3. In the first of the chain 3’s, work DC5TOG Bobble. Slip stitch into the next stitch and the next 3. Repeat from * around the entire blanket.
Dots
With your safety pins, mark the area where you would like to sew on your dots. Cut a piece of pipsqueak yarn approximately the width of the blanket. (If you are doing a larger size than the size given here, cut about 28 inches of pipsqueak.) Thread through the needle, insert needle and bring it back up the width of three stitches, or your preference. Leave a 3 inch tail. Weave the needle in and out making a circle shape then start filling in the circle. Check the back of the work and fill in any spaces as you go.
There is no wrong way to do this, just work your needle up and down to fill in and cover the white yarn, you want the dots to look the same on both sides. When you have a small amount left, finish on the same side of the blanket that the first tail is on and tie the two ends together in a tight knot. Cut the ends as short as you can to disguise them.
Feel free to make the dots as big or as little as you wish!

I told Hannah after I finished this blanket it reminded me of a frosted cake with little beads around the edge. It really is a stunning blanket in real life. I hope you’ll give Bernat Baby Blanket Yarn a try with the Pipsqueak.
Here’s a slightly different version I made for little Ava and her baby doll! (She’s my daughter in law’s little sis.)

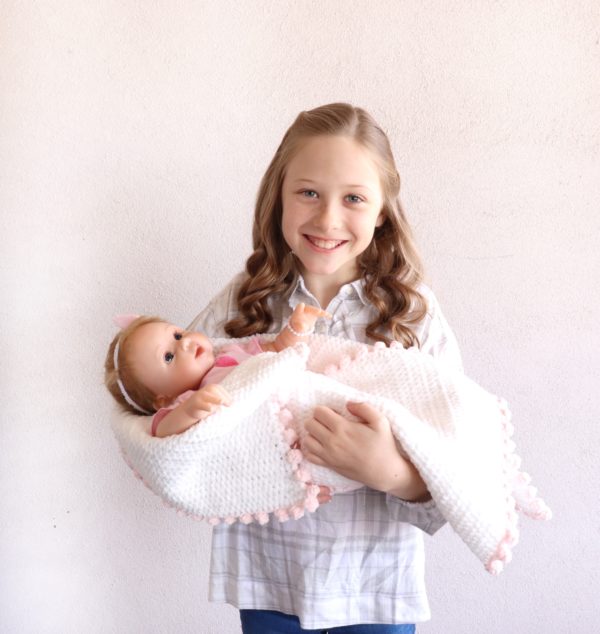
Isn’t she so cute? This yarn is perfect for doll blankets too!
Thank you for stopping by! We sure are having fun sharing what we are making as we prepare for hopeful grandma-hood for me and mom-hood for her!
As Daisy Farm Crafts has grown, we try our hardest to answer email, but we simply cannot respond to all of you. Please check out our Instagram @daisyfarmcrafts where every day we are sharing what we are making and giving tips and instructions. We also have a @daisyfarm.stitches page where you could practice making swatches with the stitches we use for our blankets. We try and write our instructions as beginner friendly as possible.
I’m so glad you love to crochet as much as us! Have a wonderful crochet day!
xo, Tiffany
Click here or on image below for printable pattern
![]()