I loved making this Linked Stitch Hat so much I decided to quickly make one for baby Jack.
I changed the yarn to Sugar Bush Extra Fine Merino Wool as I’m finding that it has bounce to it almost like a natural elasticity that makes the hat fit better.
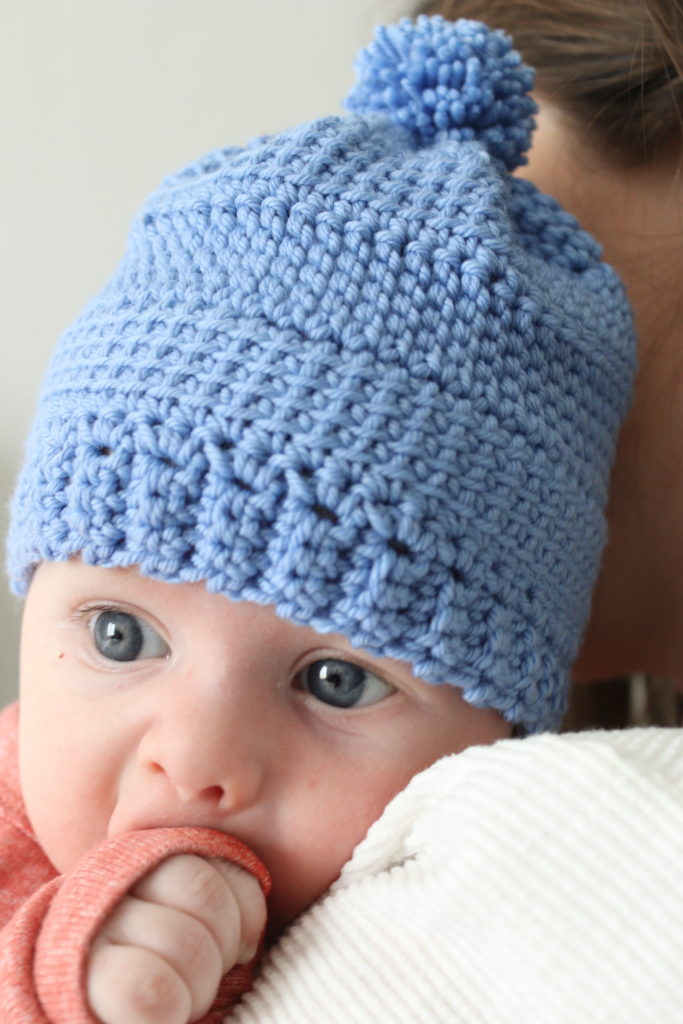
In this close up you can see the two sides of the linked stitch. The stitch can be as tall as you wish, I chose 5 chains high for each section as the original pattern, but I only needed to work 4 rounds to get to the height I needed for the baby size.
I also changed the height of the brim to be smaller for a baby.
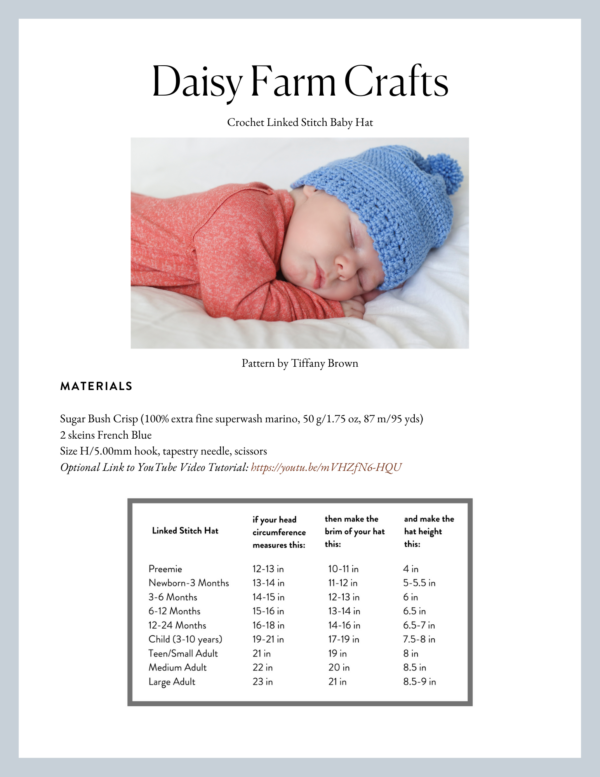
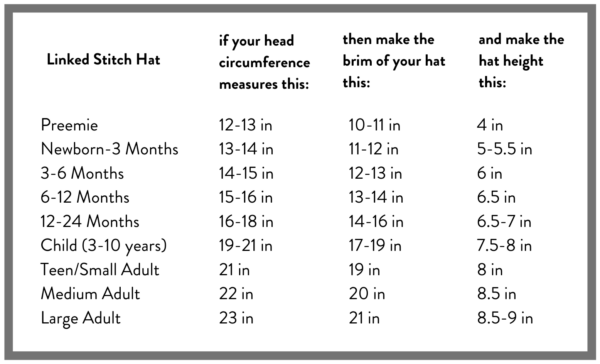
Here’s a size chart that I use that will help you decide the width and height of your hat.
Here’s Annie in the original linked stitch hat pattern made with Red Heart Dreamy yarn:

Materials
Sugar Bush Crisp (100% extra fine superwash marino, 50 g/1.75 oz, 87 m/95 yds)
2 skeins French Blue
Size H/5.00mm hook, tapestry needle, scissors
Stitches
Linked Stitch: Chain 5, (or any number that makes the height of the stitch you’d like to make but for this pattern we use 5 chains) Insert your hook into the second chain from the hook, yarn over and pull a loop back through, *insert your hook into the next chain, yarn over and pull a loop back through. Repeat from * two more times, (until all chains are worked. Yarn over and pull through two loops 4 times and until you have one loop remaining on the hook. To begin the next stitch, instead of working into chains, look for the horizontal bar and front loop of the corresponding stitch.
Back Loop Single Crochet (SC): Insert hook into back loop only of stitch, YO and pull a loop, YO and pull through both loops on the hook.
Slip Stitch (SL ST): Insert hook, YO, pull a loop and through loop on hook.
Pattern
Brim
Chain 5.
Row 1: In the second chain from the hook, work 1 SC. SC into each chain across the row. CH 1 and turn. (4)
Row 2: SC into the first st of the row. Work back loop SC into each of the next 2 sts. SC into the last st. CH 1 and turn.
Rows 3 to 2 inches shorter than the head circumference needed (Refer to the size chart): Repeat ROW 2.
When your band is the length you need, CH 1 and turn band so you are working along one long end. Work 1 SC into the end of the first row. Skip one row, work 2 SC into the next row, repeat from * to the end.
Tip: Work into the dips or valleys at the end of a row and skip over the peak rows.
Hat
Chain 5.
Work linked stitch. Insert your hook into the second chain from the hook, yarn over a pull a loop through, insert your hook and pull up a loop into each of the next three chains. Insert your hook into the SC on the band. Yarn over and pull through two loops 5 times.
*Work linked stitch underneath the horizontal bar and front loop of corresponding stitch 4 times. Insert hook final time underneath the next SC on the band. Yarn over and pull through two loops 5 times. Repeat from * across the row.
Chain 5 and turn. Work linked stitch across the row.
Work 5 rows of linked stitch.
You may choose to slip stitch your two sides together or use your tapestry needle to sew the two ends together.
Gather the top of your hat by weaving your tapestry needle in and out of the front loop of each stitch, pull tight to close.
Attach a pom pom.
Here’s a video tutorial that I made for the original Linked Stitch hat that can help you:

We wore baby Jack out taking photos of him in his little hat.
Thank you for stopping by the website!
Happy Crocheting! xo, Tiffany
Click here or on image below for printable pattern