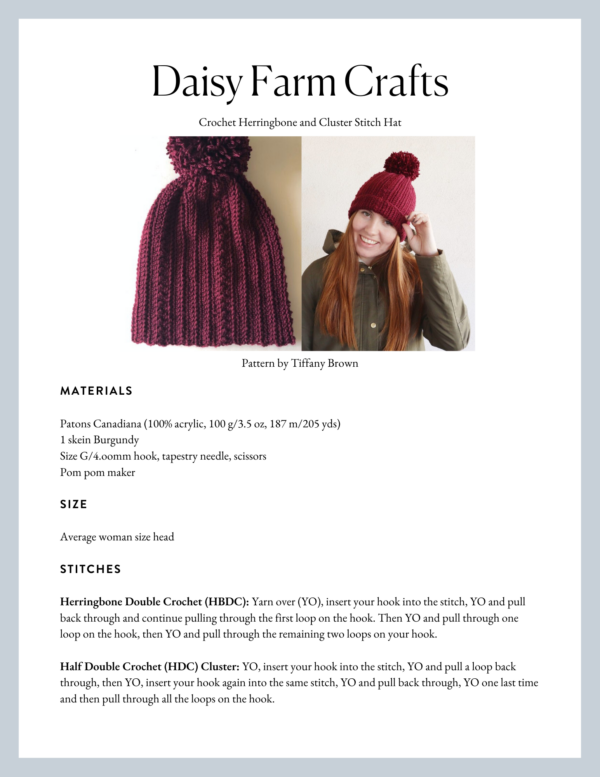
I needed to make a quick hat for Annie for this coming Thanksgiving weekend. And when I say quick, I mean I want to make the whole thing in a day if possible.
I did start this the night before, and had to undo and re-do a few rows, to get the sizing right, but I would guess, that now that I have the pattern down, I could make it in a solid three hours of work? I hate estimating though, we all crochet so differently. And since I just crochet usually alone, I don’t even know how I compare to others.
The construction is what is so simple. It’s a flat panel, that you sew up the side and gather the top. The tapestry needle, (blunt end with a big eye type needle,) is your friend with this project. As Annie was trying this on, we couldn’t even find the seam. Using the needle does a great job making the seam invisible.

The above is a picture of the work laying flat and ready to fold in half to sew. But it is worked back and forth and so the sample is laying on its side. I don’t want to confuse you and have you think you are crocheting vertical.
I used a herringbone double crochet stitch. It is a stitch that is so similar to the Double Crochet. Don’t be afraid to give it a try. You yarn over, insert your hook into the stitch, yarn over and pull back through and continue pulling through the first loop on the hook. Then yarn over and pull through one loop on the hook, then yarn over and pull through the remaining two loops on your hook.
The other stitch I use is a half double crochet cluster. With that stitch, I yarn over, insert my hook into the stitch, yarn over and pull a loop back through, then yarn over, insert my hook again into the same stitch, yarn over and pull back through, yarn over one last time and then pull through all the loops on the hook.
I do have a video you can watch, to get a general idea of the stitch, the difference is that this hdc-cluster is being worked into a HDC, and in this pattern, you simply will be working into/under the two loops of the herringbone stitch. (And if you are curious as to what project I used that stitch for, you can find it here.)
(disable your ad-blocker if the video isn’t showing)

I also used a foundation chain to start the first row. I am highly recommending you to do this. It keeps everything stretchy, but it’s okay if you don’t, I’m just recommending that if you know it, you should use it.
Would you like to learn it? I did a demonstration in a video I made for my Buffalo Check blanket. Watch by clicking those highlighted words.
I use a Clover 4 inch pom pom maker to make the pom. If you are familiar with those, my tip is to use a thin cotton type string so you can really pull the middle of the pom tight. Then I leave long tails, and thread them through the top of the gathered hat and then knot the string on the inside of the hat. I try and secure them as tight as possible.

Oh, I just remembered as I looked at this picture, the herringbone stitch is worked into the back loops of the stitch of the row below. That helps to form those lines. And feel free to mix up the amount of clusters. Maybe you will want them more often. I think that might be pretty too! Just make sure you are doing them all on the same side of the hat. You’ll know it’s going to be on the correct side if when you go to make a cluster row, previous cluster rows are on the back or facing away from you.
Materials
Patons Canadiana (100% acrylic, 100 g/3.5 oz, 187 m/205 yds)
1 skein Burgundy
Size G/4.oomm hook, tapestry needle, scissors
Pom pom maker
Size
Average woman size head
Stitches
Herringbone Double Crochet (HBDC): Yarn over (YO), insert your hook into the stitch, YO and pull back through and continue pulling through the first loop on the hook. Then YO and pull through one loop on the hook, then YO and pull through the remaining two loops on your hook.
Half Double Crochet (HDC) Cluster: YO, insert your hook into the stitch, YO and pull a loop back through, then YO, insert your hook again into the same stitch, YO and pull back through, YO one last time and then pull through all the loops on the hook.
Single Crochet (SC): Insert your hook, YO and pull up a loop, YO and pull through two loops on hook.
Pattern
Make a SC foundation chain, in a length approximately from the tip of the nose to the crown of the head. This can be any number, there is not a pattern repeat. But make sure you count and know what that number is. Sometimes it is hard to see exactly the last stitch of the row and your hat can start growing on you.) My chain number was 40.
Chain 2, (this will count as the first stitch now and throughout.) Work your first herringbone double crochet (HBDC) in the next space, back loop only, and in each space across the row.
CH 2 and turn. (Again, this counts as the first stitch, so work into the next space.) Work HBDC in each back loop stitch across. Your last stitch will be into the top of the turning chain.
Work the back loop herringbone stitch for 9 rows total. On the 10th row, after chaining 2 and turning, in the next stitch, work your first cluster. In the next stitch, work 1 SC. Repeat Cluster, SC across the row. CH 2 and turn.
Work 9 more rows of HBDC. Then cluster/SC on the tenth row. Repeat this 4 times. Then start measuring it around your head. I needed to make about 8 rows and then finished with one row of clusters and then I sewed the ends together.
With your tapestry needle gather the top and attach the pom.
Weave in ends and you’re finished!
Thanks for stopping by! I mostly have been making so many baby blankets, that it’s nice to have a quick project to share with you all! If you are new to Daisy Farm Crafts, I hope you’ll click around and get to know us! We are a mother and daughter team now, (used to just be me, the mom, and my daughter Hannah was the tech, but as she kept editing my posts and helping me, she learned to crochet and now she designs too!)
Come and find us on Instagram and share your work with us! We love to see and share with our followers. Or we have a facebook page, you can share your photos to us there too!
Have a wonderful crochet day!
xo, Tiffany

Click here or on image below for printable pattern