
If you’ve been around the Daisy Farm for a while, maybe you’ll have seen this classic “Boxed Block” pattern shared a few times. It’s one of our favorites! It’s also a favorite of Betsy Desmond, our dear crochet friend in the Daisy Farm Crafters Group on Facebook.
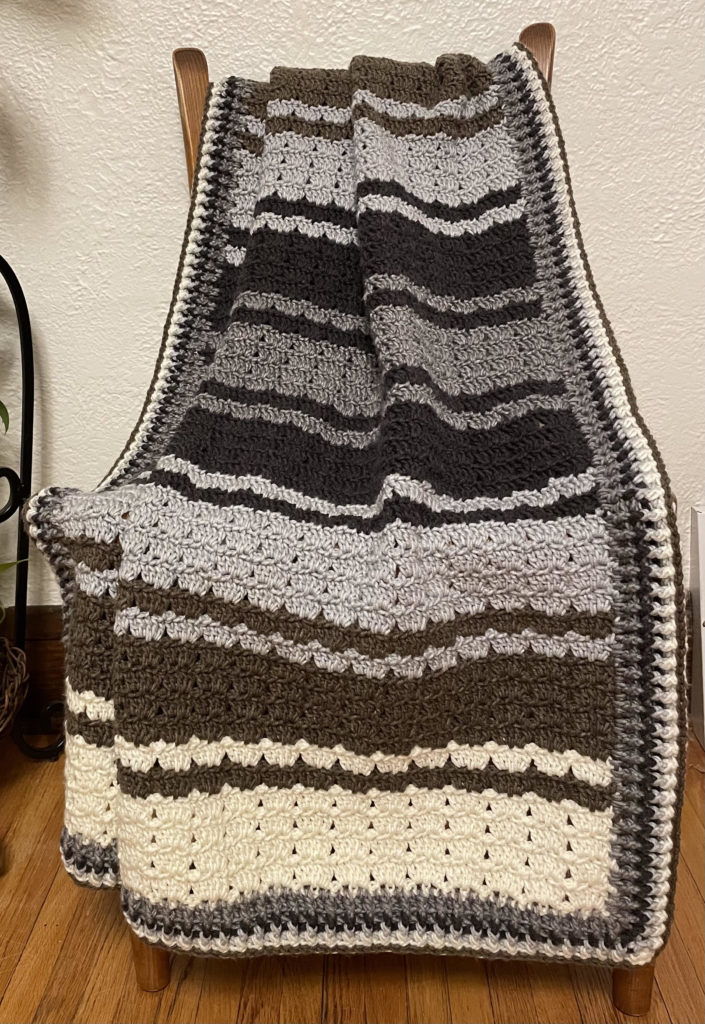
She has made this pattern a few times and has come up with a new way to begin the blanket and also made an adjustment to the 5 double crochets worked around the chain 3’s. She has worked the DC’s in a way that “anchors” the stitch to the row below and makes the blanket have a less open look.
Betsy generously emailed us with a pattern revision that she would like to share with you all.
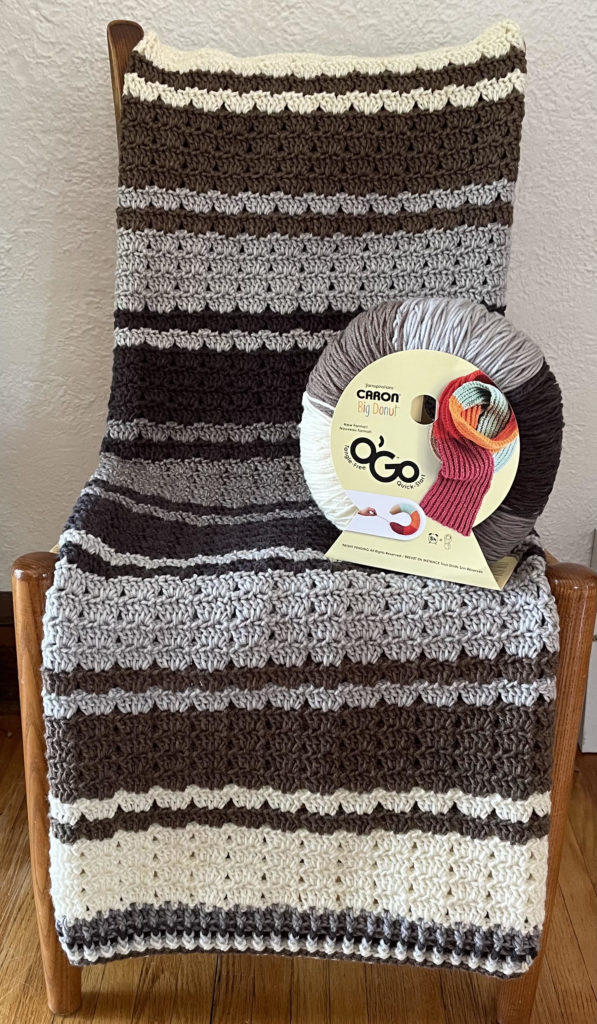
I also love that she tried the new O’go yarn so we could see what it looks like all worked in a blanket. I have been experimenting with Caron Big Donut and I really like it. It’s like a very nice acrylic that feels like fine merino wool to me.
Stitches (US Terms)
Slip Stitch
Materials
Finished size approximately 34 x 44 inches
3 Wheels Caron Big Donut O’go Boston Cream (Click name of yarn for details from Yarnspirations.)
Size I/5.5mm hook, scissors, tapestry needle
Pattern
CHAIN 123 (Multiple of 5, plus 3)
ROW 1: Starting in the 2nd chain from the hook, work 1 SL ST into each of 2nd and 3rd chains from the hook, *CH 3. Skip three chains, work 1 SL ST into each of the next two chains. Repeat from * to the end of the row. CH 3 and turn.
ROW 2: Starting in the space made by the chain 3 in the previous row, *work 2 DC around the chains, reach hook down to the previous row and work 1 DC into the 2nd chain, 2 DC around the chain 3’s. Repeat from * to the end of the row. Skip 1 stitch, work 1 DC into the last stitch. CH 1 and turn.
(Tip: You are anchoring the 3rd DC of the 5 DC that are working around the chains to the row below by working that DC into the middle stitch of the row below. This is helping to eliminate the gap caused by working 5 DC around the chain 3’s.)
ROW 3: Work 1 SL ST into each of the first two stitches, *CH 3. Skip three stitches, work 1 SL ST into each of the next two stitches. Repeat from * to the end of the row ending with SL ST in the last 2 stitches. CH 3 and turn.
(Tip: the turning CH 3 counts as a stitch, therefore the last stitch of this row will be placed in the top of the turning chain, or if it is easier, into the space made by the turning chain.)
ROW 4: Starting in the space made by the chain 3, *work 2 DC around the chain space, work 1 DC into the top of second skipped DC stitch of the previous row below, 2 DC around the chain space. Repeat from * to the end of the row. Skip 1 stitch, work 1 DC into the last stitch. CH 1 and turn.
REPEAT ROWS 3 AND 4: to complete the color sequence described below. Pull through the new color on the last slip stich of the color section (insert hook, pull through with new color, continue pulling new color through stitch on the hook, CH 3 and turn).
FINAL ROW: To form a base for the border that matches the foundation, using Ivory work 1 SL ST into each of the first two stitches, *CH 1. Skip one stitch, work 1 SL ST into the next stitch, CH 1 and skip one stitch, 1 SL ST into each of the next two stitches. Repeat from * to the end of the row ending with SL ST in the last 2 stitches.
(Tip: the turning chain-3 counts as a stitch, therefore the last stitch of this row will be placed in the top of the turning chain, or if it is easier, into the space made by the turning chain.)
Color sequence (sets of DC row and SL ST row)
Ivory 4
Tan 1
Ivory 1
Tan 4
Light Gray 1
Tan 1
Light Gray 4
Cocoa 1
Light Gray 1
Cocoa 4
Dark Gray 1
Cocoa 1
Dark Gray 4
Cocoa 1
Dark Gray 1
Cocoa 4
Light Gray 1
Cocoa 1
Light Gray 4
Tan 1
Light Gray 1
Tan 4
Ivory 1
Tan 1
Ivory 4
BORDER: Post Ribbing specific to this pattern. To use only 3 Big Donuts, the border used 2 rows Dark Gray DC post ribbing (the greatest remaining yarn as only one block of the pattern used this color), and a HDC row of each of the rest of the colors ending with the tan color for the SL ST row, as the tan remainder was the least for this color and not quite enough for a HDC ribbing row.
BORDER ROUND 1: Work DC around the blanket so that it lays flat. This involves trial and error as the yarn, hook and tension will vary. For this blanket I used 4 DC for each block on the top and bottom (skipping the middle stitch of each section, working into each of the 2 SL ST that are together and the 2 chain spaces). If it doesn’t lay flat try adding the 5th stitch every other section or placing stitches into all 5 per section; 3 DC in each corner (stitching into the top of the first and last stitch of the row for the corners as less stretching occurs); on the sides 1 stitch at the end of each SL ST row, 2 stitches at the end of each DC or CH space on the sides (To eliminate large holes along the sides I did the following for the 3 stitches: 1. DC into the end of the SL ST row, 2. DC around DC/CH into the center thread of the next DC post to anchor the stitch, 3. DC into DC/CH space)
BORDER ROUND 2: When you reach the corner you started with, work 3 DCs into the corner, then go around the blanket again, this time alternating front and back post double crochet.
A front post DC means you insert your hook from front to back around the post of the next DC and work your DC. A back post DC means you insert your hook from the back to the front and work a DC.
When you get to the corners of this row, you will want to continue the pattern of alternating front and back post double crochet, but you will work three stitches around the corner post.
So, for example, if you get to the corner post and you are supposed to work a front post DC, then work a front post DC, a back post DC, and a front post DC all around that corner post. Then in the next stitch you would continue the alternating pattern, working the opposite of whichever stitch you just used (in this example, you would work a back post DC).
Just remember that you are always alternating front and back post double crochet around the whole blanket, you just happen to be working three of those stitches around the same post when you are working the corners.
BORDER ROUNDS 3 – 5: When you finish row 2, change color for each row as available yarn allows. Work 3 HDCs into the corner you started with and repeat row 2 two more times, but with HDC instead of DC around the blanket, until you have border 5 rows total. Always match your posts so that they are poking out in the same direction as the row below. Because it would be difficult to make 3 HDC around a corner post, the 3 corner HDC are made between 2 corner posts instead.
FINAL BORDER ROW: Slip Stitch (SL ST) around (corners will receive one SL ST in each stitch). If using a contrasting color, you will notice that the front and back look very different. Turn the work if you prefer the contrast primarily on the back.
For a free printable version, look for the black bar below that says “print”.
CHAIN123 (Multiple of 5, plus 3) ROW 1Starting in the 2nd chain from the hook, work 1 SL ST into each of 2nd and 3rd chains from the hook, *CH 3. Skip three chains, work 1 SL ST into each of the next two chains. Repeat from * to the end of the row. CH 3 and turn. ROW 2Starting in the space made by the chain 3 in the previous row, *work 2 DC around the chains, reach hook down to the previous row and work 1 DC into the 2nd chain, 2 DC around the chain 3's. Repeat from * to the end of the row. Skip 1 stitch, work 1 DC into the last stitch. CH 1 and turn. (Tip: You are anchoring the 3rd DC of the 5 DC that are working around the chains to the row below by working that DC into the middle stitch of the row below. This is helping to eliminate the gap caused by working 5 DC around the chain 3's.) ROW 3Work 1 SL ST into each of the first two stitches, *CH 3. Skip three stitches, work 1 SL ST into each of the next two stitches. Repeat from * to the end of the row ending with SL ST in the last 2 stitches. CH 3 and turn. (Tip: the turning CH 3 counts as a stitch, therefore the last stitch of this row will be placed in the top of the turning chain, or if it is easier, into the space made by the turning chain.) ROW 4Starting in the space made by the chain 3, *work 2 DC around the chain space, work 1 DC into the top of second skipped DC stitch of the previous row below, 2 DC around the chain space. Repeat from * to the end of the row. Skip 1 stitch, work 1 DC into the last stitch. CH 1 and turn. REPEAT ROWS 3 AND 4 to complete the color sequence described below. Pull through the new color on the last slip stich of the color section (insert hook, pull through with new color, continue pulling new color through stitch on the hook, CH 3 and turn). FINAL ROW To form a base for the border that matches the foundation, using Ivory work 1 SL ST into each of the first two stitches, *CH 1. Skip one stitch, work 1 SL ST into the next stitch, CH 1 and skip one stitch, 1 SL ST into each of the next two stitches. Repeat from * to the end of the row ending with SL ST in the last 2 stitches. (Tip: the turning chain-3 counts as a stitch, therefore the last stitch of this row will be placed in the top of the turning chain, or if it is easier, into the space made by the turning chain.) Color sequence (sets of DC row and SL ST row)Ivory 4Tan 1Ivory 1Tan 4Light Gray 1Tan 1Light Gray 4Cocoa 1Light Gray 1Cocoa 4Dark Gray 1Cocoa 1Dark Gray 4Cocoa 1Dark Gray 1Cocoa 4Light Gray 1Cocoa 1Light Gray 4Tan 1Light Gray 1Tan 4Ivory 1Tan 1Ivory 4 BORDER – Post Ribbing specific to this patternTo use only 3 Big Donuts, the border used 2 rows Dark Gray DC post ribbing (the greatest remaining yarn as only one block of the pattern used this color), and a HDC row of each of the rest of the colors ending with the tan color for the SL ST row, as the tan remainder was the least for this color and not quite enough for a HDC ribbing row. BORDER ROUND 1: Work DC around the blanket so that it lays flat. This involves trial and error as the yarn, hook and tension will vary. For this blanket I used 4 DC for each block on the top and bottom (skipping the middle stitch of each section, working into each of the 2 SL ST that are together and the 2 chain spaces). If it doesn’t lay flat try adding the 5th stitch every other section or placing stitches into all 5 per section; 3 DC in each corner (stitching into the top of the first and last stitch of the row for the corners as less stretching occurs); on the sides 1 stitch at the end of each SL ST row, 2 stitches at the end of each DC or CH space on the sides (To eliminate large holes along the sides I did the following for the 3 stitches: 1. DC into the end of the SL ST row, 2. DC around DC/CH into the center thread of the next DC post to anchor the stitch, 3. DC into DC/CH space) BORDER ROUND 2: When you reach the corner you started with, work 3 DCs into the corner, then go around the blanket again, this time alternating front and back post double crochet. A front post DC means you insert your hook from front to back around the post of the next DC and work your DC. A back post DC means you insert your hook from the back to the front and work a DC. When you get to the corners of this row, you will want to continue the pattern of alternating front and back post double crochet, but you will work three stitches around the corner post. So, for example, if you get to the corner post and you are supposed to work a front post DC, then work a front post DC, a back post DC, and a front post DC all around that corner post. Then in the next stitch you would continue the alternating pattern, working the opposite of whichever stitch you just used (in this example, you would work a back post DC). Just remember that you are always alternating front and back post double crochet around the whole blanket, you just happen to be working three of those stitches around the same post when you are working the corners. BORDER ROUNDS 3-5: When you finish row 2, change color for each row as available yarn allows. Work 3 HDCs into the corner you started with and repeat row 2 two more times, but with HDC instead of DC around the blanket, until you have border 5 rows total. Always match your posts so that they are poking out in the same direction as the row below. Because it would be difficult to make 3 HDC around a corner post, the 3 corner HDC are made between 2 corner posts instead. FINAL BORDER ROW: Slip Stitch (SL ST) around (corners will receive one SL ST in each stitch). If using a contrasting color, you will notice that the front and back look very different. Turn the work if you prefer the contrast primarily on the back.Anchored Boxed Block Stitch Blanket by Betsy Desmond

Materials
Instructions
And here’s a link to the original boxed block pattern that I made several years ago for my niece’s new baby boy.
Thanks again to Betsy! You can find her as a member of the Daisy Farm Crafter group on Facebook. She is a valuable member of the community offering her help whenever she can. It’s a wonderful group where lots of people help with the patterns here on the site.
You also can share your projects that you made with our patterns. It’s so fun to see all the variety. Come and join!
Sending you my crochet love,
Tiffany