
Breathtaking!
We took Kate to a professional newborn photographer to capture her at just 10 days old. Elizabeth, my daughter-in-law and Kate’s mommy, and I thought it would be so cute to have her wear a crocheted bonnet.
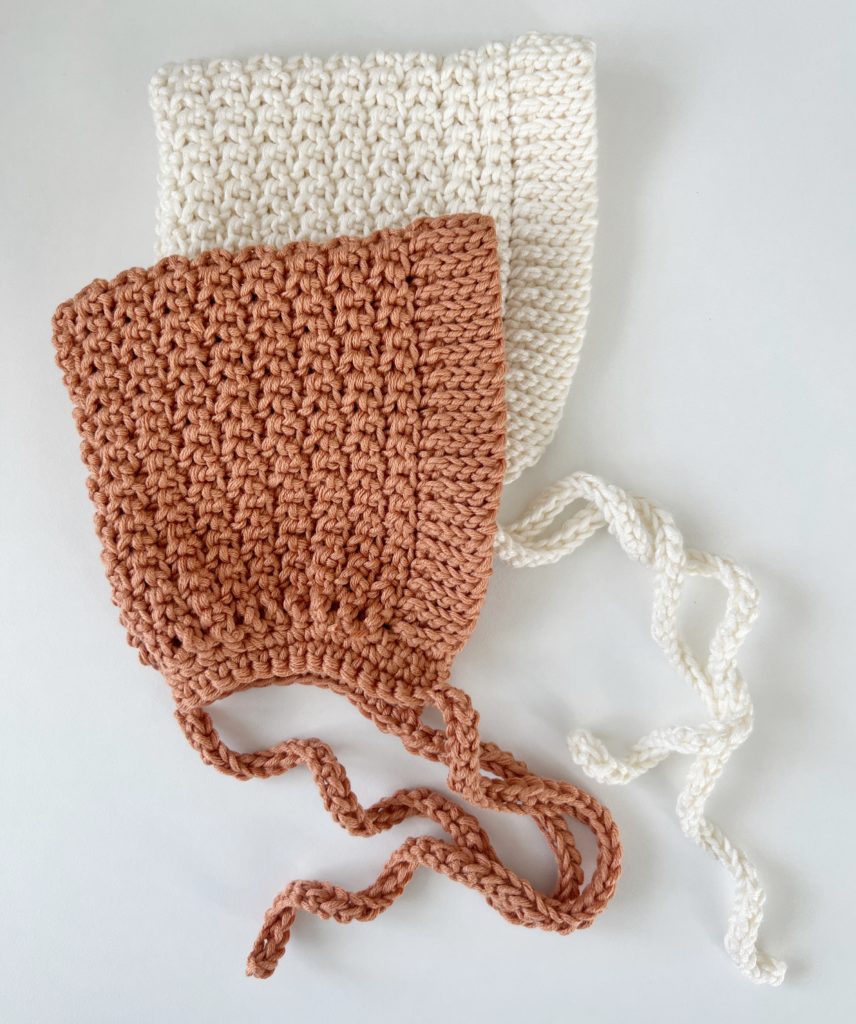
She wanted something simple and classic so I made a few samples before we decided on this simple mixed loop single crochet stitch and slip stitch ribbing.

I made two in different colors just in case we didn’t like one, and we just love them both! We were so lucky that Kate was so patient and so so sleepy the whole time we were with the photographer.

I made the brim first using back loop slip stitch. I measured under the base of one ear, up and over her head to the base of her other ear. (11.5 inches)
Then I turned and worked SC every other row on the long side of the ribbing making sure I worked an even number.

Then all I did was work SC into the front loop into the stitch, then SC into the back loop of the next stitch. I alternated all the way across. The last stitch was worked into the back loop.

I chained one and turned, then repeated the stitch until the entire bonnet from brim to the last row was 5 inches wide.
I folded the bonnet in half, and sewed up the back.

I then did a series of SC to decrease around the back of the hat and also added the ties at the same time. (I go over all that in the video linked at the end of the post, I’ll also write the details in the printable pattern below as well.)
What a precious gift God has sent us. We love this little girl with all our hearts already!
She is a peaceful soul and we are so blessed to have her.
Thank you for letting me share all these beautiful photos of her. (We also had some of her with her blessing blanket which are equally stunning!
POST EDIT: Please use caution when making the ties. If you are using the bonnet for a purpose other than a newborn photo shoot, make the ties shorter as it could pose a strangle risk to the baby.
Materials
Bernat Softee Cotton (60% cotton, 40% acrylic, 120g / 4.2 oz, 232 meters / 254 yards, 3 weight light)
1 Skein in the color Cotton (it’s an off-white) Or Sandstone
Size G 4.0 mm hook, tapestry needle, scissors
Stitches
Single Crochet (SC): Insert your hook, YO and pull up a loop, YO and pull through two loops on hook.
Slip Stitch (SL ST): Insert your hook, YO and pull loop through and through loop on hook.
Half Double Slip Stitch (HDSLST): YO, insert your hook into back loop, YO, pull up a loop and pull directly through two loops on hook.
Pattern
Brim
Chain 5.
Row 1: Begin in the second chain from the hook. Work 1 SL ST into each chain across the row, CH 1 and turn. (4)
Tip: for a neat appearance, make sure you turn your work in the same direction after each row.
Row 2: Begin in the back loop of the first stitch with 1 SL ST. SL ST into the back loop of each st across the row. CH 1 and turn. (4)
Repeat row 2 until you have 11.5 inches in length and an even number of rows.
Main Stitch
Row 1: Turn and work down one long side of the brim. Work 1 SC per each 2 rows for an even number. CH 1 and turn. (If you are using the same yarn I did, my number was 42 SC)
Row 2: SC into the front loop of the first stitch, then *SC into the back loop of the next st. SC into the front loop of the next st. Repeat from * across the row, (Your last SC should be worked into a back loop). CH 1 and turn.
Repeat row 2 until you have 5 inches in width from the brim to the edge of your work. Tie off with a long tail. Use your tapestry needle to sew. Fold the hat in half and sew the back together, weave in the end.
Making the ties
Row 1: Begin in the front corner of the brim. Work SC into each of the first 4 SL STs of the brim. Work SC into every other row to decrease and gather the back of the hat. Work 4 SC into the final 4 SL ST of the brim. CH 1 and turn.
Row 2: Work 1 SC into each SC around the bottom of the bonnet. When you get the end, CH 50 for the first tie. Turn.
Row 3: Work HDSLST (yarn over slip stitch it’s sometimes called) into each of the remaining 49 chains. Work SC into each SC around the bottom of the bonnet. CH 50. Turn.
Row 4: Work HDSLST into each of the remaining 49 chains. Work SC into each SC around the bottom of the bonnet, SL ST to first st of the tie. Tie off and weave in the end.
For the video tutorial see below:
Click here or image below for printable pdf of pattern.
![]()
Thank you so much for letting us share our crochet with you! Sending you my love,
XOXO, Tiffany