

The idea all started for this crochet polka dot blanket when I learned how to do the bobble stitch. If you don’t know how to work one, I have a clip you can watch below. (A bobble stitch is simply 5 DCTOG.)
Next, I had to experiment with several types of yarn to get the right type of look. Some yarn is so light, the bobble won’t pop out as much. So for this blanket, I used “I love this Cotton” brand from Hobby Lobby. It gave it a nice matte finish with clearly defined bobbles.

And then came the math in order to get the bobbles evenly spaced and finally it all worked!
Materials
Hobby Lobby I Love This Cotton (100% cotton, 3.5 oz/180 yds)
7 skeins White
Size H/5.00mm hook, tapestry needle, scissors
Size
Finished size 34 in x 34 in
Stitches
Single Crochet (SC): Insert your hook, yarn over (YO) and pull up a loop, YO, pull through two loops on hook.
Double Crochet 5 Together (DC5TOG) Bobble: *YO, insert your hook, YO and pull up a loop, YO, pull through two loops on hook. Repeat from * four more times, inserting your hook into same space. Then YO and pull through all loops on hook.
Pattern
The pattern repeat is 9 + 1.
Chain multiples of 9 until you have the blanket as wide as you’d like, then chain 1. For a baby blanket I usually do a range of 30 to 36 inches wide.
SC in each CH across, turn, CH 1, SC in each SC across, turn, CH 1, SC in each CH across. (three rows of SC)
First row of bobbles:
Turn, CH 1, SC in the first 4 SC, Bobble stitch in the next SC, *SC in the next 8 SC, bobble stitch in the next, SC in the next 8 SC, bobble stitch in the next.* Repeat from ** to the last 4 SC. Sc in last 4 SC.
(Side note: Do not close up the loop to the bobble stitch. That will add an extra stitch. Just finish with your five double crochets together, and move onto the next stitch. You want the bobble to be one stitch only)
In between bobble rows:
SC three rows in between each bobble row.
Second row of bobbles:
Turn, CH 1, SC into the first 8 SC, bobble stitch, SC into the next 8 SC, continuing to the end of the row. The final 9 stitches should be all SC.
Keep repeating until your blanket is to the desired height.
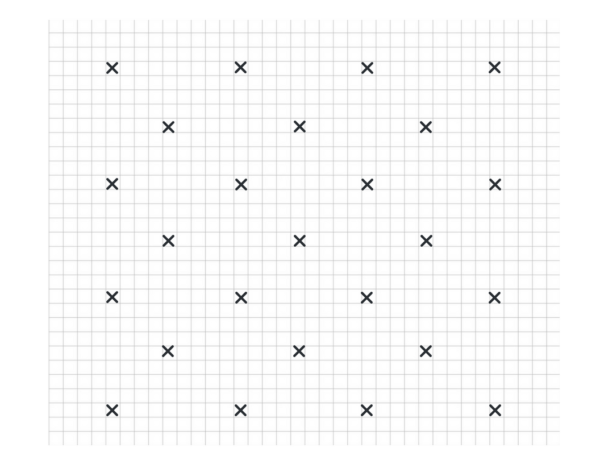
Here is a graph to give you an idea of the counting. (When you are crocheting the bobble rows will be going right to left, but you’ll want to read the bobble rows on the graph from left to right).
Ruffle Border
If you like the ruffled border use these instructions:
SC around entire blanket one time, slip stitch to join first SC.
Chain 3, Treble Crochet (TC) 2 into same stitch as join, *TC 4, into next SC, TC 3 into next SC* repeat ** all the way around blanket, adding one extra set into the corners.
Join in the top of the original CH 3, fasten off and weave in the ends.

Flat wide border
I used a linked stitch to create a wide flat border. First, work one round of SC into each stitch around the entire blanket. Then, start in any corner and have the dots facing away from you if you’d like the plain looking side of the border to be on the front of your blanket. Chain 4. Pull up a loop in the 2nd chain from the hook, the third chain from the hook, the second chain from the hook and pull up a loop in the sc on the edge of the blanket. Yarn over and pull through two loops, then YO and pull through two more loops, then YO and pull through two more loops, and then YO and pull through the final two loops. The stitch is completed. To work the next stitch, insert your hook under the horizontal loops and pull up a loop in each one. Then pull up the last loop in the next SC on the border.
Chain 4. Pull up a loop in the 2nd chain from the hook, the third chain from the hook, the second chain from the hook and pull up a loop in the sc on the edge of the blanket. Yarn over and pull through two loops, then YO and pull through two more loops, then YO and pull through two more loops, and then YO and pull through the final two loops. The stitch is completed. To work the next stitch, insert your hook under the horizontal loops and pull up a loop in each one. Then pull up the last loop in the next SC on the border.
Here is another video clip to show how to work linked stitch:
Tip: If you find that your edges are curling with this stitch, stop and change hook sizes. You need to go up one or two sizes.
When you have finished one side of the blanket, chain 4 and pull up loops down the chain and into the side of the last linked stitch you made. You will be working in the next three spaces in the side of the last linked stitch you made until you reach the SC stitches on the blanket.
Repeat that technique for the remaining sides and when you get back to where you started, work a slip stitch into the top of each linked stitch around the whole blanket. Slip stitch into the beginning SL ST and pull through and weave in the ends. You are finished.

Good luck with your crochet polka dot blanket! The easiest and fastest way is to find me on Instagram @daisyfarmcrafts. Or shoot me an email at daisyfarmcrafts@gmail.com.
I also have a Facebook page, a Pinterest page, a Twitter account, a YouTube channel all named Daisy Farm Crafts. So come and find me! I do love Instagram the best and I’d love if you’d tag me and share a picture of what you are making!
With love,
Tiffany