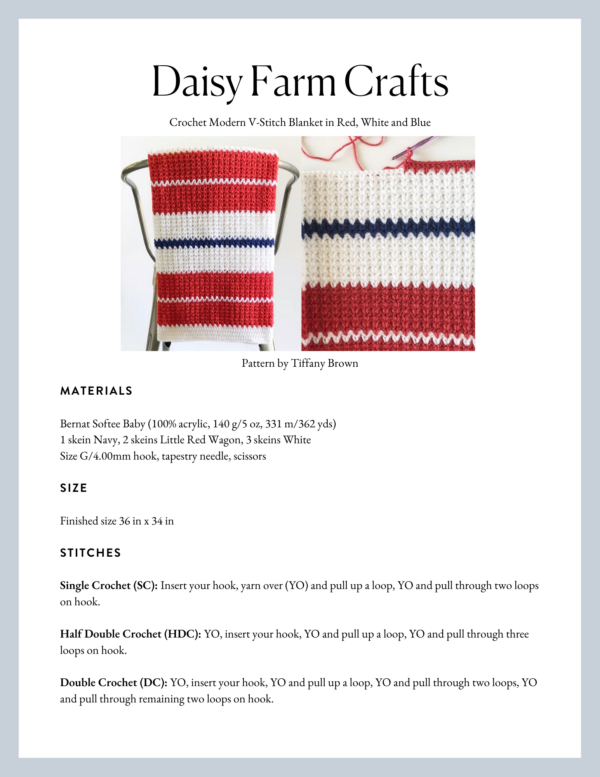
Hello friends! I’m re-sharing our classic v-stitch pattern in case you need some patriotic inspiration this time of year. Enjoy! XO, Tiffany
This classic V-stitch works up very fast and is so fun to make. You can use any brand of 3-weight acrylic yarn if you can’t find the brand I used to make this. A great website to know about when you need to substitute yarn brands is called yarnsub.com. They can give you lots of ideas.

I finished this blanket up with a somewhat solid looking border, super easy, unless you have tension problems like I did, but I’ll get to that later.
I’m going to really suggest you try this blanket if you are a beginner and here is why; your sides will be straight and it’s almost impossible to miss the very last stitch. (That’s the most common mistake I see beginners make, and I don’t blame them, it’s hard to understand and know what stitches look like when you are new into this craft.)

Look really close at the above picture, if you can tell, 2 double crochet stitches (DC) are worked in between the two double crochets of the row below. That’s how you are going to be able to see where to insert your hook. And then, at the end of each row, you will just be working one DC into the top of the turning chain.

But now let’s have that chat about the border. I got a little hasty in turning each row and my chain 3’s turned out to be too loose. That threw the tension off on the sides of the blanket. Which in turn, made the border ripple when I started working the first round.
Here was my remedy for the problem: I had to use a hook two sizes smaller than the one I used for the main part of the blanket in order to make up for the looser stitches on the sides. (The ends of the blanket were fine, and I used the same hook as the main part.)
So here is what I wish I would have done, chain 2 instead of chain 3 when I turned. Or pay very close attention to the height of my chain 3’s. They should not be taller than the posts of the double crochets in the row you are working.
I hope that tip helps you if you wish to finish the blanket in the same manner.

Let’s get to the pattern:
Materials
Bernat Softee Baby (100% acrylic, 140 g/5 oz, 331 m/362 yds)
1 skein Navy, 2 skeins Little Red Wagon, 3 skeins White
Size G/4.00mm hook, tapestry needle, scissors
Size
Finished size 36 in x 34 in
Stitches
Single Crochet (SC): Insert your hook, yarn over (YO) and pull up a loop, YO and pull through two loops on hook.
Half Double Crochet (HDC): YO, insert your hook, YO and pull up a loop, YO and pull through three loops on hook.
Double Crochet (DC): YO, insert your hook, YO and pull up a loop, YO and pull through two loops, YO and pull through remaining two loops on hook.
Pattern
Chain 120 in red.
Row 1: In the fourth chain from the hook work 2 DC. SK the next chain space, *DC 2 in the next chain space, then SK the next chain.* Repeat * across the row and work one DC into the very last chain. Chain 3 and turn. (This will count as your first DC) on the next row.
Row 2: Work 2 DC in between each pair of DC from the row below. Insert your hook in between them. Repeat across the whole row and end with one DC into the top of the first chain three. Chain three and turn.
Continue repeating row 2 for the rest of the blanket, (I’ll list the color changes in a second.) Here is a close-up picture of the stitch. You can see that that two double crochets always go in between the two double crochets from the previous row.

Here are the color changes I used: *7 rows red, 1 row white, 7 rows red, 7 rows white, 2 rows blue, 7 rows white Repeat from the * one more time, and then end with 7 rows red, 1 row white, 7 rows red.
Border
Weave in all the ends first before you get started.
Start in the upper left-hand corner of the blanket, where you will be working down the left-hand side of the blanket. With white, pull up a loop and chain 3. (This counts as a DC.) DC two more times in that corner. Work 2 DC for each row of V-Stitch. Check your tension and see if you need a smaller hook–you’ll know if your blanket is rippling on you.
In each corner work 6 DC. On the ends of the blanket, work 2 DC in between each group of V-stitches.
When you return to the start, DC 3 and slip stitch to join, CH 1 and turn. SC in each stitch around, working 3 SC into the 3rd DC of the row below to round the corner. SL ST to join the round, CH 2 and turn.
HDC in each stitch around, working 3 HDC into the middle SC stitch of the row below in each corner. SL ST to join the round and CH 1 and turn.
Repeat rows of SC and HDC two more times. Tie off and weave in all ends.
BLOCK your blanket to get it looking awesome by pinning the blanket as straight as you can to a towel, or foam mats if you have them. Use a spray bottle and wet the border and finger press it as close to perfect as possible. Massage those stitches to get them just right! Let the blanket air dry. Unpin and now go find that perfect little baby outfit to match the blanket!
I think this Crochet Modern V-Stitch Blanket in Red, White and Blue will be perfect for a July baby for sure! Perfect for the Fourth of July parade.
I hope you’ll tag me or share your picture on Instagram or Facebook. (Scroll down to the end of the post for links to follow me on either platform.)
xo, Tiffany
Click here or on image below for printable pattern