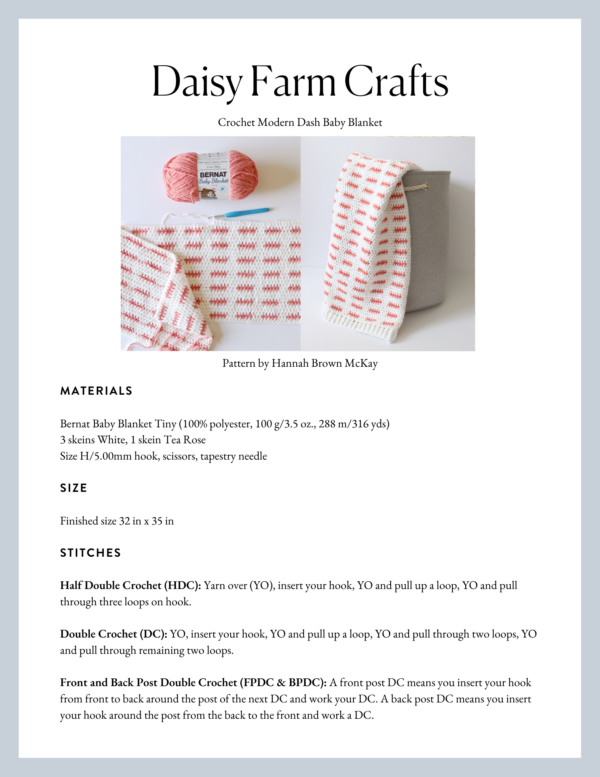
Hello crochet friends! Last month our friends from Yarnspirations sent us some different colors of Bernat Baby Blanket Tiny yarn to try out and I was excited to get to use it for the first time. Not only does it come in some beautiful colors, but I love how soft and squishy it made the blanket turn out! Perfect to snuggle with a little baby.
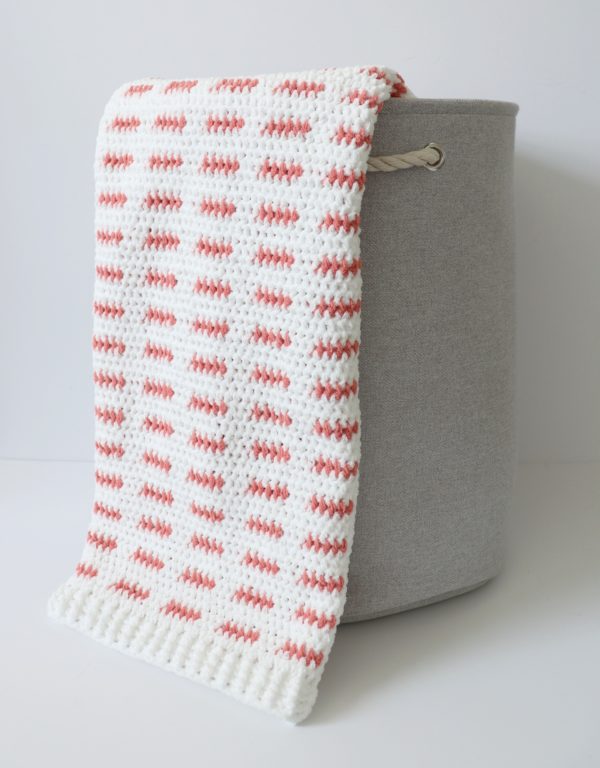
I’ve been seeing a lot of dashed line patterns on a lot of pillows and rugs lately, and I thought it would be fun to crochet that type of design into a blanket.

I played with several different color combinations as you can see in the swatches above, but I ultimately decided I liked the simple look of two colors the best.

In order to get this dashed line effect, I needed to carry the yarn along with me as I worked, a technique that my mom uses for her gingham blanket patterns.
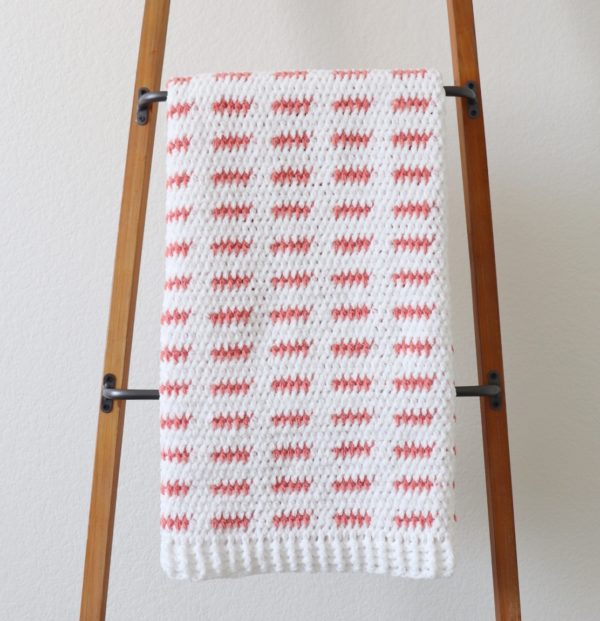
Usually you carry the yarn along the top of your work and if it’s a darker color against a light color it will sort of peak through on both sides, but I really wanted to hide my yarn on the front side as much as I could, so I intentionally carried the yarn along the back of my work so that it shows through on purpose and creates another cool design on the back side – more of a dotted line effect. Here’s a picture of the back side of the blanket:

If you’re not sure what it means to carry yarn along as you crochet, my mom made a great video tutorial for this blanket that you can watch on YouTube or watch below. The other important thing you’ll need to know for this blanket is how to do half double crochet working in between the posts and the video shows you how to do that as well:
If you’ve never practiced the technique of carrying yarn before, it can be a bit tricky when you’re first starting out, but it helped me to do a few practice swatches before I started on the real blanket.
Post update: since making this blanket, I made a similar Lines and Dashes Blanket and I discovered that you can actually disguise your yarn on both sides of the blanket if you insert your hook underneath the yarn you carried on the row below. Hopefully that makes sense, but if not here is a quick video clip!
Materials
Bernat Baby Blanket Tiny (100% polyester, 100 g/3.5 oz., 288 m/316 yds)
3 skeins White, 1 skein Tea Rose
Size H/5.00mm hook, scissors, tapestry needle
Size
Finished size 32 in x 35 in
Stitches
Half Double Crochet (HDC): Yarn over (YO), insert your hook, YO and pull up a loop, YO and pull through three loops on hook.
Wide Half Double Crochet (WHDC): YO, insert your hook between stitch posts, YO and pull up a loop, YO and pull through three loops on hook.
Double Crochet (DC): YO, insert your hook, YO and pull up a loop, YO and pull through two loops, YO and pull through remaining two loops.
Front and Back Post Double Crochet (FPDC & BPDC): A front post DC means you insert your hook from front to back around the post of the next DC and work your DC. A back post DC means you insert your hook around the post from the back to the front and work a DC.
Pattern
Tips to know before you start:
-Pull through with the new color on the last step of the stitch.
-Lay whichever color you aren’t using along the top of your work and crochet over it as you go.
-To avoid your yarn getting twisted as you carry it along your work, it helps to always keep one color to the front and one color to the back each time you switch colors.
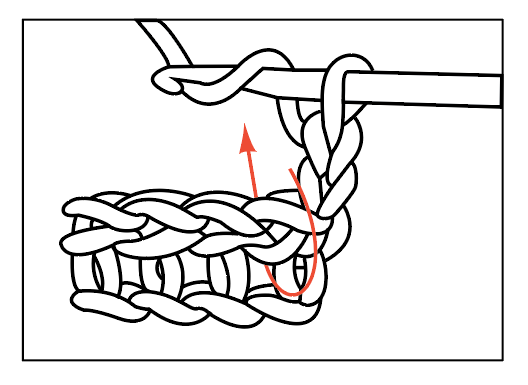
-To better cover up yarn that is being carried through, always insert your hook underneath the yarn that was carried across the previous row.
Chain 103 in White. (To make your blanket larger or smaller, chain any multiple of 8, then add 7.)
Row 1: Starting in the 3rd chain from the hook, work 1 HDC in each chain across the row. When you reach the last stitch, pull through with Pink (you should have 3 loops on your hook when you pull through.) Don’t cut the White yarn. Chain 2 and turn.
Row 2: Pull the White yarn behind your work, and crochet over it as you work 1 WHDC in each of the first 5 spaces. On the 5th stitch, pull through with White. Carry the Pink yarn along and work 1 WHDC in each of the next 3 spaces. On the 3rd stitch, pull through with Pink. Then work 5 WHDCs with Pink, carrying the White yarn along your work.
Continue the pattern of 5 WHDCs of Pink, 3 WHDCs of White until you reach the end of the row, always carrying the yarn you aren’t using along the top of your work so you can easily pick it back up again. You should end the row with 5 WHDCs of Pink.
When you reach the end of the row, pull through with White on the last stitch, and cut the Pink, leaving a tail that is long enough to weave in later.
Rows 3 – 5: Work 3 rows of WHDC with White, chaining 2 and turning and at the end of each row. On the last stitch of row 5, pull through with Pink.
Repeat rows 2 – 5 for the remainder of the blanket. I ended up with 25 pink rows when the blanket was the length I wanted. When you reach your desired length, work one row of White after the last Pink row to match the one row of White at the beginning of the blanket.
Border
After I tied off and wove in all my ends, I added a front and back post double crochet ribbing border around the edge. Here are instructions for how to add that border, and there is also another video below.
Round 1: Pull up a loop in any corner and chain 3. DC around the entire blanket, working 3 DCs into each corner stitch.
Round 2: When you reach the corner you started with, work 3 DCs into the corner, then go around the blanket again, this time alternating front and back post double crochet. When you get to the corners of this row, you will want to continue the pattern of alternating front and back post double crochet, but you will work three stitches around the corner post.
So, for example, if you get to the corner post and you are supposed to work a front post DC, then work a front post DC, a back post DC, and a front post DC all around that corner post. Then in the next stitch you would continue the alternating pattern, working the opposite of whichever stitch you just used (in this example, you would work a back post DC). Just remember that you are always alternating front and back post double crochet around the whole blanket, you just happen to be working three of those stitches around the same post when you are working the corners.
Rounds 3 – 4: When you finish round 2, work 3 alternating front post/back post DCs into the corner you started with and repeat row 2 two more times around the blanket, making sure your post DCs are popping out in the same direction as previous round, until you have four rows total. (Or you can go around as many times as you’d like to get your desired border height. I only had enough yarn to go around 4 times.)
Below is the video that demonstrates this border or you can watch it on YouTube:
Thank you so much for coming to read this pattern, I hope you enjoy making this baby blanket! When you’re finished with your project, come share a picture with us on Facebook or Instagram using #daisyfarmcrafts, we’d love to see!
xo, Hannah
Click here or on image below for printable pattern