I fell in love with this bright apricot peach shade of Patons Astra baby yarn and knew it would look so cute paired with gray and white. So I started playing around with our chevron pattern and changed the stitch to come up with this Herringbone Chevron Arrows pattern.
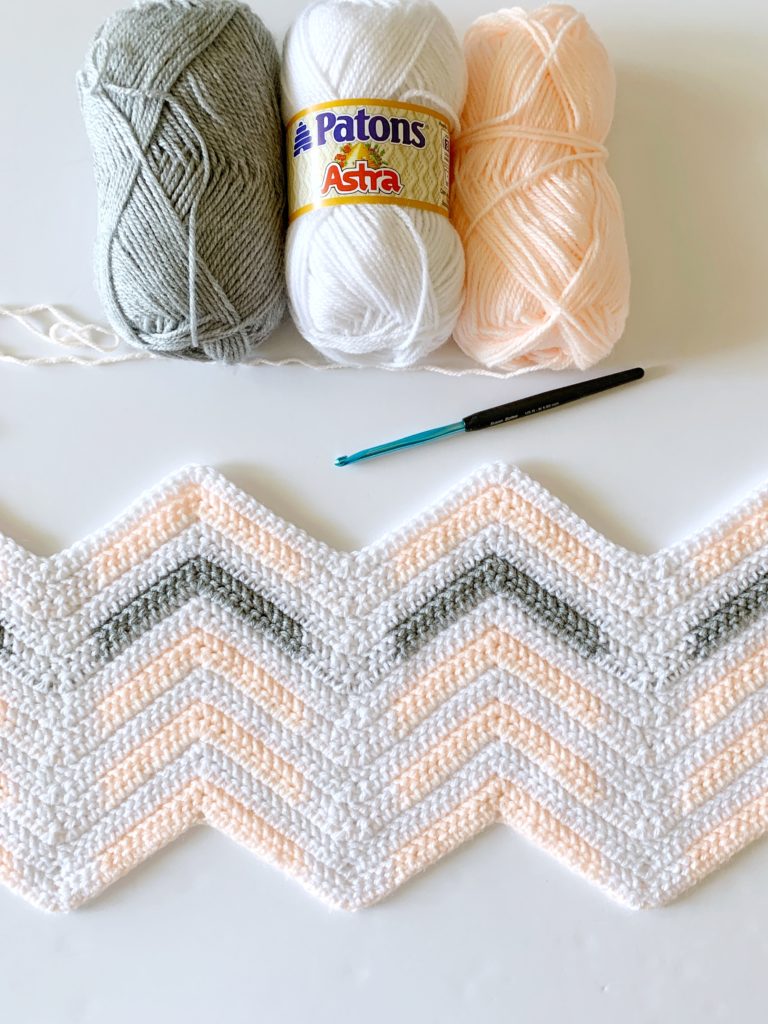
You’ll be carrying yarn along the rows and working over the strand not in use through the rows with color. This makes it a more seamless look and saves from weaving in so many ends. You will see a bit of the color Silver Grey Mix through the White, but the Apricot didn’t show at all.
Materials
Patons Astra (100% acrylic, .75 oz/50 g; 133 yds/122 m)
7 skeins White, 3 skeins Apricot, 2 skeins Silver Gray Mix
Size H/5.00mm hook, tapestry needle, scissors
Size
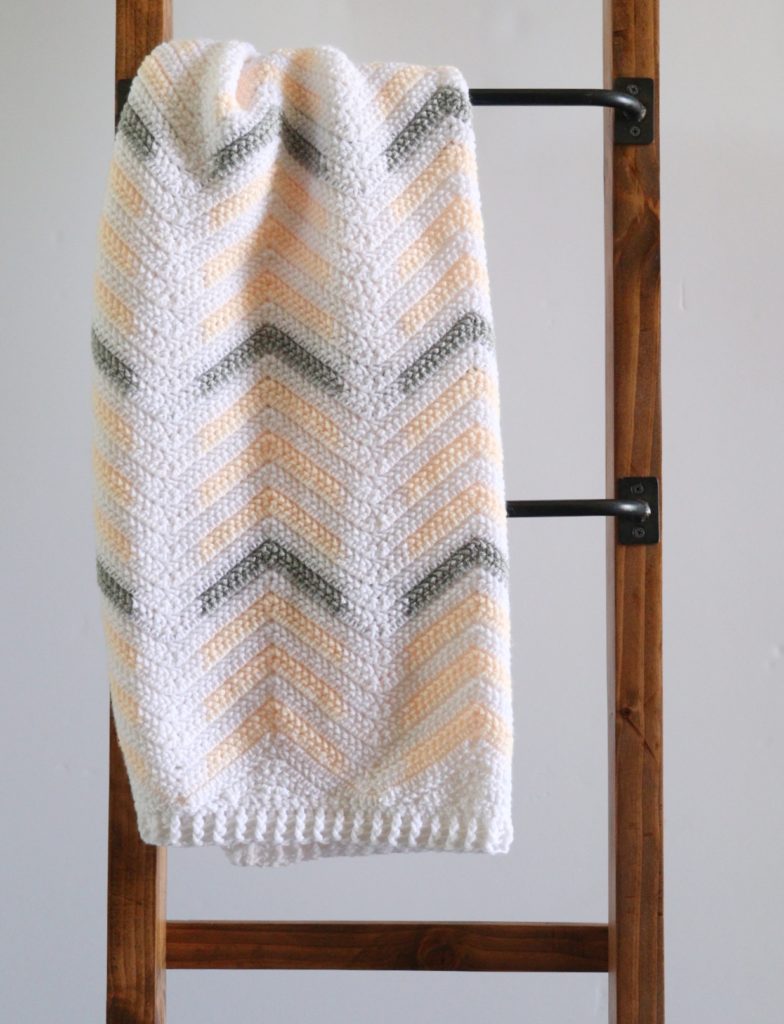
Finished size 34 in x 34 in
Gauge 4 in = 16 st and 10 rows of HHDC
Stitches
Herringbone Half Double Crochet (HHDC): YO, insert your hook, YO and pull up a loop and pull directly through first loop on hook. Then YO again, and pull through the remaining two loops.
Herringbone Half Double Crochet Two Together (HHDC2TOG): YO, insert your hook into stitch, YO and pull back through the stitch and continue directly through the first loop on hook, YO, insert your hook into the NEXT stitch, YO and pull back through the stitch and continue directly through the first loop on hook. YO and pull through all loops left on the hook. (You are turning 2 stitches into 1 with this stitch.)
Double Crochet (DC): YO, insert your hook, YO and pull up a loop, YO, pull through two loops, YO, pull through remaining two loops.
Front and Back Post Double Crochet (FPDC & BPDC): A front post double crochet means you insert your hook from front to back around the post of the next DC and work a DC. A back post double crochet means you insert your hook from back to front around the post of the next DC and work a DC.
Pattern
Tip: You will be changing colors mid-row and be carrying the color not in use along the row by laying it flat across the row and working over it. When it’s time for the color change, pull through with the new color on the last step of the stitch. To make sure the yarn carried stays flat against the row, give it a little tug just before you pull through and begin using that color.
Chain 148 with White. (Pattern repeat is any number x 29, plus 3.)
ROW 1: HHDC2TOG across the second and third chain from the hook. HHDC in each of the next 4 chains, pulling through with Apricot on last step of the 4th stitch. *HHDC in each of the next 9 chains, crocheting over the white by laying it across the chain and bringing it along the work. Work 3 HHDC in the next chain. HHDC in each on the next 9 chains, pulling through with White on the last step of the stitch to change color. Lay the Apricot along the chain and work HHDC in each of the next 3 chains. Across the next 2 chains, work HHDC2TOG. HHDC2TOG across the next 2 chains again. Work HHDC in each of the next 3 chains, pulling through with Apricot on last stitch. Repeat from * across the row until there are 6 chains remaining. Work HHDC in White in each of the next 4 chs, Work HHDC2TOG across the last two chains of the row. CH 1 and turn.
Tip: For each peak after a HHDC2TOG, there will be 3 HHDC in White, 9 HHDC in Apricot, 3 HHDC worked into the top stitch in Apricot, 9 HHDC in Apricot and 3 HHDC in White then HHDC2TOG also in white. At the beginning of the rows, there will be an HHDC2TOG in white followed by 4 HHDC in white, then 9 HHDC in Apricot. And at the end of each row, after the 9 HHDC in Apricot, there will be 4 HHDC in white and then HHDC2TOG.) This also applies to the rows where you use Grey instead of Apricot.
ROW 2: HHDC2TOG across the first two stitches. HHDC in each of the next 4 sts, change to Apricot. HHDC in each of the next 9 sts. 3 HHDC in next st. HHDC in each of the next 9 sts, change to White, HHDC in each of the next 3 sts. [HHDC2TOG across the next 2 sts] 2 times. HHDC in each of the next 3 sts, change to Apricot. Repeat from * across the row to the last 6 sts. Work HHDC in white in each of the next 4 sts, HHDC2TOG across the last 2 sts. CH 1 and turn.
Tip: You may leave the Apricot attached and carry up the side, or cut and weave in later. Carry the white up the side the entire blanket. It will be covered by the border.
ROWS 3 and 4: With only White, HHDC2TOG across the first two sts. *HHDC in each of the next 13 sts. 3 HHDC in next st. HHDC in each of the next 13 sts. [HHDC2TOG across the next 2 sts] 2 times. Repeat from * across the row ending with HHDC2TOG across the last 2 sts. CH 1 and turn.
ROWS 5 and 6: Repeat Row 2 twice.
ROWS 7 and 8: Repeat Rows 3 and 4.
ROWS 9 and 10: Repeat Row 2 twice.
ROWS 11 and 12: Repeat Rows 3 and 4.
ROWS 13 and 14: Repeat Row 2 twice cut Apricot and change to Silver Grey Mix.
Repeat rows 3 through 14 three times. After the 4th set of Silver Grey Arrows, repeat rows 3 through 10 ending with Apricot as your last set of Arrows. Ch 1 and turn and begin filling in the peaks and valleys to square off the blanket.
FILLING-IN TO SQUARE OFF THE BLANKET
Top Right Hand Corner
ROW 1: After the last set of Apricot Arrows and after chaining 1 and turning, with White, HHDC2TOG across the first 2 stitches. HHDC in each of the next 13 sts. Work 1 SC into the next st. CH 1 and turn.
ROW 2: SKIP over the first 2 sts and work 1 SC into the next st. HHDC in each of the next 10 sts. HHDC2TOG across the last 2 sts. CH 1 and turn.
ROW 3: HHDC2TOG across the first 2 sts. HHDC in each of the next 8 sts. 1 SC into the next st. CH 1 and turn.
ROW 4: SKIP over the first 2 sts and work 1 SC into the next st. HHDC in each of the next 5 sts. HHDC2TOG across the last 2 sts. CH 1 and turn.
ROW 5: HHDC2TOG across the first 2 sts. HHDC in each of the next 3 sts. 1 SC into the next st. CH 1 and turn.
ROW 6: SKIP over the first 2 sts. 1 HHDC, HHDC2TOG, ch 1 and tie off. Cut White.
Valleys across the top
ROW 1: Pull up a loop in the middle st of the peak. Ch 1 and work SC into same st. HHDC in each of the next 12 sts. [HHDC2TOG across the next 2 stitches] 2 times. HHDC in each of the next 12 sts. 1 SC into the next st. CH 1 and turn.
ROW 2: SKIP over first 2 sts. 1 SC into next st. HHDC into each of the next 9 sts. [HHDC2TOG across the next 2 stitches] 2 times. HHDC into each of the next 9 sts. 1 SC into the next st. CH 1 and turn.
ROW 3: SKIP over the first 2 sts. 1 SC into the next st. HHDC into each of the next 6 sts. [HHDC2TOG across the next 2 stitches] 2 times. HHDC into each of the next 6 sts. 1 SC into the next st. CH 1 and turn.
ROW 4: SKIP over the first 2 sts. 1 SC into the next st. HHDC into each of the next 3 sts. [HHDC2TOG across the next 2 stitches] 2 times. HHDC into each of the next 3 sts. 1 SC into the next st. CH 1 and turn.
ROW 5: SKIP over the first 2 sts. 1 SC into the next st. [HHDC2TOG across the next 2 stitches] 2 times. 1 SC into the next st. CH 1 and tie off.
Top left corner
ROW 1: Pull up a loop in the middle st of the peak, ch 1 and SC in peak. HHDC in each of the next 13 sts. HHDC2TOG across last 2 sts. CH 1 and turn.
ROW 2: HHDC2TOG across the first 2 sts. HHDC in each of the next 11 sts. 1 SC into the next st. CH 1 and turn.
ROW 3: SKIP the first 2 sts. 1 SC into the next st. HHDC into each of the next 8 sts. HHDC2TOG across the last 2 sts. CH 1 and turn.
ROW 4: HHDC2TOG across the first 2 sts. HHDC in each of the next 6 sts. 1 SC into the next st. CH 1 and turn.
ROW 5: SKIP the first 2 sts. 1 SC into the next st. HHDC into each of the next 3 sts. HHDC2TOG across the last 2 sts. CH 1 and turn.
ROW 6: HHDC2TOG across the first 2 sts. HHDC into the next st. CH 1 and tie off.
Filling in the starting chain side of the blanket
ROW 1: Pull up a loop in the underside of the first starting chain of the blanket. Ch 1 and SC into next st. HHDC into each of the next 11 sts. [HHDC2TOG across the next 2 stitches] 2 times. (skip over the chain that has the 3 sts worked into it, do not work into that hole.) HHDC into each of the next 11 sts. 1 SC into the next st. Ch 1 and turn.
ROW 2: SKIP over the first 2 sts. 1 SC into the next st. HHDC into each of the next 8 sts. [HHDC2TOG across the next 2 stitches] 2 times. HHDC into each of the next 8 sts. 1 SC into the next st. CH 1 and turn.
ROW 3: SKIP over the first 2 sts. 1 SC into the next st. HHDC into each of the next 5 sts. [HHDC2TOG across the next 2 stitches] 2 times. HHDC into each of the next 5 sts. 1 SC into the next st. CH 1 and turn.
ROW 4: SKIP over the first 2 sts. 1 SC into the next st. HHDC into each of the next 2 sts. [HHDC2TOG across the next 2 stitches] 2 times. HHDC into each of the next 2 sts. 1 SC into the next st. CH 1 and turn.
ROW 5: SKIP over the first 2 sts. [HHDC2TOG across the next 2 stitches] 2 times. Slip Stitch to the next st, Tie off.
Weave in all ends before starting the border.
Border
Begin in any corner and pull up a loop. CH 1 and SC into that same sp. SC around entire blanket working 3 SC into each corner. Work 1 SC per the end of each row for the sides of the blanket and approximately 20 SC per “V”. (Meaning from peak to peak work 20 sc. or as evenly as possible.) Slip Stitch to starting SC, CH 3.
RIBBED BORDER
ROUND 1: DC around the entire blanket, working 3 DCs into each corner stitch.
ROUND 2: When you reach the corner you started with, work 2 DCs into the corner, (the chain 3 counts as a DC) then go around the blanket again, this time alternating front and back post double crochet. (FPDC and BPDC)
When working the corners of this row, you will want to continue the pattern of alternating front and back post double crochet, but you will work three stitches around the corner post.
So, for example, if you get to the corner post and you are supposed to work a FPDC, then work the FPDC, BPDC, and FPDC all around that corner post. Then in the next stitch you would continue the alternating pattern, working the opposite of whichever stitch you just used (in this example, you would work a BPDC).
Just remember that you are always alternating front and back post double crochet around the whole blanket, you just happen to be working three of those stitches around the same post when you are working the corners.
ROUND 3: When you finish row 2, work 3 alternating front post/back post DCs into the corner you started with and repeat row 2 two more times around the blanket, until you have four rows total. Always match your post double crochets to so that they are poking out in the same direction as the row below. You can go around as many times as you’d like to get your desired border height.
Tie off and weave in ends.
If you’d like to have assistance with this pattern, I’ve made a video tutorial to help out. Here’s the video on YouTube:
Thank you for stopping by our website!
Have a wonderful day!
Tiffany
Click here or on image below for printable pattern
![]()