
Hello crochet friends, Hannah here with a new quick and easy hot pad pattern just in time for spring and Easter!
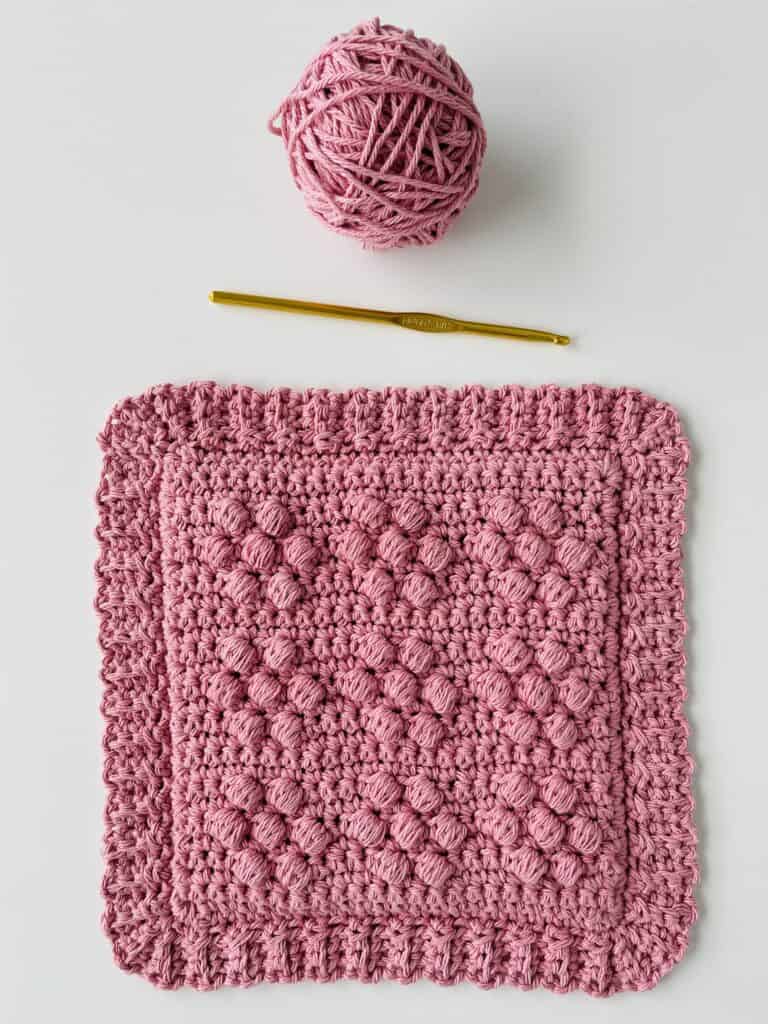
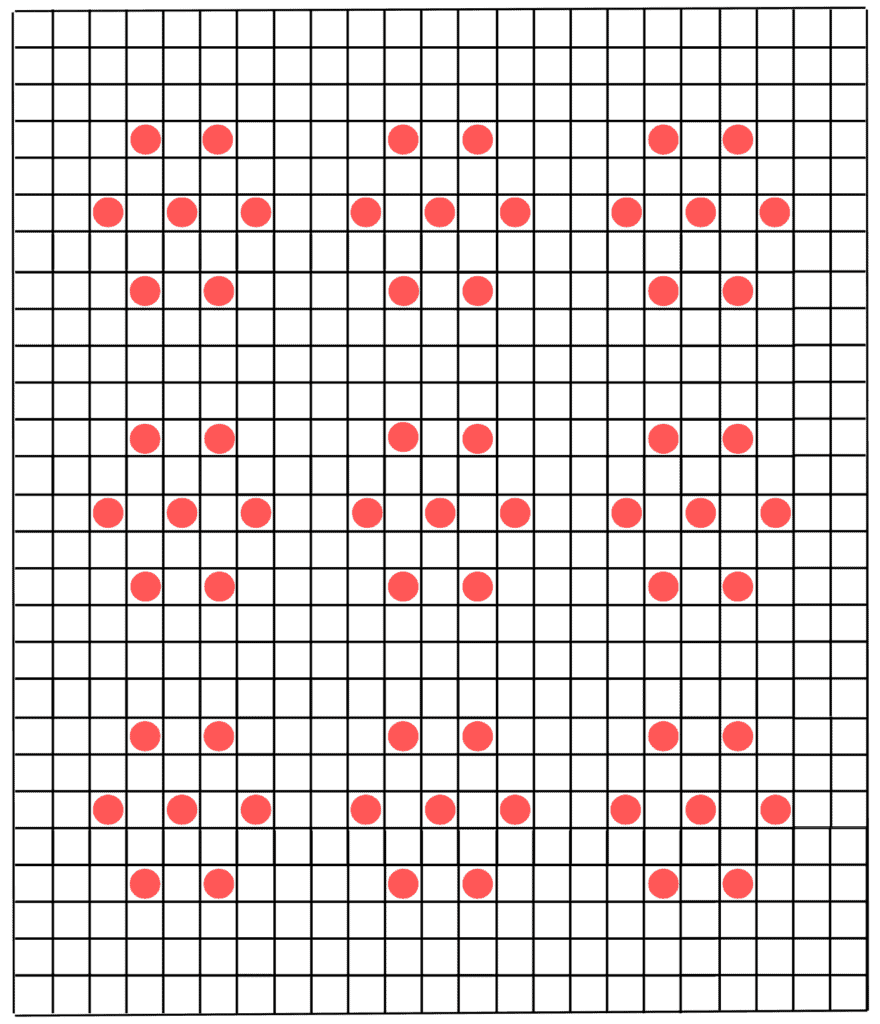
These Daisy Puffs Hot Pads are made with the exact same stitches as my Happy Heart Hot Pad that I made for Valentine’s Day – all I did differently was work the puffs in a different order to make little flowers instead of a heart, so if you need any visual help with how to work the stitches for these hot pads, you can watch the video for the heart hot pads and use the graph for the daisy puffs in the pattern below.
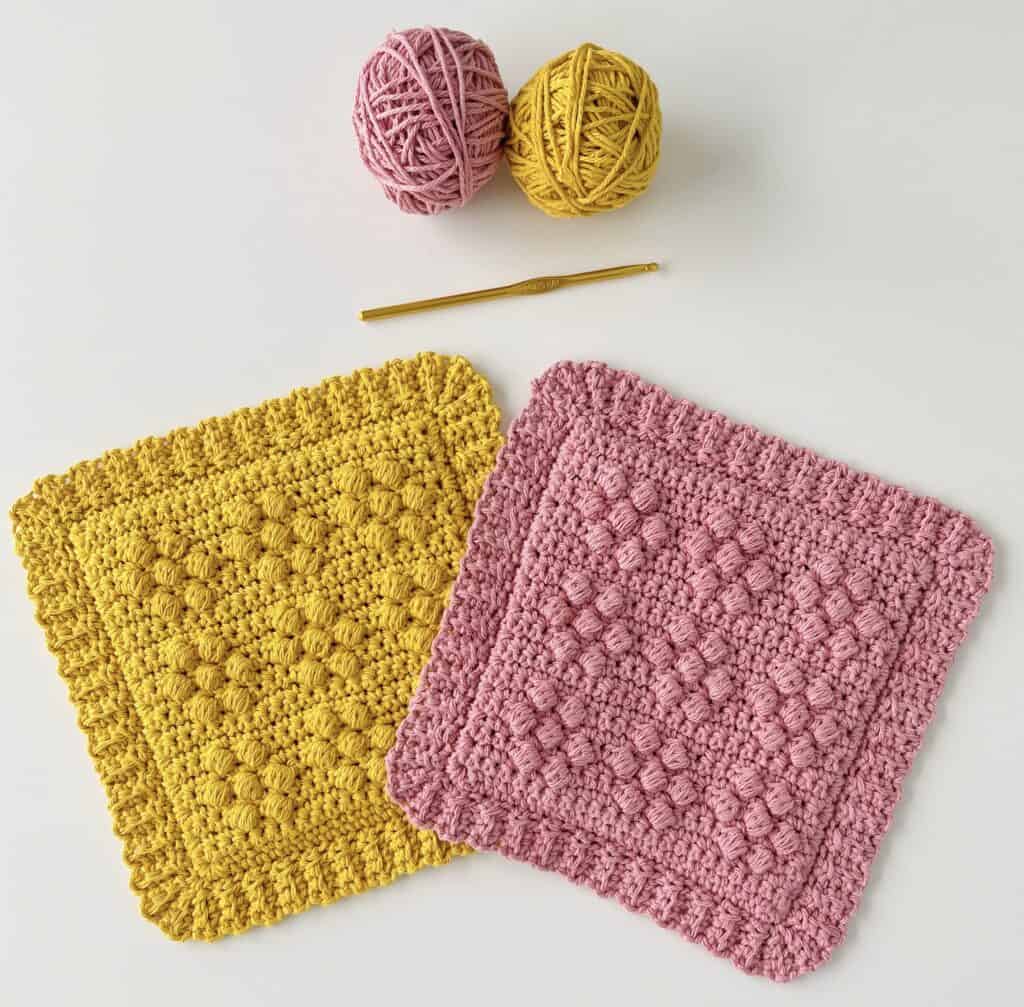
All these hot pads are made with Lily Sugar ‘n Cream yarn, one of our favorite cotton yarns, mostly because it comes in so many beautiful colors! For this pattern I used one of the bigger Super Size skeins for one hot pad – so if you’re using the smaller sized skeins you’ll probably need 2 skeins.
Materials
Lily Sugar ‘n Cream Super Size Yarn (100% cotton, 113 g/4 oz, 184 m/200 yds)
1 skein any color (colors pictured are Bamboo and Rose Pink)
Size H/5.00mm hook, tapestry needle, scissors
Size
Finished size 9.5 in x 9.5 in
Gauge 4 in = 7 stitches and 7 rows of SC
Stitches
SINGLE CROCHET (SC): Insert your hook, yarn over (YO) and pull up a loop, YO and pull through two loops.
PUFF STITCH: *YO, insert your hook, YO and pull up a loop. Repeat from * 3 more times, inserting your hook into the same space. YO and pull through all loops on hook.
SLIP STITCH (SL ST): Insert your hook, YO, pull up a loop and pull directly though loop on hook.
Pattern
Click here for printable graph
Chain 24.
Row 1: Starting in the 2nd chain from the hook, work 1 SC in each chain. CH 1 and turn.
Rows 2 – 3: Work 1 SC in each stitch across the row. CH 1 and turn.
Row 4: Work 1 SC in each of the first 3 stitches. *Work 1 Puff in the next stitch, 1 SC in the next stitch, 1 Puff in the next stitch, 1 SC in each of the next 4 stitches. Repeat from * across the row, ending the row with SC in each of the last 3 stitches. CH 1 and turn.
Row 5: Work 1 SC in each stitch across the row. CH 1 and turn.
Row 6: Work 1 SC in each of the first 2 stitches. *Work 1 Puff in the next stitch, 1 SC in the next stitch, 1 Puff in the next stitch, 1 SC in the next stitch, 1 Puff in the next stitch, 1 SC in each of the next 2 stitches. Repeat from * across the row. CH 1 and turn.
Row 7: Work 1 SC in each stitch across the row. CH 1 and turn.
Row 8: Work 1 SC in each of the first 3 stitches. *Work 1 Puff in the next stitch, 1 SC in the next stitch, 1 Puff in the next stitch, 1 SC in each of the next 4 stitches. Repeat from * across the row, ending the row with SC in each of the last 3 stitches. CH 1 and turn.
Rows 9 – 11: Work 1 SC in each stitch across the row. CH 1 and turn.
Repeat rows 4 through 11 two more times to finish the square. Then tie off and make a second square with a base chain of 24 and work 27 rows of SC.
Combining Squares
Place squares together evenly with heart facing toward you. Insert your hook through a corner of both squares and pull up a loop, then CH 1. Work 1 round of SC around the edge of the squares, continuing to insert your hook through both squares. Work 3 SC in each corner. (I worked 23 – 24 SC on each side, and 21 – 22 SC on each end.)
At the starting corner, slip stitch into starting stitch. Continue working in same direction and CH 4.
Starting in the 2nd chain from the hook, work SC in each of the 3 chains back toward the edge of the squares. *Slip stitch into the next stitch, and in the next stitch. Turn and work in the back loops of each of the 3 SC you just made. CH 1 and turn. Work back down the SC in the back loops only. (Be careful not to miss the 3rd stitch, it sometimes pulls tight and is hard to see.) Repeat from across * each side.
CORNERS: When you reach a corner space, only slip stitch once, before turning and *working the SC back up to the top of the border. Return and slip stitch once into the corner space. Repeat from * two more times, then resume slip stitching into each of the next two stitches and working across the side.
(If your corner isn’t looking rounded enough, you can slip stitch an additional time into the corner and work up and down an extra time with SC, or if it is causing the border to ripple, you can slip stitch into the corner only two times instead of three.)
When you reach the starting corner, work the corner the same way as previous corners. Stop when you get to the top of the border and tie off, then use a tapestry needle to sew corners together. Then tie off, weave in any additional ends and enjoy your hot pad!
If you’d like to add finishing touches to your hot pad, lay it out flat on a towel or foam blocking boards if you have them. Use a spray bottle with water to dampen. Press the hot pad into straight lines, massaging the stitches and adjusting your tension. Pin with straight pins and let it dry.
Thank you for visiting Daisy Farm Crafts! Happy Crocheting! xo, Hannah
Click here or on image below for printable pattern
![]()