
Boo!
It’s baby James as a not-so-scary little ghost! But so so adorable.
I was able to modify slightly our Velvet Nightgown Pattern I made several years ago and turn it into a darling ghost costume for him.
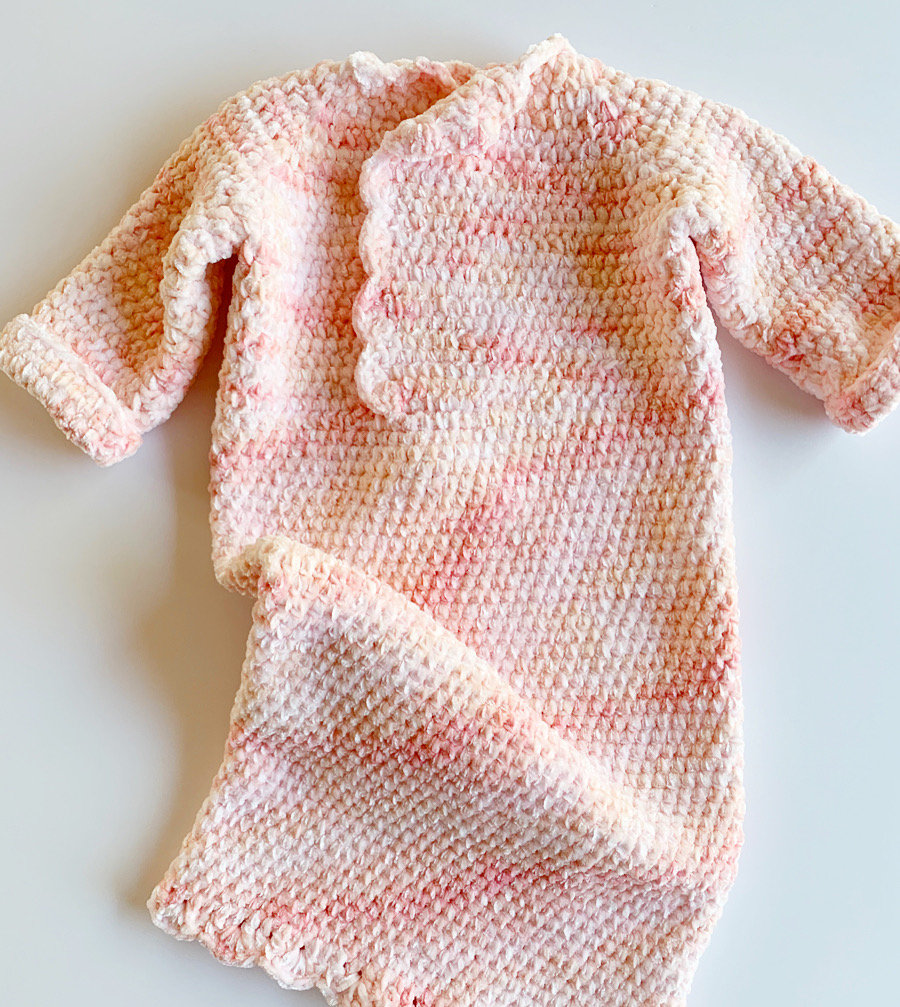
James is wearing the nightgown with the opening to the back and with Velcro to hold it shut. I also lengthened the opening so it would be easier to get him into the costume.
I also added more to the length and then finished the bottom with elastic instead of the shell stitching.
The cuff on the sleeves is an addition too, but totally optional.
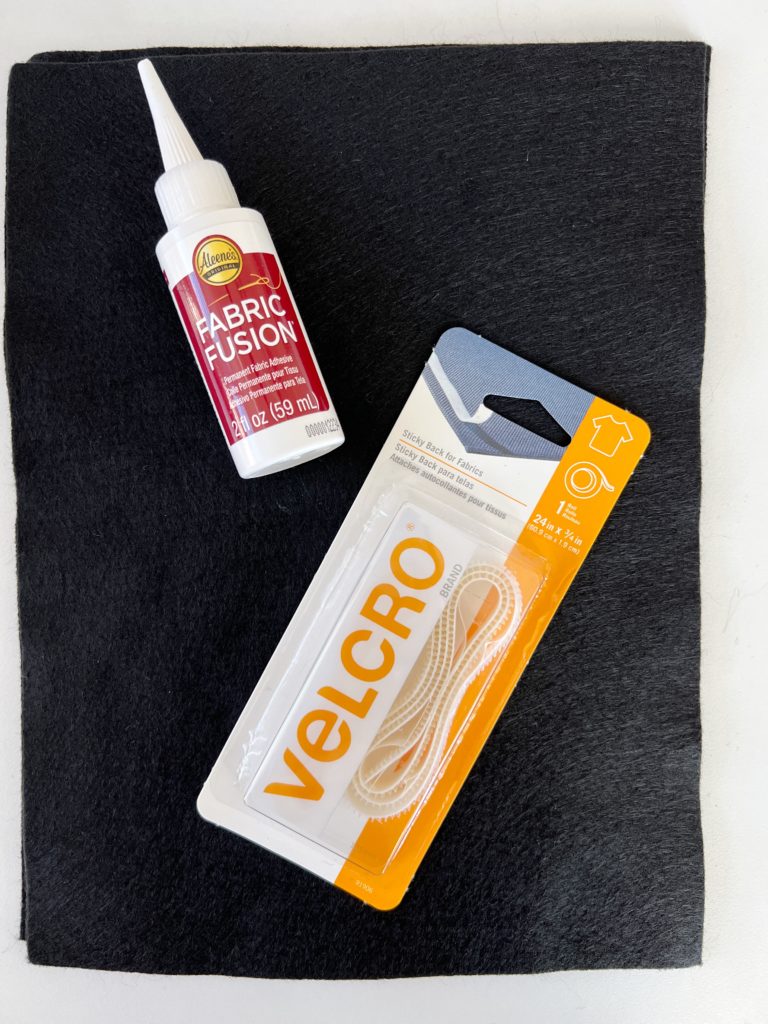
I made a simple little hat for his head and also cut black felt for the eyes and mouth and used fabric glue to attach them.
Overall, this is such a fun little costume to keep him warm on Halloween! It made him super snuggly too!

Materials
Bernat Velvet (100% Polyester, 300g / 10.5 oz, 288 meters / 315 yards)
1 skein White
Size J, 6.00mm hook, tapestry needle, scissors, measuring tape, black felt (1 8×11 sheet), fabric glue, 13 inches of 1/4 elastic tied into a circle, sticky back Velcro for fabric.
Size
Gown
newborn to about 12 lbs
gauge: 4 inches = 13 wHDC sts and 13 wHDC rows
overall length from neck to bottom 23 inches, width 14 inches
arms length from under armpit to wrist= 5 inches
Hat
6 inches high, 15 inches in circumference.
Felt
eyes 2 inches x 1.5 inches
mouth: 1.5 inches x 1.5 inches
Stitches
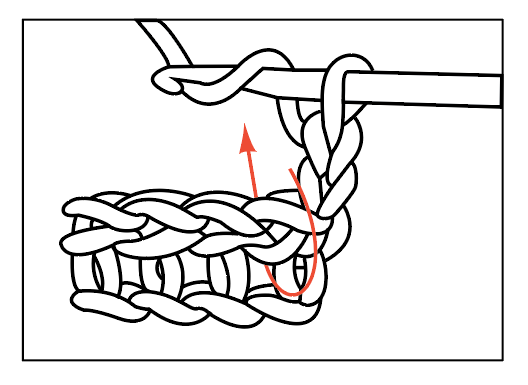
Wide Half Double Crochet (wHDC): YO, insert your hook in between stitch posts of previous row, YO and pull up a loop, YO and pull through three loops on hook. (We also call this HDC worked between the posts.)
Double Crochet Post Ribbing (FPDC, BPDC): DC around the post by YO and inserting hook from front to back and back to front then complete the DC. (The post pops forward: Front Post DC.) Work 1 DC around next post by YO, inserting hook from back to front and front to back then complete the DC. (Post pops to the back: Back Post DC.)
(Tap highlight name of stitch for a tutorial)
Pattern
CHAIN 38.
ROW 1: Work 1 HDC in 3rd chain from hook. 1 HDC into the next chain. *Work 2 HDC in next chain, 1 HDC into each of the next 2 chains, repeat from * across the row. CH 2 and turn. (48 HDC’s made)
ROW 2: Work 1 Wide HDC (wHDC) in each of the next 8 spaces. 3 wHDC in next space. 1 wHDC in each of the next 4 spaces. 3 wHDC in next space. 1 wHDC in each of the next 16 spaces. 3 wHDC in next space. 1 wHDC in each of the next 4 spaces. 3 wHDC in next space. 1 wHDC in each of the remaining 12 spaces. CH 2 and turn.
Tip: the last stitch of each round is worked in the space between the last post and the turning chain.
ROW 3: *Work 1 wHDC in each space to the corner 3 HDC’s of the row below. Work 2 wHDC in between first and second post and work 2 wHDC in between second and third post. Repeat from * around. CH 2 and turn.
Tip: Mark the space in between the 2 sets of 2 HDC’s for ease of finding the space where you will be working 3 HDC’s in Row 4.
ROW 4: *Work 1 wHDC in each space, (including in between the pair of HDC’s that are worked together) to the space in between the 2 sets of HDC’s of the row below. Work 3 wHDC in that space. Repeat from * around. CH 2 and turn.
ROWS 5 THROUGH 9: Repeat rows 3 and 4.
ROW 10: (Joining for the armholes) Work 1 wHDC in each space to the center space between the pairs of HDC. *Work 1 wHDC into the center space, CH 4, SKIP over all the stitches to the next center space, work 1 wHDC. Work wHDC across the back and to the next center space. Repeat from * and finish with wHDC to the end of the round. CH 2 and turn.
ROW 11: Work 1 wHDC in each space across the row working 4 HDC around the chains that make the armhole. CH 2 and turn.
ROW 12: Work 1 wHDC into each of the next 10 sts, 2 wHDC into the next. Repeat from * across the row. CH 2 and turn. (Adding a bit of increase to make the gown flare out a bit more.)
ROW 13 UNTIL the measurement from the neck down reaches 16 inches: Work 1 wHDC in each space across the row. CH 2 and turn.
ROW 14: Lay the gown flat and position the longer flap over the shorter for 8 stitches. Work the first 8 wHDC of the round by working the hook through both sides of the gown joining the front together. Then continue wHDC around. Do not join.
ROW 15 UNTIL the gown measures 23 inches: Work 1 wHDC in each space around the row. Do not join or turn. You will be working in the round.
LAST ROUND: Work final round of wHDC around the elastic to bring the bottom of the gown in a bit. Tie off and weave in the ends.
SLEEVES: Pull up a loop in the center space of the chain 4 that is the bottom of the armhole. Work 1 HDC in that space. wHDC in the next space. Work a wide HDC 3 together across the next 3 spaces (this will fill in the corner spaces). Work wHDC in each space around to the last space, work wHDC3tog across the last 3 spaces that make the corner, work final wHDC in space before starting st. Join with a slip stitch to starting ch space, CH 1 and turn.
ROUND 2 UNTIL sleeve measures 4 inches: Work wHDC in each space around, join with a slip stitch to starting ch space, CH 1 and turn.
Tip: count how many stitches around on round 2 and keep it the same amount each round. Also, keep it the same amount for the second sleeve. When joining the rounds, insert your hook underneath the turning chain, then CH 1 and turn.
Ribbing for Wrists: *Work 1 DC into next 2 sts, skip one st, DC into next. Repeat * around. Join. CH 2 and turn.
Work 3 rounds of Double Crochet Post Ribbing. Tie off and weave in the ends.
Hat
Chain 14 inches. (or the circumference of the head, if you can get your baby’s measurement that can be more accurate.)
ROW 1: Work 1 DC into each ch across. CH 2 and turn.
ROW 2: *1 FPDC around first st, BPDC around next st. Repeat across. CH 2 and turn.
ROW 3: Work Ribbing stitch across the row. CH 2 and turn.
ROW 4 until hat is 6 inches tall: wHDC into each space, CH 2 and turn after each row.
Tie off leaving a long tail. Sew hat together by gathering the top then sew the two sides together. Weave in the ends.
Attach sticky back Velcro for fabric to close the back opening.
Eyes, Mouth:
Cut pieces of black felt and attach with fabric glue. Let dry 24 hours.
Click here or image below for the free PDF pattern:
![]()
Thanks for stopping by!
XO, Tiffany
