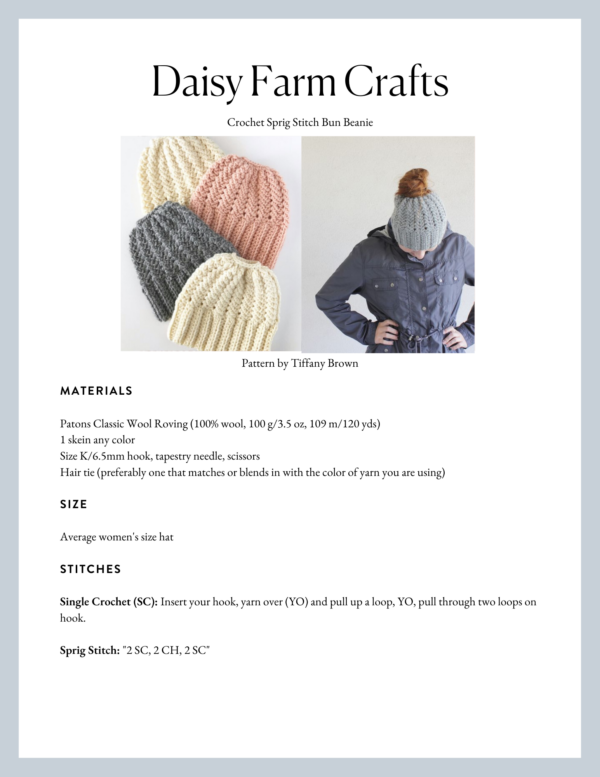
After many tweaks and trials, I’m excited to share the crochet sprig stitch bun beanie hat pattern. I’d rate this advanced beginner as there are no rounds to join and it ends up easily enough with a hair tie.
Materials
Patons Classic Wool Roving (100% wool, 100 g/3.5 oz, 109 m/120 yds)
1 skein any color
Size K/6.5mm hook, tapestry needle, scissors
Hair tie (preferably one that matches or blends in with the color of yarn you are using)
Size
Average women’s size hat
Stitches
Single Crochet (SC): Insert your hook, yarn over (YO) and pull up a loop, YO, pull through two loops on hook.
Sprig Stitch: “2 SC, 2 CH, 2 SC”
Pattern
Chain 12, leaving a long tail that will be used to sew the band together.
In the third chain from the hook, work one HDC into the bump on the back of the base chain (it makes it look prettier when you join the band later) and into each bump across for a total of 10 HDC.
Chain 2 and turn. Now work HDC into the back loops only across for a total of 10. Continue in this manner for a total of 38 rows.
Secure your loop while you put down your hook and work with your tapestry needle. Thread the long tail through your needle. Line up the two ends. You want to insert your hook down and under the two loops of the beginning chain, (the other side of the bumps) and up through the back loop of the HDC (same one you were crocheting into.) Sew down and back up as neat as possible and wait to weave in the tail when you are finished. Use it as a marker that lets you know the start of each round. (If you are struggling to find the same back loop as when you were crocheting, try turning the band the other way.)
Now, put your hook back into your loop, and you are going to work 66 SC around one edge of the brim. Roughly that is 2 SC per each HDC minus ten. (I have tried to work the math and I just can’t figure out any good way to explain it. You want to work 2 SC per each HDC in each stitch except in ten of them- only work one SC. So spread those ten out however you wish. It doesn’t really matter.) In order for the Sprig Stitch to work out, the number needs to be divisible by 4 plus 2. So you are working 64 plus 2 stitches.
When you get back to the first SC you worked, do not join with a slip stitch, you are going to work the first row of the sprig stitch by doing *2 SC, CH 2, into that first SC, and 2 SC into the next stitch. SKIP over 2 stitches and repeat * all the way around the brim and your very last 2 SC, CH 2, 2 SC will be worked in the 65th and 66th stitches.
Here is where it is a piece of cake here on out! Oh but first, count your chain 2 spaces. You should have 17.
Now, all you are going to do is work the Sprig Stitch, (2 SC, 2 CH, 2 SC) into each chain 2 space for about 10 rounds. (That tail hanging out comes in handy as your stitch marker!) Don’t join the rounds. Just start working into the chain 2 space.
When you complete the 1oth round, grab the hair tie and work one or two SC per CH 2 space around the hair tie.
I’ve made a video clip showing you what I mean:
And here is a picture of what your crochet sprig stitch bun beanie looks like just before you weave in all the ends:

All you have to do now is weave in all the ends and enjoy!

Extra notes:
If you have a smaller head, or larger head, or want to make this for a child, you easily can! All you have to make sure is that the first row of SC around the band is a pattern repeat of 4 plus 2. And you might have to work a few rounds of the sprig stitch to see if you had enough stitches around. I did a hat with two SC per each HDC and the hat part was too loose, that’s why I had to take about 10 stitches out. So just play with it if you are going to customize this. You definitely will get different results using a different yarn. This pattern is specific to Paton’s Roving Wool. It will turn out very different even using Bernat Roving wool or another 5 bulky weight. But don’t let that scare you away from trying this. Just use the pattern repeat and you should be fine.
Come find me and show me your crochet sprig stitch bun beanie on either Instagram or Facebook! I’d love to see if I actually wrote out a pattern that someone else was able to understand! I’d breathe a huge sigh of relief!
I’m @daisyfarmcrafts on Instagram and Facebook page is Daisy Farm Crafts.
Thank you as always for stopping by!
Tiffany
Click here or on image below for printable pattern