POST UPDATE:
So much has happened since I first published this single crochet chevron blanket in mint, gray, and white pattern over two years ago. This chevron pattern first appeared on my blogspot website when I had the idea to write down the patterns to the blankets I was making in hopes to become a grandma.
 |
| Single Crochet in back loop only to get these ridges. |
It was because of this simple chevron that I’ve been able to turn Daisy Farm Crafts into the website you see today. This blanket pattern brought so many crocheters around the world into my life and I’m so grateful to be on this crochet journey of mine with so many others! I’ve had so much fun sharing what I’m making on Instagram and Facebook with you all, not to mention Pinterest!
But, this blanket also brought a dear little baby boy into my friend Andrea’s life. I’ve talked about the miracle of this blanket here and here if you’d like to read.

It’s really a simple pattern, but making a chevron can be so difficult at first! It was for me, and I know for a lot of others because I read your emails and respond as best I can with as much help I can give. For some reason, that chevron pattern gives us all fits and demands a practice swatch and a lot of patience.
I even wrote a whole essay on my experience with making a chevron blanket!

A chevron blanket must be good for our souls. So this is why I want to update this post and let you all know of the other chevron blankets that have been made from this simple/not so simple pattern.
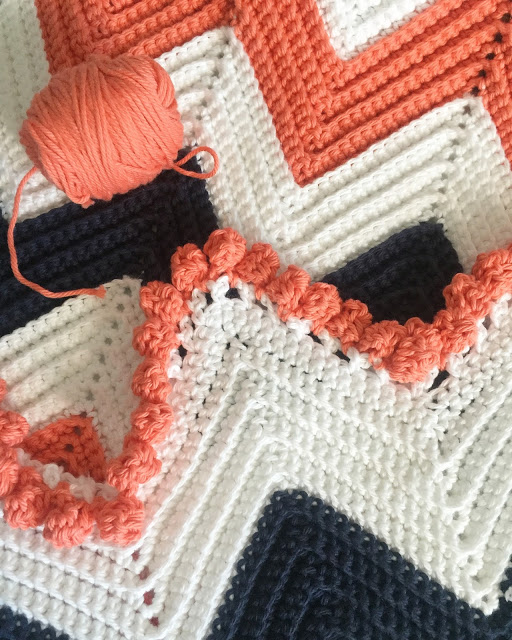
I’ve made it in navy blue and mango for my darling niece Lucia:
![]()
and added a pom pom border for it:
Then my daughter Hannah expanded her beginner crochet skills to learn the chevron and made a gorgeous tribal chevron blanket that made this pattern look even more amazing. I promise it is the very same pattern!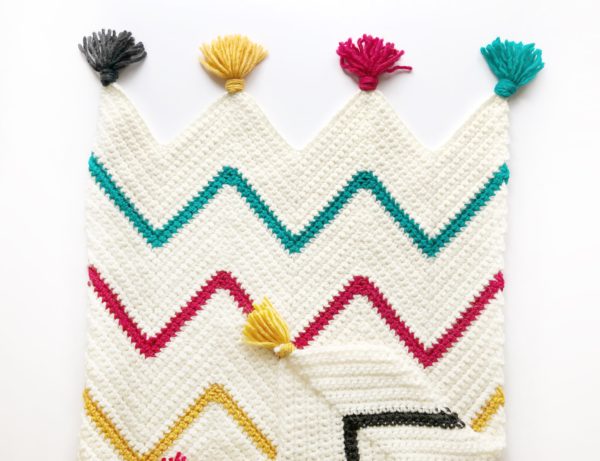
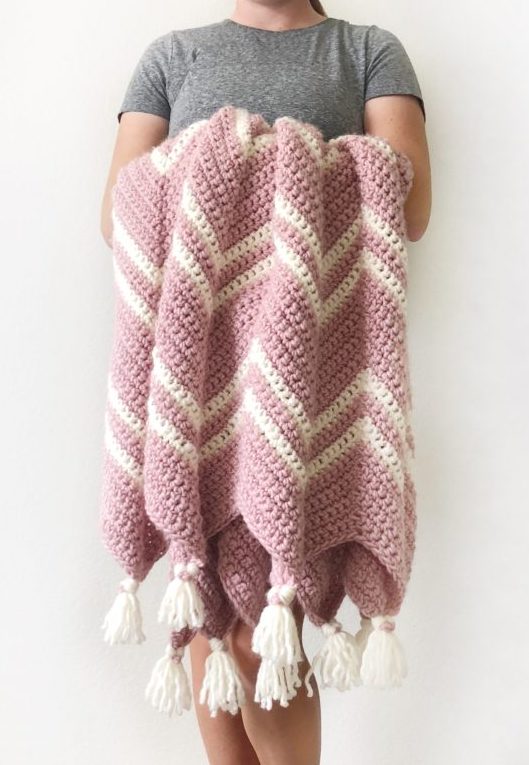
And then she did it again with her pink chevron throw!
So many beautiful blankets from the very same pattern. I remember sitting with my graph paper for days trying to figure out how to make this blanket work too. I really wanted a steeper peak and deeper valleys than the patterns I’d been seeing. I also really like single crocheting the last stitches together. It seemed to give a neater appearance to the edges.
I’m not a mathematician at all! I really had to figure this out and do many practice swatches to get it just right. I’m fairly confident that it is now correct, simply because so many of you have made this chevron and shared your finished blankets with me.
And, Hannah proved it worked for her!
But I needed to update this original first pattern with a few more details that I have included in other posts because I’ve learned that in this giant online world, posts don’t really die!
I recently had a follower of the farm email with questions about the chevron and she was referring to this post. It has been a pretty bare bones post with just the symbols and a few instructions.
I’ve since learned to give a lot more instruction as most crocheters are new into this craft and appreciate an explanation instead of just the abbreviations. (And, I want my patterns to be understood for sure by my future grandchildren with ease.) The colors for this blanket are heavenly. Perfect for a new baby boy or girl. I used “I Love This Cotton” brand of yarn from Hobby Lobby with a size H hook. I like a pointy chevron peak so here is a version of a simple pattern I tweaked a bit to achieve this look.
Thank you for coming to my website! I really do appreciate it and I still am holding out hope that one day one of these lovely blankets will be for a grandbaby of my own.
Here is a video to show you the counting pattern for a chevron blanket (I’m using different yarn, but the counting is the same.
Original (updated) Pattern below

Materials
I Love This Cotton Yarn (100% cotton, 3.5 oz/180 yds)
7 skeins White, 5 skeins Mint, 5 skeins Dove
Size H/5.00mm hook, scissors, tapestry needle
Size
Finished size 34 in x 34 in
Stitches
Single Crochet (SC): Insert your hook, yarn over (YO) and pull up a loop, YO and pull through two loops on hook.
Single Crochet 2 Together (SC2TOG): Insert your hook into the first stitch, YO and pull up a loop, insert your hook into the next stitch, YO and pull up a loop, YO and pull through all loops on your hook.
Pattern
Chain 177 with Gray (if you’d like to make a larger blanket, the pattern repeat is 29 + 3).
Row 1: In the second chain from the hook and the next chain, SC2TOG. (insert your hook into the first chain, pull up a loop, insert your hook into the next chain, pull up a loop, yarn over and pull through all loops on your hook). *SC in the next 13 chains, work 3 SC into the next chain, SC in the next 13 chains, skip 2 chains. Repeat from *. After you have worked the last 13 chains, you should have two extra. SC2TOG, these last two stitches. Chain 1 and turn.
Row 2: (From now on insert your hook into back loop only of each stitch.) Now, start the next row by SC2TOG, *then work 13 SC, work 3 SC into the next stitch (this should be the middle stitch of the 3 SC you did in the row before), work 13 SC, skip two stitches at the bottom for the valley, and repeat from *.
Always remember to SC2TOG when you end a row, and start a row. Always skip two stitches for a valley, always work 13 up each side. Always work 3 SC into one stitch for the peak. Always insert hook into back loop. Always chain 1 and turn.
Color changes went as follows: 4 rows Dove, 4 rows White, 4 rows Mint, 4 rows White. Repeat 5 times or as long as you wish.

Border
After weaving in all ends, I started in any corner and worked a SC into each stitch around, working one into the valleys. I worked 3 SC into each corner and 3 into the top of each peak. I worked around the blanket six times all in the same direction. I finished by slip stitching to the first stitch of the round and wove in all the ends.
To get a really nice finish, lay the blanket out on blocking mats, pin into shape and then use a spray bottle to press the blanket further into shape. Let it dry completely. Then take out the pins and gift!
Good luck! And tag me on Instagram with a picture of your blanket if you choose to follow this pattern. @daisyfarmcrafts
With love,
Tiffany
Click here or on image below for printable pattern
![]()
