POST UPDATE: I have modified this pattern and included a video tutorial! Click here to see the easier to understand, more detailed version of this sweater.
This simple single crochet baby sweater pattern is for experienced cardigan crochet makers. (Only because I’m still a beginner at writing up patterns so there will be some instructions that will be confusing if you’ve never made a sweater/cardigan before.) But if you are a bold beginner, just try and see if how I write the pattern makes sense to you. Sometimes, you’ve just got to jump into the pool.
Materials
Hobby Lobby I Love This Cotton (100% cotton, 3.5 oz/180 yds)
2 skeins White, 1 skein Antique Cream
Size H/5.00mm hook, tapestry needle, scissors
Stitch markers
Size
The finished baby sweater is approximately a 3-6 month size
Pattern
Chain 44.
Lay the chain out in front of you and starting with the chain closest to the hook, count out ten chains and put a stitch marker into that tenth chain. Then put a stitch marker in the 16th chain, the 29th chain, and the 35th chain. I do this because now, you don’t have to count anymore.
In the second chain from the hook, the second chain you counted, work a single crochet and then keep working SC until you get to the first stitch marker. Work 3 SC into that chain. Continue with your SC, until you get to the next stitch marker. Always work 3 SC into each of those marked spaces. When you get to the end of your chain, chain 1 and turn.
Start with a SC again, except now that your stitch markers have been removed, all you have to do is look for the middle SC of the three that made your corners. (If you are not good at finding the middle SC, feel free to keep using your markers.)
Continue increasing your work for a total of 9 rows. And then change colors for rows 10 and 11.
Row 12, change back to white. Now, if you look at the work, you have a square yoke, with an opening to the front. I like to place a stitch marker in the middle SC of the four corners. This is where I will be stopping the SC work, chain 3, and then SC again where the next stitch marker is placed, forming the arm hole. Then crochet all around the back until you get to that next stitch marker, SC into that space, chain 3, and then SC into the next marked space. Finish SC to the front. (another way to explain: SC into that middle SC, then chain 3 and the SC into the next middle SC, you skip over the other SC’s, and that forms the armhole)
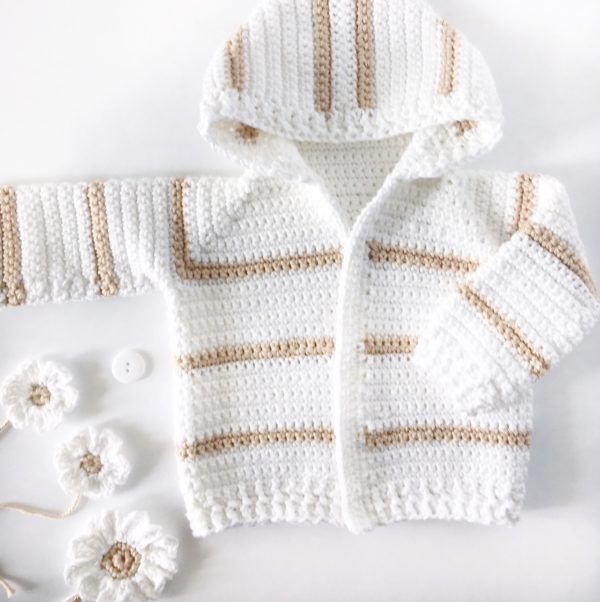
Now you are working on the bodice. Just SC back and forth, always chain one and turn after each row. I did nine rows of white, changing colors and doing two rows of the new color. Then change back to white for nine rows. If you look at the picture above I changed colors two times.
The last time that I changed to white, I did six rows of SC, and the final three rows are alternating front post and back post sc.
Sleeves
Here is a tip to make sure you are joining the yarn and crocheting in the correct direction. Join the yarn into the middle of the chain three that you did earlier to make the arm hole. Now look closely at the SC’s and determine which direction they are pointing. You want to start your SC’s in the opposite direction, just as if you would have chained one and turned. So I always think of the tops of stitches as little v’s and I know that if I crochet into them with the small part of the v on my left, or pointing left, that is the opposite direction. You want to pay attention to this because you want the crochet to match the bodice.
So after you determine the correct direction, SC2TOG, the first two spaces, one will be the chain space, one will be a SC space. Then SC around to the last SC space of the row below and the final chain space and SC2TOG. I try and make the sleeves approximately 30 stitches around. So, adjust by an increase or decrease. (Again, this is where experience comes in, and I’m assuming you know how to do that.) (When I can get better at patterns, I will put up more pictures etc.)
Continue the bodice pattern of nine rows of white, two rows of antique cream, the last three rows are alternating FPSC, BPSC. And that makes the little cuffs.
Before I start the hood, I edge the whole sweater with a row of SC. I start at the front bottom and SC one per row up the sides, around the neck, and down the other side.. You can stop right here, skip the hood, do two more rows of SC up and down the left side for a placket, attach buttons and call it good.
Hood
I started two chains in on both sides and worked the single crochets in the same pattern, (9 white rows, 2 antique cream) going back and forth around the neck. I did 35 rows and then seamed the hood together with a row of SC. Then I started back at the front of the hood with my three rows of alternating FP SC/BP SC slip stitching into those 2 spaces each round. I slipped stitched twice into the last one. I sort of actually fudged through this part, and just made sure I slipped stitch to make the hood evenly lined up with the front sides of the bodice. (Zoom in on the picture)
Placket
I SC down and back the left side two times and finish off. I haven’t attached buttons yet, but I will as soon as I decide if I should attach flowers.
I’m always coming back and editing my posts, so if you find a mistake, or can tell me a way to word the pattern better, leave a comment and I’ll change it up.
Good luck making this! And as always, I’d really love to see your sweater! I am usually on Instagram, but I have a Facebook page too! Or you can simply leave a comment or email me at daisyfarmcrafts@gmail.com.
Tiffany
