Materials
Hobby Lobby I Love This Cotton (100% cotton, 3.5 oz/180 yds)
1 skein each White, Green and Yellow
Size G/4.00mm hook, scissors, tapestry needle
Stitches
Single Crochet (SC): Insert your hook, yarn over (YO) and pull up a loop, YO, pull through two loops on hook.
Half Double Crochet (HDC): YO, insert your hook, YO and pull up a loop, YO and pull through all 3 loops on hook.
Double Crochet (DC): YO, insert your hook, YO and pull up a loop, YO, pull through two loops, YO, pull through remaining two loops.
Pattern
Make a magic ring. Here is a video I put together in case you haven’t learned how to make one quite yet. Promise me you’ll practice making one at least ten times before you give up and go back to chaining 4 and slip stitching together. A magic ring will eliminate the gaping hole in the middle of the flower. We want the center of the flower to be tight.
Center
Chain one and work 6 SC into the magic ring.
Pull the ring closed and slip stitch the SC together in the back loop forming a circle. Chain one.
Continue in the same direction and work 2 SC in the back loop of each SC to make 12 SC. Slip stitch over the chain one and into the first SC you made and then chain one again.
Continue on in the same direction and now work 2 SC (back loop only) into one SC, and then 1 SC into 1 SC, (this is increasing SC by 1, over 2 SC’s you are putting 2 in one stitch and then 1 in one stitch.)
Repeat this all the way around and you should be left with 18 SC. Slip stitch to the first SC, (skip the chain 1), but before you pull all the way through, change colors to the white.
Petal
Chain 10 with the white. In the second chain from the hook, work one SC. In the next chain space, work one HDC (half double crochet). In the remaining 7 chains, work SC. Skip one chain space over on the yellow center and slip stitch into that space. (A DC takes up the space of 2 chains. We want the petals to lay flat. so leave a chain space in between each slip stitch).
Chain 10 again and repeat making a petal. Slip stitch again by skipping one chain and slip stitching into the next. You should be making 11 petals in one round.
After making 11 petals, slip stitch into the chain space that is empty, or that you skipped over when you made your first petal. Now, chain 10 and start your petal making again. When you finish your dc’s, look for the empty chain space and slip stitch into it. This will stagger the petals and give them the double layer look. Finish the round, and clip the yarn giving yourself a long tail. (You will be using it to sew on the stem.)
Stem
Chain approximately 30. (you can decide how long you want the stem) In the second chain from the hook, dc. DC into each remaining chain. Continuing in the same direction, slip stitch into the first chain space and up the side until you feel it’s a great place to make a leaf. I did about 9.
Chain about 10. In the second chain from the hook, dc and dc all the way back to the stem. Slip stitch into the next chain space, (skipping over one, because a dc takes up two spaces.) Continue slip stitching around and down the other side. (On the other side you will notice that you will be slip stitching under both loops or the top of a stitch, while on the other side you were slip stitching into the bottom of a the stitch.) Go as far as you like and make another leaf in the same manner as stated above. Slip stitch until the end and tie off.
Attach the stem to the center edge with the long piece of white yarn you cut when you tied off from the petals and weave in all the extra ends.
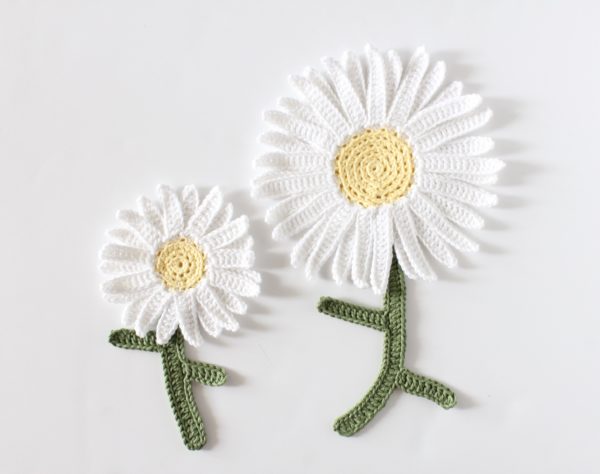
And that’s all it is! Now, smaller yarn will obviously make you a smaller flower. Get creative! Adjust for the center. I made a larger one with a bigger center. Just increase by one, over 3 sc. (2+1+1) It’s no different than when you start a beanie hat.
Good luck!
Notes
I hope my pattern can make sense to you. I tend to write them out as if I’m sitting next to you, explaining to you what to do. I also like to introduce a little theory of why I am doing something. It took me the longest time to understand increasing in a circle. But once I figured out the first row is doubles in each stitch, (2 to 1) then 3 over 2 stitches, then 4 over 3 stitches, it became easier to understand patterns.
Are you on Instagram? I am and I share so much more. I’d love to have you as a follower and get to know you. I’m on Facebook and Twitter, too.
Thanks for stopping by!
Tiffany
